

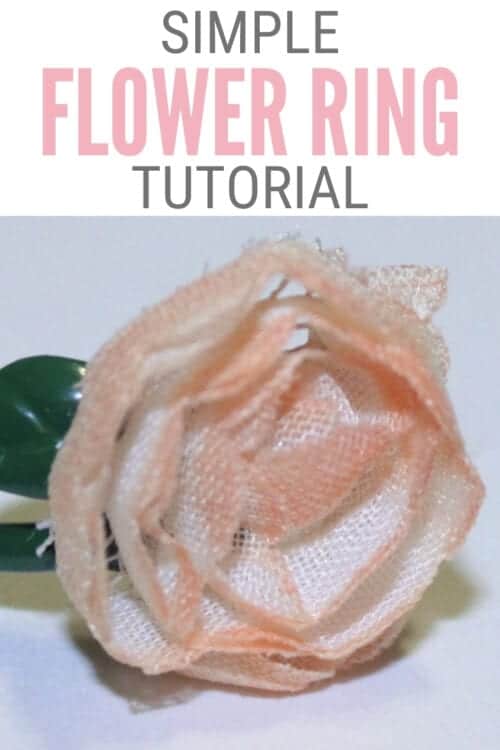
Create a beautiful flower ring using a flower ribbon. Below is the step-by-step tutorial for DIY Jewelry that you will love.
Do you love unique handmade jewelry? This tutorial is for you.
This handmade ring is beautiful and can be made in any color to match any outfit, mood, or preference simply by changing the color of the ink that you use.
This is a pretty simple tutorial and there really isn't much to it! Those are the best kinds of tutorials if you ask me.
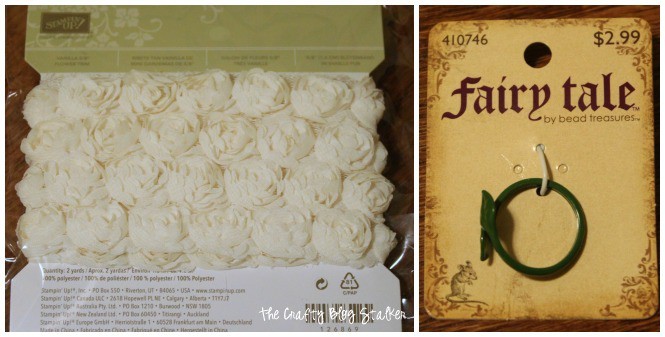
Supplies You'll Need to Create this Project:
This post contains affiliate links.
Handmade Ring Tutorial:
- Cut a single flower off of the flower ribbon.
- Using the dauber pick up some ink off of the ink pad.
- Tap the dauber to the flower to get the desired look. You can add as much or as little color as you want. Reinking the dauber when necessary.
- Apply a glue dot to the ring base and adhere the flower to the ring.

You will be surprised at how well the glue dots stick, but the flower may fall off over time. But this also means that the flower can be changed out on the ring base with a different color.
If you want the ring to be more permanent I would suggest E6000 Glue or a hot glue gun.
If you love this handmade ring tutorial, please give it a five-star review and help me share it on Facebook and Pinterest!
Our Jewelry Making Essentials List:
- Jewelry Pliers are a necessity and a different plier is needed for different tasks.
- Good quality Jump Rings are a necessity in many different sizes and metals.
- A Non-slip Bead Mat keeps all of your beads, findings, and tools in front of you without rolling away!
- The more you DIY Jewelry the more little beads and things you will accumulate. Keep them organized with Plastic Organizer Containers.
Rita
Fun idea. I like that you can change out the flower!
Amanda Nichole
Love this! I have been wanting to purchase one of these ring bases from hobby lobby, but hadn't decided what to put on it. I also have some trim left over in bright pink just like the trim you used. My trim may be a little bigger though. Thanks for the idea.
Someday I'll Learn
Thanks so much for sharing.
Mary Beth
What a pretty little ring ~ so delicate.
Thanks so much for linking up to Project Inspire{d} and have a wonderful week!
Hugs, Mary Beth
Peggy Jones
I like this. Have been trying to fine a place to get the flower trim. Maybe a craft shop, of course we do not have one in my town so have to go to the city. Some great ideas here.
QMM
Katie Adams
The trim I used is from Stampin' Up!
Ana Lopes
So lovely!Thanks so much for sharing tutorial!
Have a fabulous day!
Hugs from Portugal,
Ana Love Craft
Randi~Dukes and Duchesses
That's really cute! I have some of that trim ... I'll have to make some rings for my girls!
Maggie
cute! love the trim, i've never seen it before!
Rachel {BubblyNatureCreations.com}
So pretty and simple!!
Michelle Lunt
What a cute project! I saw you at BYB & I'm popping by your great blog to say "hello". It was really nice to meet you & I hope to see you again soon.
Warmly, Michelle
Faith, Trust & Pixie Dust
Christy Gossett
Very cute and it looks so simple! Thanks for sharing this tutorial.
emmi Langer
How cute and easy! My daughter would love these!
Tonia L
Cute! These would be fun to make at a party!
SweetPepperRose
Cute ring!
Mel Lockcuff
This is so pretty, I love it. Thanks so much for linking up to Inspire Me Wednesday.
stacey gibbon
So pretty! And I love that color from Stampin up 😉
Thank you for linking up at Crafty Thursday Obsessions
Christine
The ring is oh so cute!!!
Thanks for linking up at The DIY Dreamer... From Dream To Reality! See you tomorrow evening! 🙂
Natalie B.
Too sweet 🙂
Thanks for sharing on Tutorial Thursdays.
x
Natalie
Lindsay @Artsy-Fartsy Mama
So cute!! Love everything about it 🙂 Thanks for sharing at Artsy Corner
Gloria Garza
This idea of making this ring is amazing. My daughter would love to try hands on this one. Thanks for sharing this amazing art!