

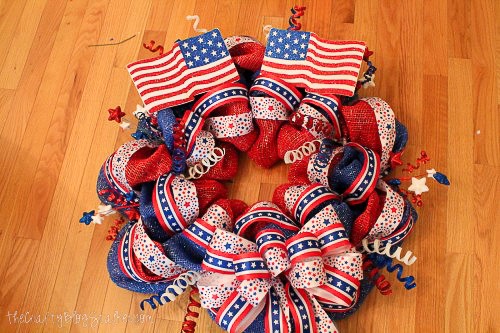
Make a beautiful Patriotic Mesh Wreath for your front door for Memorial Day or the 4th of July. Below is the complete tutorial.
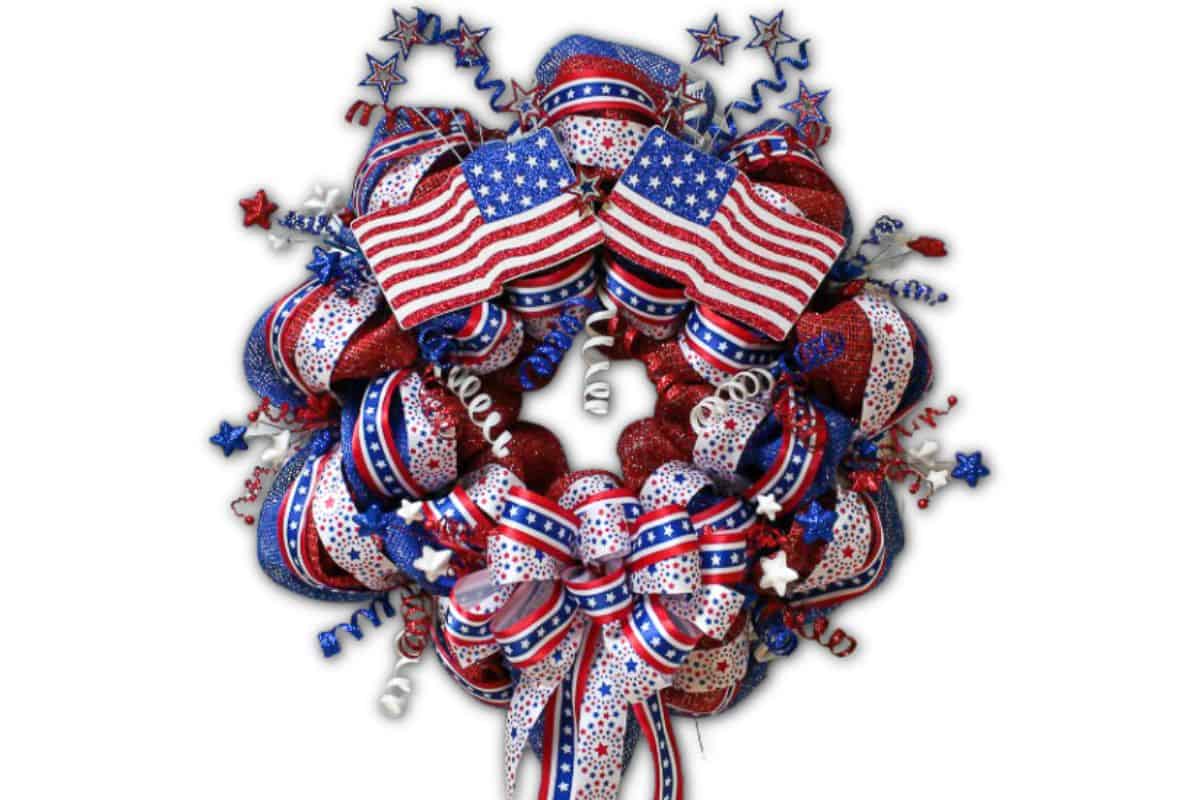
With Memorial Day Weekend and July 4th around the corner, it's time for red, white, and blue colors. In this quick tutorial, we will craft a unique wreath that will add a special patriotic POP to your front door!
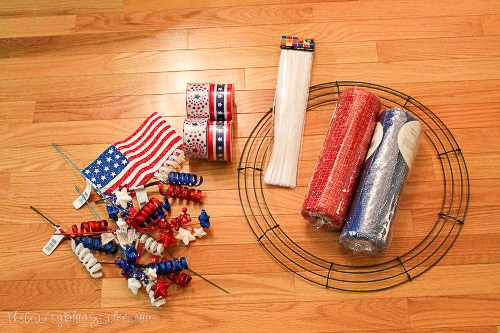
Supplies You'll Need to Make This Craft:
This post contains affiliate links.
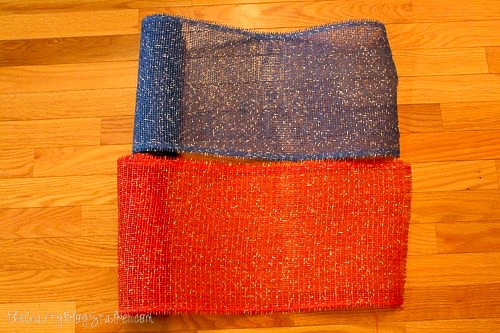
- 2 rolls of 10" Deco Mesh (1 Red and 1 Blue)
- 20" Wire Wreath Frame
- Pipe Cleaners
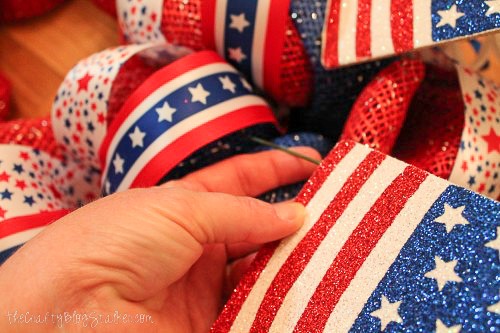
- 4 rolls of 1 ½" Ribbon (2 of each pattern)
- 2 Decorative Flags
- 16 decorative Floral Picks


How to Make a Mesh Wreath:
Now let's get started! Begin by adding the pipe cleaners to the wire wreath frame. Starting on the outer edge of the frame, tightly twist the pipe cleaner around the two outside rings of the frame. Attach one pipe cleaner at each of the cross wires on the frame.
When you have done this, move to the inside and twist a pipe cleaner around the two inside rings. This time, attach the pipe cleaner between the cross wires of the frame. The illustration below will show you how.
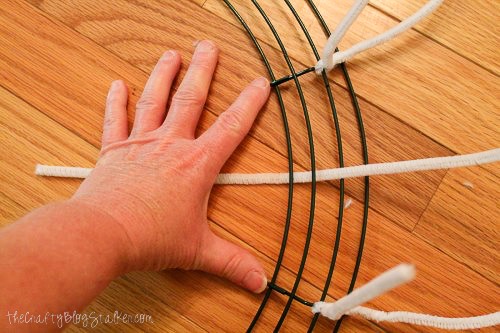
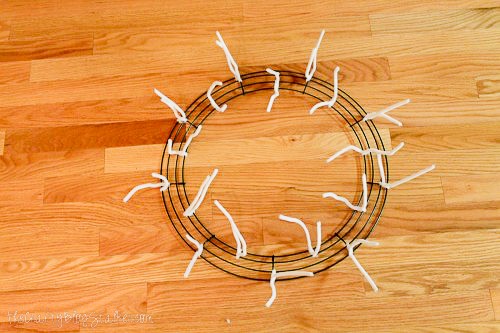
When you have added pipe cleaners around the inside and outside rings of the wireframe, you should have a total of 16 pipe cleaners attached.
The next step is to roll about 10" of each color paper mesh out. Floral mesh is quite stiff but is easy to work with. Typically it is less expensive than the poly mesh. Gather the ends of both colors together.
Secure the gathered ends of the mesh to the inside rings of the frame by twisting the pipe cleaners tightly around the ends. Remember to always twist in the same direction to avoid untwisting the pipe cleaner underneath.
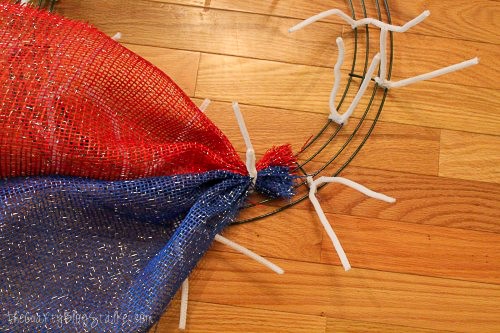
Now that you have started, the next step is easy. Following the circle, attach the mesh to each of the pipe cleaners around the inside rings. Allow approximately 10" of the mesh between each pipe cleaner.
When you have completed the inside, cut the rolls of mesh and then start with fresh ends on the outside rings. Repeat the same process around the outside rings.
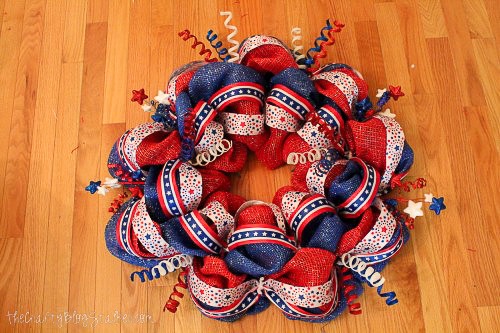
When you have finished, fluff the mesh with your hands. Your wreath should now look like the one pictured below.

To give pops of contrast, let's add a ribbon. Adding two ribbons at a time keeps it from losing its stiffness and limits the chance of loosening the mesh. Hold the ends together and twist the pipe cleaner around the two ribbons.
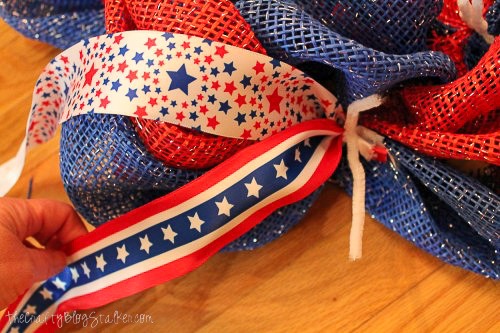
Add the ribbon around the outside and then the inside attaching it to each pipe cleaner. Allow the ribbon to be loose. Never pull it tight between the pipe cleaners.
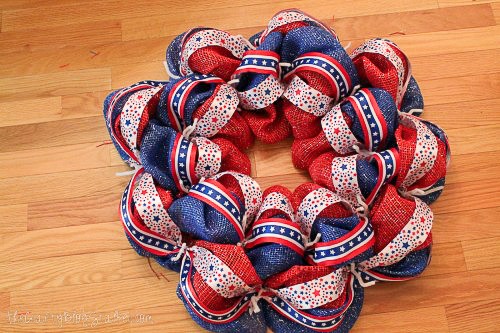
After adding the ribbon, trim the excess pipe cleaner stems before moving on. This will keep your wreath neat. Next, add a floral pick to each of the places a pipe cleaner was used on the outer edge of the wreath. A drop of hot glue to the stem of the pick will secure it in place.
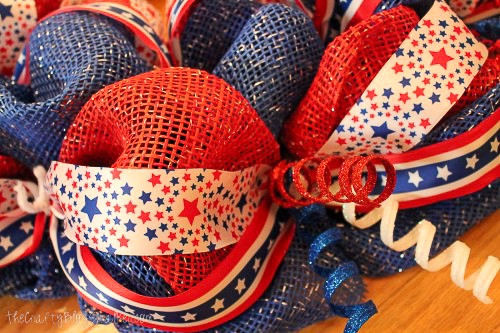
I added a couple on the inside too. Leave one place at the bottom of the wreath empty. This is where we will add a bow.
Now, craft a bow using the remainder of the ribbon and attach it to the bottom of the wreath.
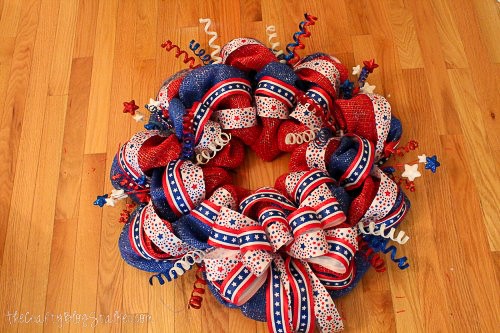
The last step is to add the flags. The American flags I chose had wires on the bottom. I trimmed the wire leaving about 3" to work with.
Put a dab of hot glue on the end of the wire and thread the wire into the mesh. The glue will adhere to the wire to the mesh.
For added stability, also put a bit of glue to the back of the flag and press to the mesh.
Then to make the wreath really come alive, add a few more festive floral picks around the wreath.
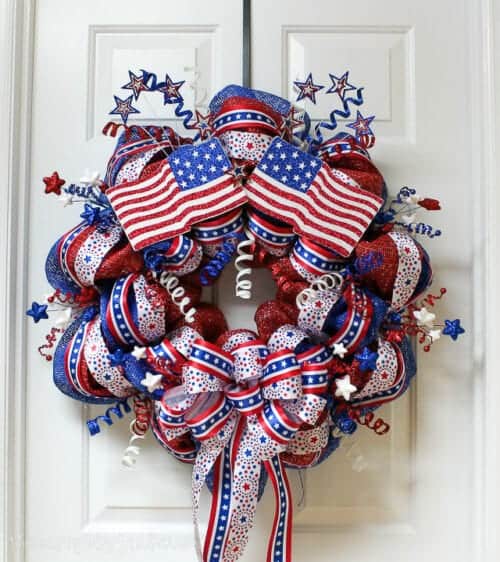
And now you are ready to impress your family and friends by hanging your new festive wreath! Thank you to Katie for having me and thanks to you guys for following along. Best of luck crafting and happy summer!
Crafting Essentials
- The Cricut Cutting Machine is easily my favorite crafting tool. We use it in so many of our tutorials!
- These MakerX Crafting Tools are perfect for keeping in the craft room and are always ready when needed!
- This Fiskars Paper Trimmer is easy to use and cuts nicely without frayed edges.
- These Scotch Precision Scissors cut like a dream, and you get multiple pairs in a pack!
Donna
This is beautiful! I love patriotic decor--great creation. Thanks for sharing.
Joann Woolley
I love this! And I'm not for one who likes a lot of other holiday wreaths but this one just looks amazing. Pinning it to my 4th of July board.
Laurie
This is incredible! You did such a fantastic job! Love it! Thank you for sharing your talent with us each week at Brag About It! I really enjoy seeing what you share with us next! Pinning!
~Laurie
Sheena
I normally don't like mesh wreaths but yours with the ribbon makes it so much cuter. I really like it!!
Sherry
This wreath is stunning. It's featured this week on Funtastic Friday. Hope you join us again this week...pinned and stumbled! Hope you join us again this week for Funtastic Friday.
JeN
I love, love, love this! It took me all week and a lot of traveling to different craft stores, but I found almost the exact same supplies to make this wreath! The only thing I can't find are flags like that! Could you share your secret of where you found those?
Katie
The flags were purchased at Carolina Pottery in Smithfield NC. Sorry that's probably not a lot of help unless you live in Smithfield. 🙂
Judy trylong
Found some flags at joanns
Dee @CupcakesandCrowbars
Thank you for sharing this at Awesome Things Tuesday last week! You've been pinned to our group board - we would love to see you again!
Ashleigh
I've been wanting to do a mesh wreath project for some time now. You make it look so easy! Thanks for sharing!
Linda Bass
So beautiful! Thank you for sharing.
Katie
Thanks for stopping by Linda! I have added your linky party to my list. Thanks for the invite!
Chelc | Inside the Fox Den
Love this! Perfect for the upcoming summer holidays. Thanks for sharing at Merry Monday, hope to see you again next week!
Katie
Thank you Chelc, It is a super fun project!
Jackie
Hi Katie! Couldn't find where to leave a comment, so adding here. I've always wanted to make a mesh wreath, and yours was the first one that actually explained how to do it. Thanks so much! Yours is beautiful!!!
Katie
Thank you so much, Jackie! I am so glad I was able to help you! You've made my day!
Victoria @DazzleWhileFrazzled
Great wreath! Love the patriotic curleques. Thanks for linking up with Funtastic Friday.
Katie
Thank you Victoria, I am so glad that you like it. Thanks for stopping by.
condo blues
Your wreath is incredible! It's sooooooooo fluffy!
Katie
Thank you! It was really fun to make too!
Beverly Stephens
Beautiful wreath! Does the 1.5" ribbon have wire in it? And where did you find it? Thanks for sharing this tutorial!
Beverly
Katie
Thanks for asking Beverly. The 1.5" ribbon does not have wires in. The ribbon came from a local craft store in the 4th of July/Patriotic section.
Beverly Stephens
Thank you for replying! Hope you have a happy and safe 4th of July! 🙂
Mckenzie
Thank you so much for sharing !! What size is this mesh across ? I'm going to try this tomorrow !!
Katie
I am so glad that you like it McKenzie! The mesh rolls used are 10" wide. I'd love to see your finished project!
elly
Is your ribbon wire edge?
Katie
Thanks Elly, this particular ribbon does not have a wired edge, but you could use wired ribbon if you wanted too.It's easier to make it stay put where you want it. 🙂
Erica
do you have a tutorial on how to make that type of bow?
Katie
Hi Erica! I do not have a tutorial that is ready right now. It is a five loop bow with the smallest loop in the middle, and the loops getting bigger as they go out. Then simply spread the loops out. I hope that helps!
erica
Thanks for the quick reply. One more question, will this work with regular deco mesh instead of using paper mesh. I don't have any paper mesh in my area and I don't feel like ordering online
Katie
Yes, the deco mesh will work just fine. If you want more detail about the different type of mesh products I found this great post: https://www.trendytree.com/blog/differences-poly-mesh-products/
Thanks Erica!
Judy Lynch
Hi I might of missed it, but could you tell me what size wreath you used. This is beautiful!! Thank you in advance
Judy Lynch
Found it
Debra
Love this wreath. I purchased all the supplies to make it and realized. I didn’t get wired ribbon. Did you use wired or not? Thanks for sharing your talent.
Katie
I did not use wire ribbon, so you are good to go!!
Fiona Jackson
Wow, that looks really good. I have seen Christmas wreath, new year wreath, but not this patriotic wreath. Really loved the idea
Katie
Thank you so much Fiona!
Katie Adams
Thank you, Bethann. I am so glad you liked my article.