

Want to save money on your water bill? Learn how to make a DIY sprinkler using PVC pipe that will effectively water your lawn without breaking the bank.

It's hot, my lawn is looking sad, and my yard work is... let's just say not my idea of a fun weekend.
The lush green grass from spring has turned patchy and brown, and we needed a watering solution that didn't involve standing outside with the hose for an hour.
One of my husband's friends mentioned making a homemade sprinkler from PVC pipe, and suddenly, we had a plan.
After a quick trip to Home Depot, where a very patient employee walked us through what we needed, we came home with all the parts and got to work.
Simple, affordable, and way more fun than watching the lawn die.
Working Time: 45 minutes
Skill Level: Beginner
Supply List
- 10-foot ¾" PVC Pipe cut in half (2, 5-foot pieces)
- 2-foot ¾" PVC Pipe cut in half (2, 1-foot pieces)
- PVC Pipe Cement
- Plumbers Tape
- 2 Sprinkler Heads
- 3 Threaded Cap
- 3 Male Thread Adapter
- 2 Close Riser
- 2 Elbows
- 1 Cross-Section
- 1 Hose Adapter

You can cut the pipes to the needed sizes at Home Depot, or you can purchase a PVC pipe cutter to do it at home.
Instructions
Start by gluing the longer ends to the cross-section.
Apply the PVC Pipe Cement to both the inside of the piece you are attaching it to and the outside of the pipe that is going into the piece.

Wipe away any excess that squeezes out from the join with a paper towel.

Adhere the shorter pieces across from each other using the same method as before into the cross-section.

On one of the short pipes, attach a threaded cap using the same glue method.
Use the plumber's tape on the screw on pieces, and the pipe cement on the smooth fittings.

On the other end of the short pipe, attach the hose adapter, ensuring the top still rotates freely after gluing.
This is where you will connect your garden hose to the sprinkler.

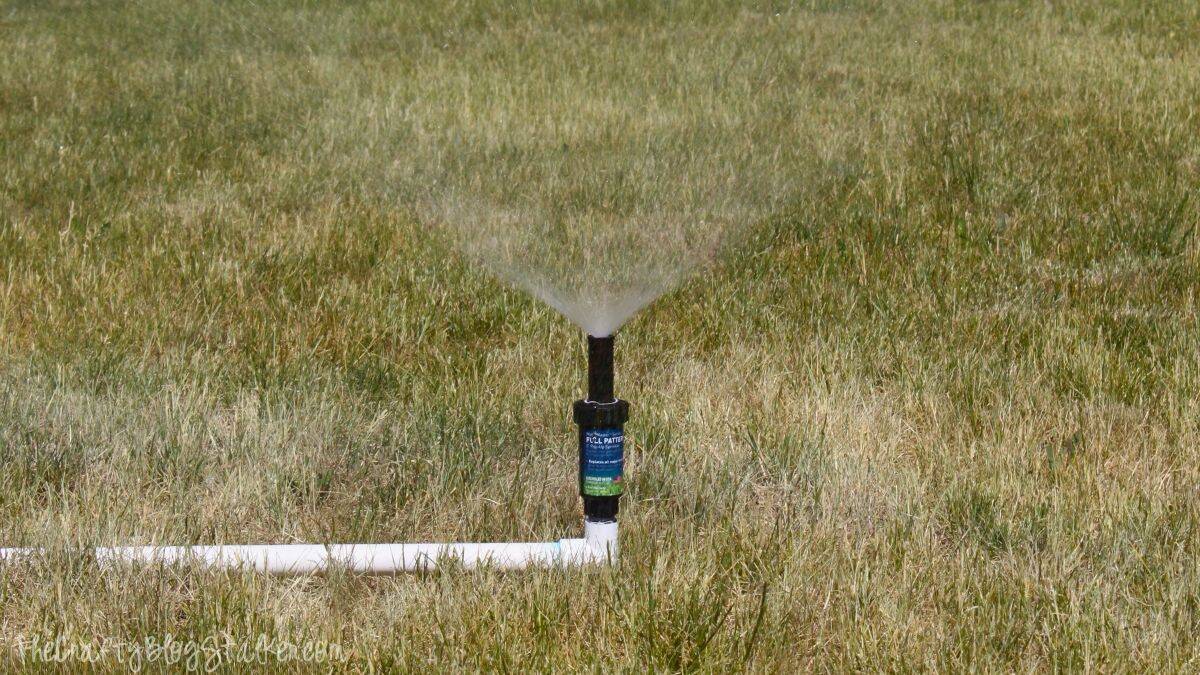
This is what it should look like up to this point.

Attach the elbows to each end of the long piece. This is for the sprinkler heads.

Wrap plumber's tape around both male ends of the adapter.

Screw the adapters into the elbow and tighten with adjustable pliers to make it nice and tight.

Screw the sprinkler head into the adapter.

And voilà! You are all done! The entire project took about 30-45 minutes, plus a bit more for drying.
More Outdoor DIY Ideas
Want more crafty outdoor ideas? Here are a few more fun ideas.


Hi, I'm Katie!
I'm so glad you're here. Want to make something fabulous? I'm here to help!
Claiming Our Space
What a great project. We need to whip up some of these since our underground sprinkling system died this summer after limping along for the last 2 summers. I would love it if you shared this on Tout It Tuesday.
Claiming Our Space
Thanks for sharing on Tout It Tuesday. Hope to see you again for tomorrow's party.
Tammy
How do you move it for mowing?
Katie Adams
The entire thing is really pretty light since it is made with pvc pipe. Simply pick it up and move it where you need to.
Michelles Tasty Creations
Katie,
Awesome tutorial! Something my husband would do too. Thanks so much for linking up to Creative Thursday last week. I can't wait to see what you link up next. Have a great week.
Michelle
Nicole@Show Off Friday
It looks like the kids thought it turned out great!
Evelyn
Are you a plumber? If not you should be, great tutorial:) Very clever. Thank you for sharing at Freedom Fridays.
Katie Adams
No I am not a plumber and neither is my husband. But thanks for the vote of confidence 🙂
2Momma2
Great project! I have seen some PVC sprinklers with holes on the pipe for kids to play in but hadn't thought about using a sprinkler head. We want to make one this summer with a lot of water for the kids. Great job!
Chasity
Did you ultimately bury thus or left above ground?
Katie
No we didn't bury it. You use it above ground and move it to different parts of the lawn to water. They are nice because you can get a larger area without having to move a little one around so much.
Debbie Fowler
Just curious where you stored it after watering -- or even for the winter. I would so love to do this but I'm at a loss as to where I would put it when not in use.
Katie
Hi Debbie! We kept it on the side of hour house. We kept it on the ground but you could hang hooks to keep it off the ground.
Donna
Katie, Have you tried rotor heads instead of the pop up sprayers? I need to make one for my daughter, but would rather use rotors to get more coverage.
Katie
Donna, I haven't tried this design with the Rotor heads so I can't say for sure, but I don't see why it wouldn't work! How is that for helpful. Thanks Donna
Rikki Flores
This may be a dumb question but where do u hook up water hose ..
Katie Adams
Not a dumb question at all! Make sure you get a hose adapter, and then just hook up to the hose through the hose adapter.
Dean Pegal
You did it really well. PVC Sprinkler system makes it very easy to take care of our garden and also the maintenance of PVC System is not very expensive. It works fine, Just try it.
Evgeny
What is a glue you are using? Why not soldering?
Katie
It is a glue just for PVC Pipes. It is called PVC Pipe Cement. Thanks Evgeny!
Alfred
Only see one sprinkler head where do you put the other are the two heads on one or separate
Katie
This PVC Sprinkle holds two sprinkler heads. One on each end. Since the sprinkler is so long it was hard to get them both in the same picture 🙂
Ashley
How well did both sprinklers run at the same time?
Katie
They work great!
KC
Great idea. Thanks for sharing. PVC pipes are like Legos for adults! I've made a bunch of things out of them. My orchids will enjoy this "thing.""
Katie Adams
LOL! You are so welcome KC.
JAMES MOGLIA
Can I use more than 2 sprinklers on the pvc pipe. I would like 3 or 4 for more coverage. Thanks Jimbo.
Katie Adams
We used 3 and it worked great. I imagine 4 would be fine.
Daniel White
I know this is an old post, but wanted to say thank you for this post. I used your idea with the pvc pipes I buried last year. It worked out great.
https://www.facebook.com/share/p/181vi611op/
Katie Adams
That is awesome! Thank you so much for sharing!