

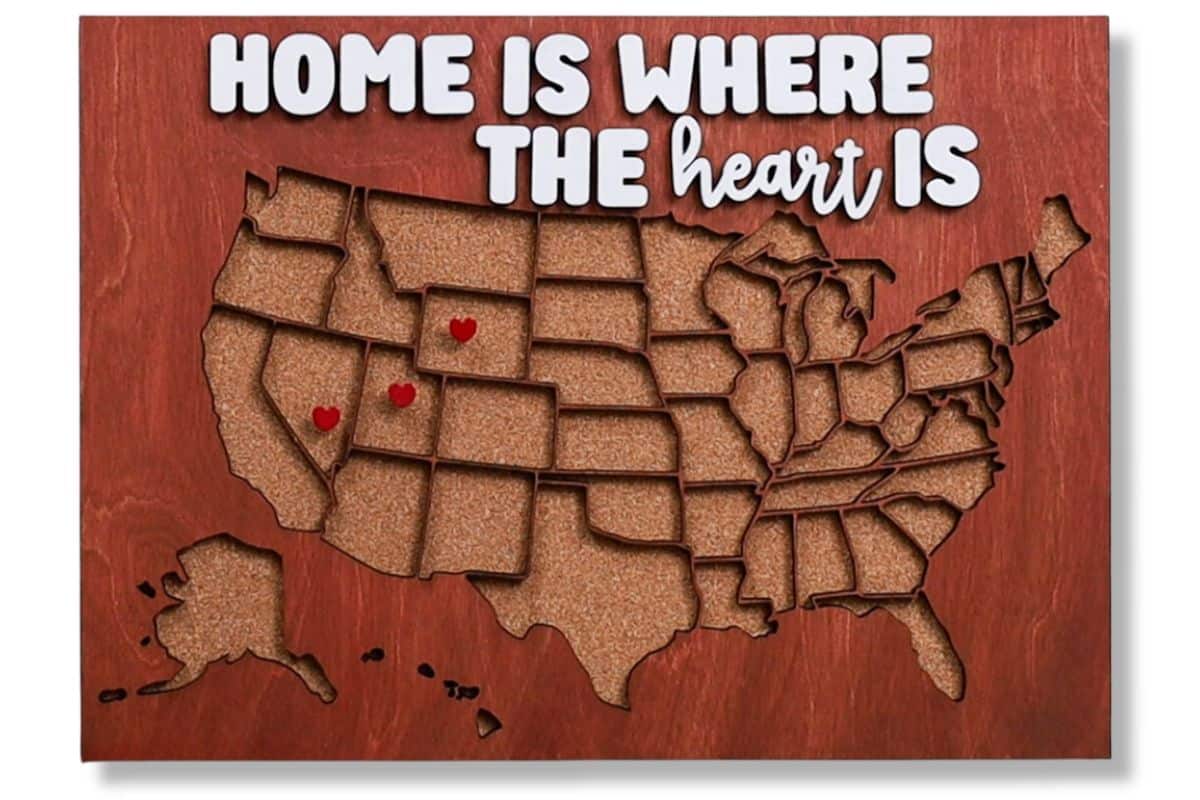
Celebrate family with this laser-cut wood map decor. Mark where loved ones live using heart-shaped push-pins. Home truly is where the heart is.
When decorating your home, there's nothing like adding a personal touch that celebrates the people you love most.
I'm so excited to share this laser-cut wood map decor with you!
It's a beautiful way to keep your family close, no matter how far apart you might be.
With heart-shaped push-pins, you can mark the special places where your loved ones live, creating a unique and heartfelt piece that reminds you that home is truly where the heart is.
Jump to:
Craft Tutorial Video
If videos are your thing, you're in luck-I've got a full tutorial ready for you!
Subscribe to my YouTube channel and stay inspired with every new project.
Supply List
Some links may lead to similar items when the exact item is unavailable.
- Laser Cutting Machine
- US Map Home Decor Laser File
- 2 sheets 3mm MDF
- 12x19-inch sheet 6mm Birch
- 15x9-inch sheet Cardboard
- Acrylic Paint
- Cork Sheet
- Marker
- Scissors
- Paintbrush
- Masking Tape
- Makeup Sponge
- Heart Pushpins
- Wood Glue

This project can be created on any laser-cutting machine that accepts .svg files and can be customized to fit any style.
Grab the Laser File:
Download the SVG laser file to your computer or device.

Stain Wood Sheet
I am staining the wood to get the color I want, if you are purchasing wood, grab the color of wood you want. I am just trying to use what I already have.
My wood sheet has a glossy side and a natural side. I will apply the stain to the natural side because it will wipe off too easily on the glossy side.

I will create a stain using acrylic paint and water to achieve a dark cherry look.
Combine red, brown, and black paint on a paper plate.

Add a good amount of water, the homemade stain should be pretty thin.

Combine the paint mixture with a paintbrush, and the brush onto the wood. Only do small sections at a time.

Quickly wipe away any excess with a paper towel.

After about two-thirds of the board was stained, I decided that the stain was a little too red.

I went back to the paint mixture and added more brown and black to darken it.
Then I went over the previously stained area and repeated applying the stain and wiping it with the paper towel.
After this second coat, I liked the look of the wood much more.
It is okay that the end section is quite the same color because that is where the words will be cut, and I am pointing those pieces white after cutting.

Laser Cut
Pull the SVG laser file into your cutter software and cut.
I am sorry but I can not give cut settings because every machine is different.
There are four layers to cut, but it looks as though there are only 3.
The first layer is the map with the words which should be cut from the wood sheet.
Be very careful when removing and holding this layer. The lines between states are small and will break if pressure is applied.

The second layer is the rectangle, with a second rectangle inside. This layer should be cut twice. Once with MDF and the second time with cardboard.
The third layer is a single rectangle, this is the back of the design and should be cut out of MDF.
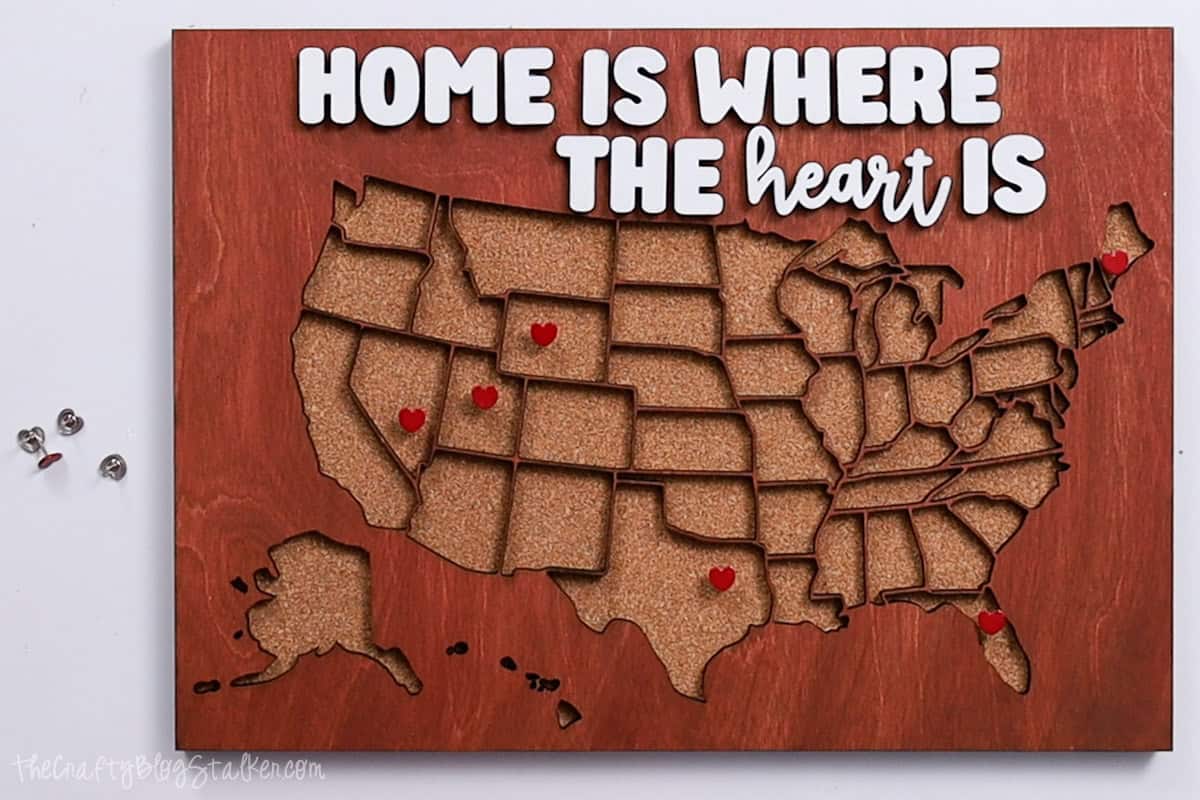
Here are all of the laser-cut pieces.

Cut Cork Sheet
My cork sheet came on a roll so it would have been difficult to cut on my laser, but if your cork sheet is flat, it can be cut on the same layer as the cardboard.
Trace the cardboard piece onto the cork sheet with a marker.

Then cut the rectangle with a pair of scissors.

Paint Letters
Cut a long piece of masking tape, roll it over on itself, and stick it to the table. Then stick the letters to the tape.

I like to put the letters in word order to make sure I have them all.
Add some white paint to a paper plate, pick up the paint with a makeup sponge, and dap the paint onto the letters.

This is a great way to paint small pieces. They are painted quickly by getting paint all over my fingers.
Let the paint dry completely.
Assemble
Start assembly by gluing the middle and back MDF pieces together, make sure they are lined up on all corners.

Apply glue inside the rectangle opening and place the cardboard rectangle inside the opening.

Apply glue to the back of the cardboard and lay the cork sheet on top.

Apply glue to the back of the map layer and center it on top of the stack.

I like to brush my smaller pieces with wood glue and a small paintbrush.
This helps me control how much glue I am putting onto the piece so I don't get a lot of excess glue around my pieces.

The front of the sign has outlines where the letters go so I know exactly where to place them.

Once all the letters have been glued into place the sign is done!
Next comes the best part! Placing pins on the map where family and friends live!
Laser Essentials
- Are you new to laser machines? I highly recommend the xTool M1 Ultra! This machine is super easy to learn and helps you create beautiful projects!
- Are you more experienced with lasers and want more power? I love my OmTech 50W, but they have all types of machines up to 150W!
- Craft Closet is my favorite shop for laser materials. Their products are high-quality, and they have the lowest price I can find anywhere!
Pam@over50feeling40
That is quite a masterpiece! Thanks for sharing how to make it with the Thursday Blog Hop!
Katie
Thank you Pam, I am so glad that you like it!
Marina @ Home Office Geeks
Wow, this looks amazing - I love it! It would fit perfectly into my home office.
Katie
I am so glad that you like it, Marina! I am sorry but the kit is no longer available.
Ashleigh
This came out really good! I love it and i know exactly where to put it in my home once I make it!
Katie
Thank you, Ashleigh! It was a really fun project to create.
megin
This is a super cool project! I love that you are able to customize it to your own decor.
Thank you for sharing this week at Brag About It link party on VMG206 (Mondays at Midnight).
~ Megin of VMG206
Katie
Thanks Megin! It was a lot of fun to make too!
Morgan
OH I LOVE LOVE LOVE this! And it's so simple!
Katie
Thank you Morgan! I am so glad that you like it. It was really a lot of fun to make.
Gwen
I am obsessed with maps! We have a huge one that takes up almost an entire wall in our homeschool room and I have some printed of places we have lived or traveled! Needless to say, I find this adorable! Well done!
Katie
Thank you so much Gwen! I love maps too and wish I had a huge one on a wall! 🙂
sue
Oh you are talented - I'm pretty hopeless at DIY but this really looks impressive. Thank you for sharing with us at OVer the Moon link up.
Ali B
This looks fabulous! Saw your post at the DIY Crush link party and had to come over to see how to make it!
Nicole
That is such a nice idea ~Thanks for sharing!
Katie
Thank you Nicole, It was a fun project to put together and turned out even cuter than I had pictured. I love those kinds of projects!
Diana Rambles
This is so adorable! Thanks for sharing!
EMMA
This is so beautiful,now I just need one for Canada and the UK
Fiona - Coombe Mill
I like your creative take on the design
Katie
Thank you Fiona. It's kinda of fun to think outside of the box.