

If you've seen Sharpie plates all over Pinterest, you've probably wondered the same thing I did… do they actually work?
This is one of those DIY projects that looks simple and fun, especially if you want to turn your kids' drawings into something you can keep or give as a gift.
I decided to test it myself to see how the finished plate holds up and whether it's safe to use on dishes.
Jump to:
Skill Level: Beginner
Total Time: 45 minutes
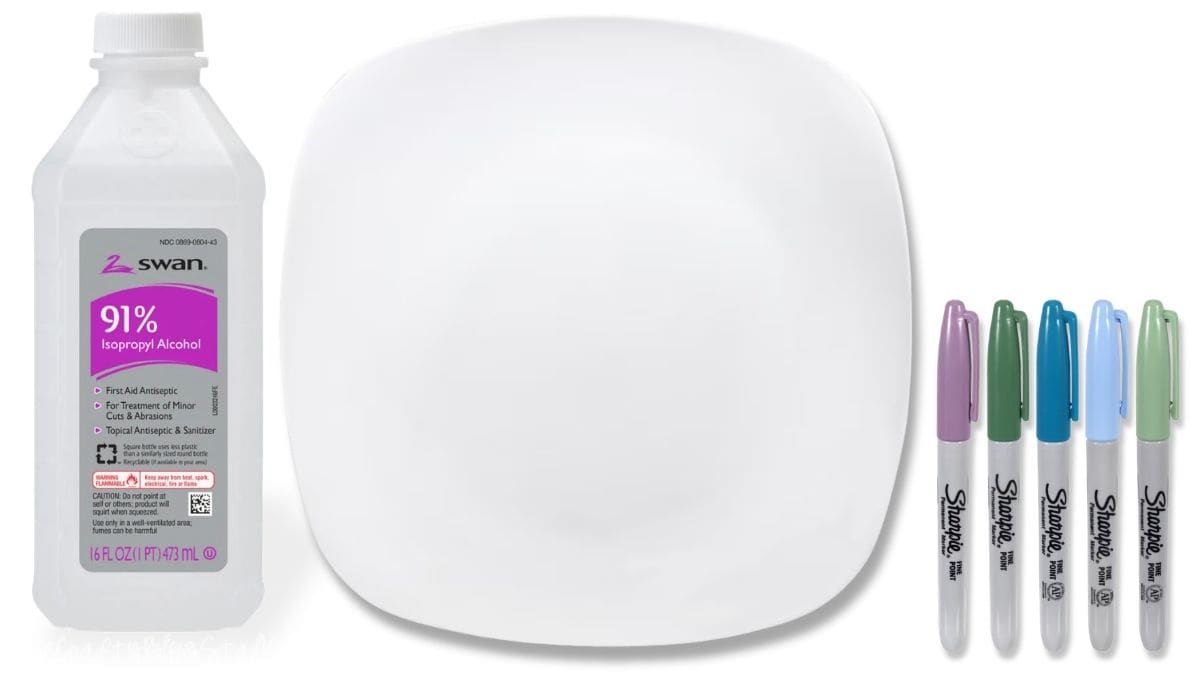
Supply List
Instructions: How to Make Sharpie Plates
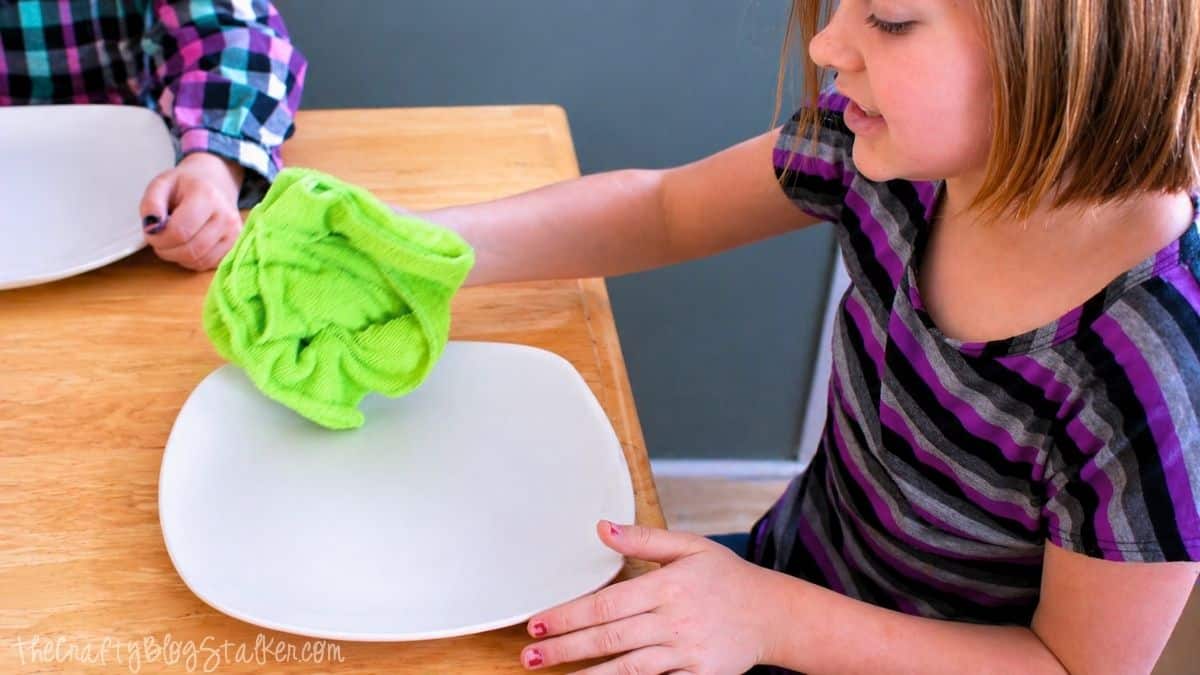
Step 1. Clean the Plates
Start by cleaning the entire plate really well.
Pour a little isopropyl alcohol onto a paper towel and wipe down the surface. This removes any oils or residue so the ink will stick better.
Let the plate dry completely before moving on.
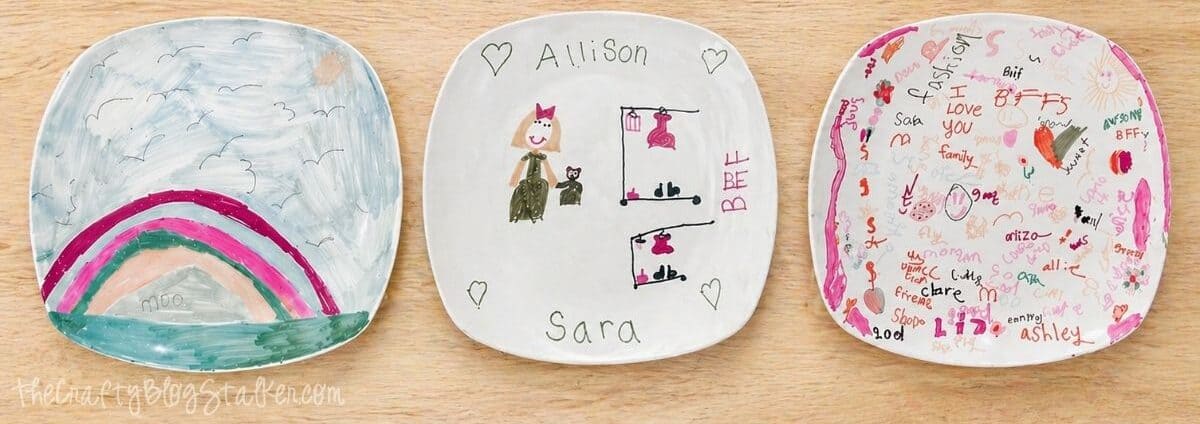
Step 2. Draw Your Design
Now it's time to decorate.
Use your permanent marker to draw directly onto the plate. You can:
- Freehand a design
- Use a stencil for more control
- Let kids draw their own artwork
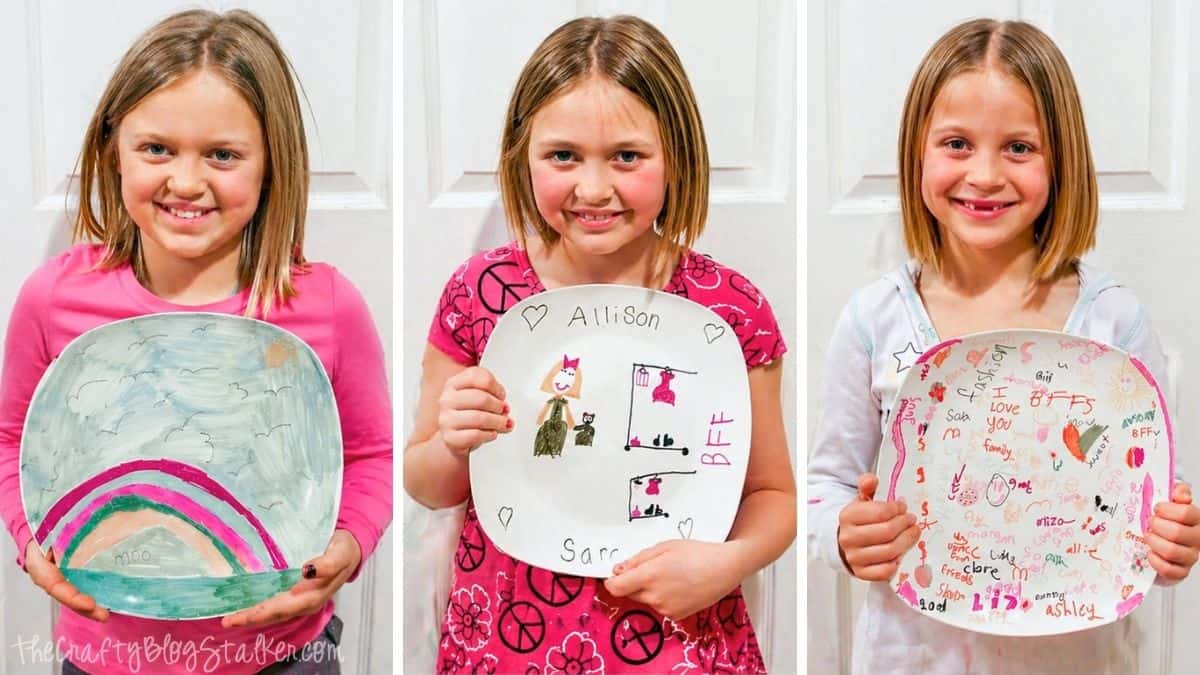
Each of my kids chose a different theme, and it was fun to see how creative everyone got.
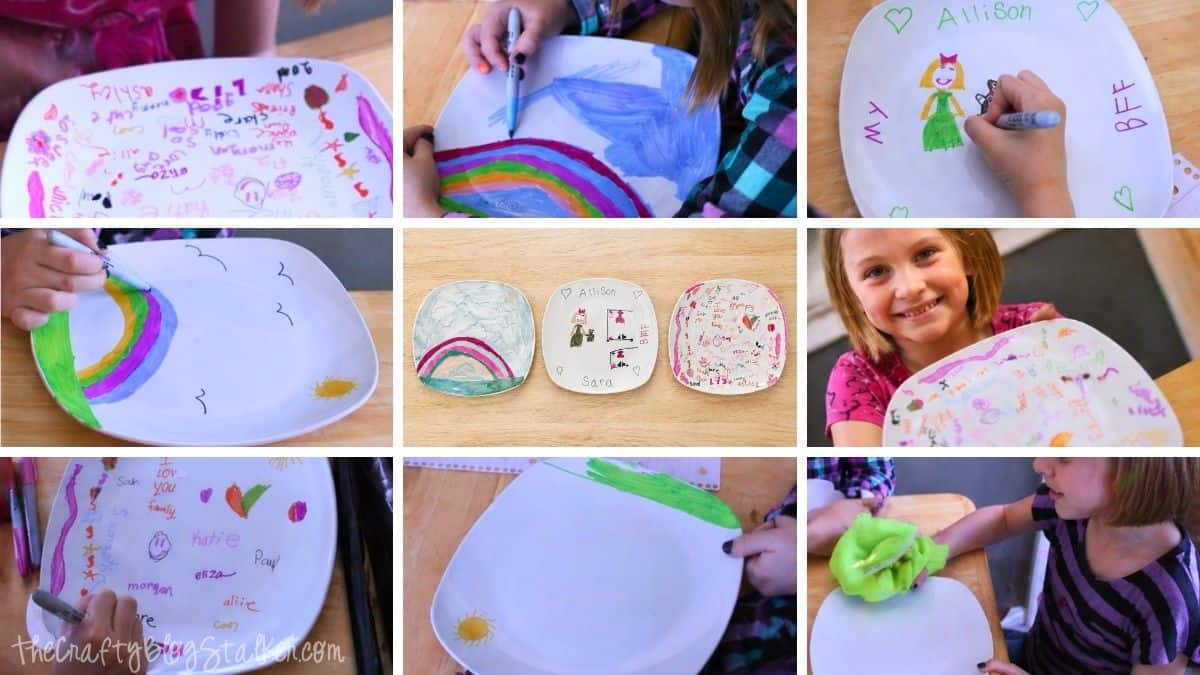
Step 3. Let the Ink Dry
Once your design is finished, let the ink dry for a few minutes before baking.
This helps prevent smudging when you move the plate.
While we waited for everyone to finish, we had some fun posing for the camera and dancing to the music.
Bonding time with the kids is the best part of family craft time. 😆

Bake the Plates
Place the plates in a cool oven first, then set the temperature to 350°F.
Let the plates bake for 30 minutes.
When the time is up:
- Turn the oven off
- Leave the plates inside to cool completely
Letting them cool slowly helps reduce the chance of cracking.
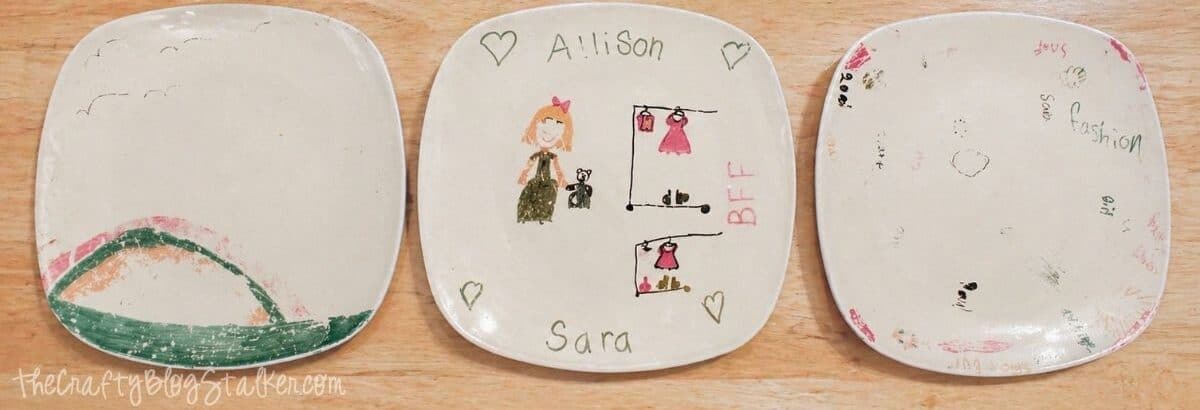
What Happened After Baking
This is where things got interesting.
When we pulled the finished plate out, some of the colors had changed quite a bit. A bright blue turned greenish, and other shades looked darker.
It still looked fun, just not exactly how it started.
Are Plates with Sharpie Permanent?
Short answer… not really.
After using the plates and putting them in the dishwasher:
- The first wash showed some fading
- The second wash removed even more of the design
So this method is not dishwasher safe, at least not the way I tested it.
Hand washing may help the design last a little longer, but it still isn't truly permanent.
Are Plates with Sharpie Food Safe?
This part is important.
Sharpie markers are AP-certified non-toxic, but they are not meant to be used on surfaces that come into contact with food.
They are also not considered oven-proof products for this type of use.
That means:
- These plates are better for decorative purposes only
- They should not be used as everyday dishes, mugs, or anything that touches food
Of course, this was looked up after we made our plates and used them many times.
Yup, the best mom award goes to me!
Final Thoughts
This was a really fun project to do with the kids, and it's still a great idea if you want to preserve artwork in a creative way.
But there are a couple of things to keep in mind:
- The design is not permanent
- It will fade, especially in the dishwasher
- It's best used for display, not eating
If you treat it like decor rather than functional dishes, it can still make a really cute keepsake or even a thoughtful holiday gift.
Since making these plates, I have also been told we used the wrong Sharpie Markers. We should have used the Oil-Based Sharpie Markers, but these are not food-safe either, so use at your own discretion.
More Sharpie Craft Ideas
If you're looking for more Sharpie tutorials that hold up better over time, here are a few fun ideas to try next.

Hi, I'm Katie!
I'm so glad you're here. Want to make something fabulous? I'm here to help!
Anonymous
Thanks for posting. Had similar results to Christmas presents my kids made for their grandparents. 🙁
Brandi Golden
Read that oil based sharpies are supposed to work. Decorated 4 plates and baked today. Scared to wash because i dont want to mess them up. Maybe i'll sacrifice one tomorrow and hope for the best.
Cam
We had the same results here...
玉芳
This is very intresting! I wondered if it worked! Thanks for sharing!
Bonnie
I had heard that they made a sharpie especially for this. But I haven't found them yet. If I do I might have to give it a try.
Rhaven
They make a type of pen called Porcelaine 150 pen that is recommended for this type of stuff. I haven't used it, but several I know have had good luck.
jamie @ [kreyv]
Bummer! I've been wondering about this!
Emily Thompson
yep... I had the same experience with sharpies and ceramic :o) All washed off! I went to Amazon and bought the real thing glass markers... they do work better and still a good way to save their artwork. Thanks for linking up to Tasteful Tuesdays @ Nap-Time Creations. So glad you stopped by! Emily
Lisa
Thank you for doing a review on this. I've been wondering about the same thing. I bought supplies to try this with the oil-based sharpies and glass, so maybe that will work. Hope so!
Beth@Under A Pile of Scrap!
I'm glad I found this today. I had just been thinking if this would work or not just yesterday. Glad I didn't waste the time & create any disappointment with my daughter. I thought I read somewhere tho, that someone let theirs cure after baking for like 2 days or so. Not sure if that would make any difference or not.
Tonya @ The Traveling Praters
Oh no! That stinks! My daughter made some ceramic mugs for her friends at Christmas, but we never thought to test the theory. DUH! Big fail on our part. Thanks for sharing.
Jacquelyn Karlic
Hi! Followed you over from Someday Crafts link up. Thanks for posting this because I have been seeing this on pinterest and have been thinking of trying it. Good to know that the colors will change after being baked and that they don't last after being washed. Guess this is only a good project if yo are making the plate as a keepsake and not to actually be used :-/
Jackie
Kayla Janachovsky
What a great idea! Thanks for linking up to The DIY'ers!
Jeni IGOTTHISMARTHA
Super cute idea!
Melissa at My Fabric Relish
Thanks for this post! Such a bummer!
Vicky @ Mess For Less
That stinks that it didn't work! I thought for sure it would. Pinterest fail.
Ashley
I ended up putting mine in at 450 for about an hour. It might have been a bit excessive, but the Sharpie has survived several trips through the dishwasher already without any signs of wear.
Lise Garneau
Hi Katie! Was that with the oil Sharpies? Just wondering! Did some for gifts for our children for Christmas! Now I am wondering if I should scrap the whole project!
Alexis AKA MOM
OH man I keep hearing it doesn't work :(. I heard you have to handwash only. Then I heard that there is a certain type of sharpie you must use but for the life of me I can't google and find the right kind.
Valerie
I've heard you have to use the oil-based sharpies (available on Amazon, plus some Wal-Marts, and Office Depot/Staples type stores). I haven't tried it but it seems to be the preferred method.
Mary Beth
Thanks so much for sharing your project at Project Inspire{d}.
I've tried this as well and it has been hit or miss for me. I did a vase for Valentine's Day and it worked but some other projects haven't.
Have a wonderful weekend!
Hugs, Mary Beth
Andrea Reed
Stopping by from Sugar Bee Crafts, thank you for sharing. I've always wondered if this worked or not!
O'Mamas
We did this for Valentine's Day on a set of mugs ... we used Sharpies for the outlines, colored in with permanent paint pens. We set the oven temp to 450, popped the mugs in the oven and did the same as you ... when it beeped that it was at 450, I set the timer for 30 minutes. Took them out, let them cool completely. Waited 24 hours before we used them, and while we don't use the dishwasher (we use milk dishwashing soap, and a soft sponge), we've been using them daily and they are just fine.
O'Mamas
And by "milk" I meant "mild" dishwashing soap ... oops
Joshua
These should also work just fine.
stacey gibbon
very interesting! I always wondered about it, especially since tutorials were all over Pinterest. Well now I know.
Thanks for linking up at Crafty Thursday Obsessions. Hope to see you this week again.
Have a great week <3
Natalie Buehler
Thanks for sharing this on Tutorial Thursdays 🙂
Your post was one of the most visited links and I will be featuring it tomorrow on my blog, and your image will also be pinned and added to my Facebook Page Album of the same name.
Please do come by to grab your button.
I would love it it you would visit again this week 🙂
x
Natalie
Rose :: Fine Craft Guild .com
Hi
There are actually specific ceramic pens that you can use. yes, they are EXPENSIVE and yes they are not food safe.... so you have to make the designs only on the outside/edges which you will not touch/where you will not put your food.
Actually, the sharpie method is good for ceramic projects like little vases, for grandma... which she's not about to wash, smother with grease, etc... but which just contain some pretty flowers, picked in the field when her grand kids are over...
Katie Adams
Thank you for letting me know! With this idea pinned all over pinterest I just assumed it would work.
Maria Linhart
You are supposed to used unglazed (unpainted or unfinished) ceramics to make this really work. This way the ink can penetrate the dish not just sit on top of it. If you can only get your hands on glazed ceramics I have heard there are sharpies that are made to penetrate the glaze. I don't know if they really exist but it's worth a Google search.
Sarah Vanderkooy
Thanks for sharing your experience, I love seeing all the ceramic projects, so good to know. I have a marker intended for this type of thing but I only have black and would have loved to use color. At least it was a fun experience right?
Missie
i had the same results and was super disappointed. Then we used non toxic acrylic paint and it worked out great
Amy
Your project may not have worked for several reasons...
1. You put them in the oven before it was preheated.
2. You left them in there for several hours after the timer went off.
3. You put them in the dishwasher.
#s 1 and 2 may be the reason your colors did not turn out right....the plates were left "baking" the whole time your oven was cooling down.
As far as putting them in the dishwasher....I'd say 99% of the project instructions I've seen for these say hand wash only.
I've made several Sharpie plate/mug/bowl projects & they all turned out great & have lasted through tons of hand washing.
Etta
So happy I wasn't the only one who has white plates again!!!! I thought it was just me!!
Luana
Take the kids to color me mine if u have one near you. I took my son and you get to pick and paint your own bowl, cup or what ever you choose. He uses his every morning for breakfast.
Sally
My daughter colored a mug for me in grade school, years ago and I have put it in the dishwasher many times, and it still looks good. I don't know how they did it though.
Tamara Clymer
If you use a clear dish, color on the bottom and then cover with the Mod Podge that is dishwasher -safe gloss, it should hold up in the dishwasher and since the ink is on the bottom of the dish it is food safe.
Katie Adams
Great tip! Thanks Tamara