

This post is sponsored by Duck Brand. All opinions expressed are my own.
Halloween is one of my favorite holidays; there are so many fun ways to decorate, and pumpkins play a big part!
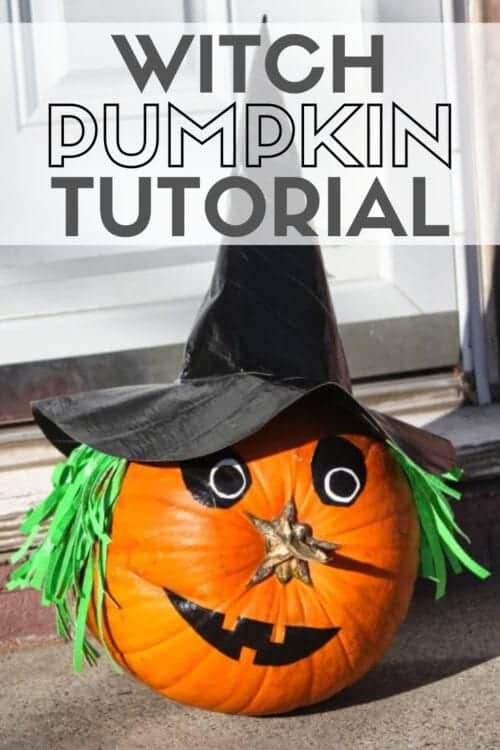
So let's make a no-carve witch pumpkin! All we need is duct tape and a pair of scissors!
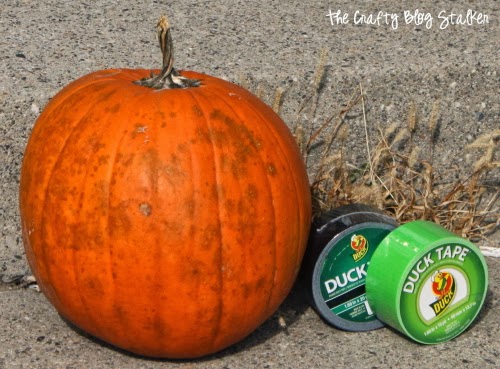
Supplies Used to Make a No-Carve Pumpkin Witch
Items linked below may go to similar items when exact items couldn't be found online. Links are affiliate so when you purchase, I will get a small kickback to help fund the next tutorial!
Picking Your Pumpkin
This pumpkin came from my local grocery store, but I do love wandering the pumpkin patch too!
I chose this pumpkin because of the spots and the twisty stem, all will add to that witchy look!
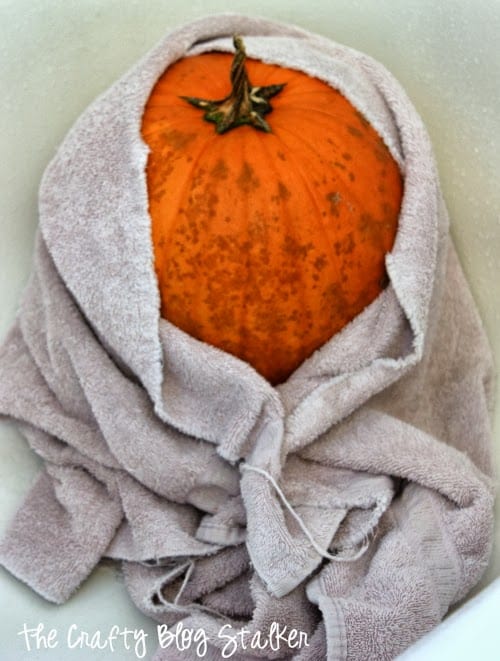
The pumpkin was a little dirty and there was quite a bit of dried mud stuck to the backside.
The first step was giving it a bath. (I thought this picture was hilarious but my kids just rolled their eyes at me. Come on, I'm funny! I wrapped the pumpkin in a towel like a baby!)
How to Decorate a Witch Pumpkin with Duck Tape®
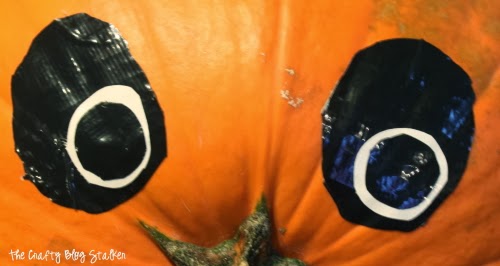
We are going to use the stem of the pumpkin as the eyes, so place the pumpkin on its side and find where the new bottom is. It will probably be the flattest side of the pumpkin so it wont roll away.
The Eyes
Now we can start with the eyes. Cut a strip of black Duck Tape® and cut an oval shape and a smaller circle. Cut a circle out of the white Duck Tape® to make the eyes.
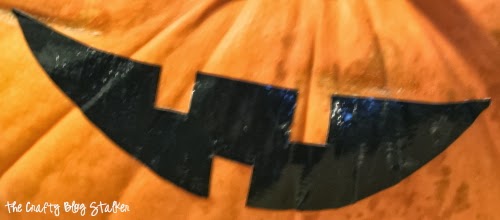
The Mouth
The mouth was a little tricky because the tape kept wanting to stick to itself.
I discovered that if you lay the Duck Tape® on some vinyl backing paper, you could cut the shapes out and then peel them from the backing paper. That made cutting the shapes out a bit easier.
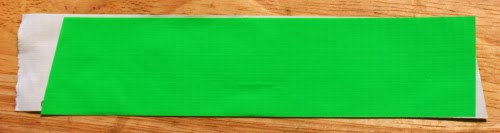
The Hair
Now that the witch pumpkin has a face, it is time to start working on the green witch hair.
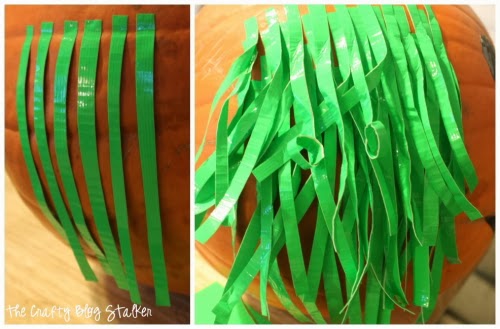
Cut a strip of the green Duck Tape® and cut another piece that is just a little bit shorter and put the two sticky sides together. Make sure to leave one side with the sticky still exposed.
Cut the strip into smaller strips and use the exposed sticky end to stick the "hair" to the pumpkin. I did about five rows on each side and scrunched up each strand to give a crazy hair look.
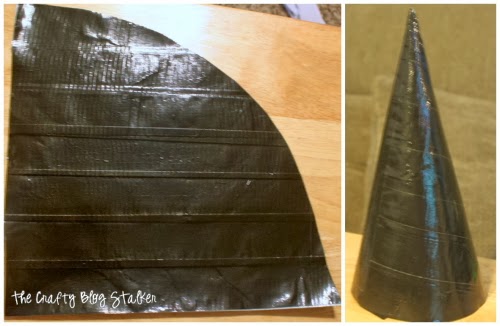
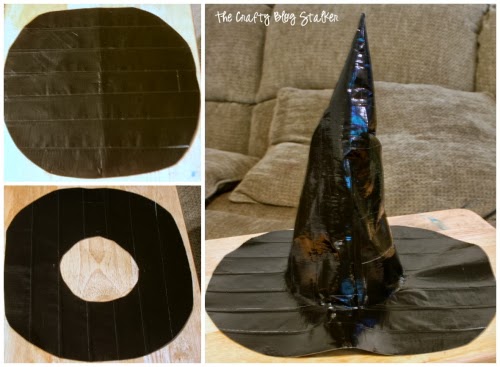
The Hat
To make the witch hat out of Duck Tape® make 2 sheets using the same technique as for the hair but keep adding strips until it makes a sheet with no sticky exposed.
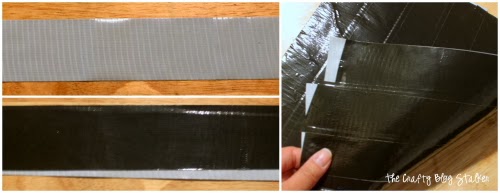
Cut the sheet into a triangle with a rounded bottom then roll into a cone.
For the brim of the witch hat, make a second sheet of Duck Tape® and cut it into a large circle. Tape the cone to the circle by using small strips of Duck Tape® and tape the cone to the rim from the inside of the cone.
Isn't my witch pumpkin so cute? I think she turned out even cuter than I expected!

What scary, silly, or fun pumpkin are you going to decorate? Share and leave a comment below!
Crafting Essentials
- The Cricut Cutting Machine is easily my favorite crafting tool. We use it in so many of our tutorials!
- These MakerX Crafting Tools are perfect for keeping in the craft room and are always ready when needed!
- This Fiskars Paper Trimmer is easy to use and cuts nicely without frayed edges.
- These Scotch Precision Scissors cut like a dream, and you get multiple pairs in a pack!
Marvelous Mommy
Wow that's really cute! I love the hat!
Our Pinteresting Family
That is too cute! I love how you turned it on the side, and that hat is perfect.
Becca Diestelkamp-Woodham
Haha, very cute!
Lynn Blaylock
So cute and a little easier for little ones.
Camila Rojas
LOL This is super fun! I love Duck Tape! and I love this project! Cute. Pinning!
XOXO
Cami
Marti @ SewLicious Home Decor
That is too cute!! I love how you turned it sideways using the top for the nose..so clever! 🙂
Marti
Mandy Beyeler
Thanks for linking to Take-A-Look Tuesday over at Sugar Bee Crafts - I featured you today!
--Mandy, SugarBeeCrafts.com
Natalie
What a great idea! I wasn't even aware that duck tape was so versatile! It has only become available here in the last month or so. I guess I need to catch up on some crafting 🙂
Thank you for sharing on Marigolds' Loft Tutorial Thursdays Linky Party.
Your post will be featured on the tutorial round-up tomorrow, 30 October 2014.
I look forward to seeing you again at next month's party.
x
Natalie
Amanda
Great Idea !!! I'm submitting this post with a round up to a client. I hope it's ok she links to this post ! 🙂
Katie
Thanks Amanda, as long as they give proper credit I am totally fine with it. Thank you!