This post may contain affiliate links. For more information, please see our disclosure policy.
Capture the perfect shot with our DIY PVC Camera Mount! Follow our easy guide to craft a versatile accessory for your photography needs.
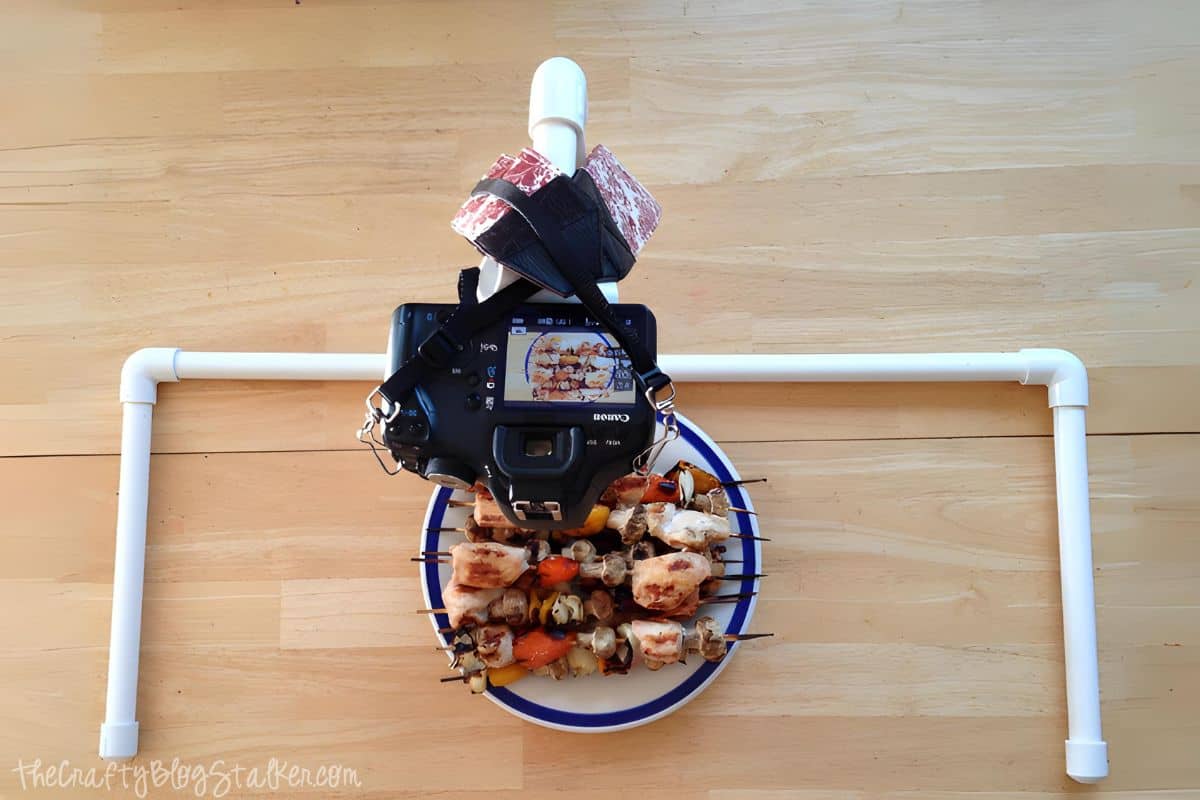
Ready to take your videography to the next level?
In this post, we'll show you how to create your own camera mount using PVC pipes.
Whether you're experimenting with angles, or filming a hands-only video for TikTok, this DIY project is perfect for enhancing your creative vision.
Get ready to unleash your video potential with this easy step-by-step tutorial!
Jump to:
Craft Video Tutorial:
Like videos? I have a video tutorial for you! Subscribe to my YouTube Channel so you don't miss any future videos!
Supply List:
Some links may be to similar items when exact items couldn't be found online.
- 1, 10-foot piece of ½" PVC Pipe
- 2, ½" PVC Caps
- 3, ½" PVC Elbows
- 2, ½" PVC Tee
- 1, ¼-20 x ½-inch bolt
- Hand-Held Drill
15/64 Drill Bit
- Smartphone Mount (optional)
- PVC Pipe Cutter
(optional)
Cut PVC Pipe:
If you can, cut the PVC pipe into the below pieces while you are still at the store.
Most hardware stores have a PVC pipe cutter you can use, so you won't need to purchase one.
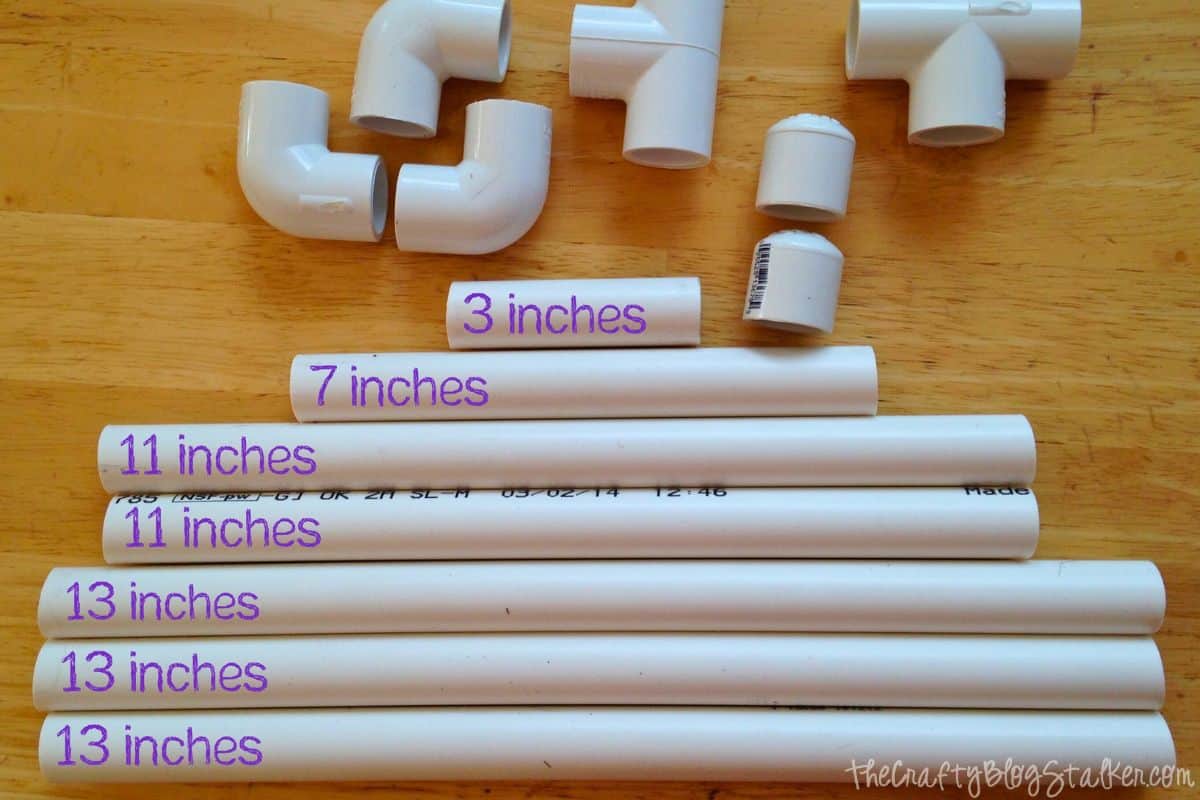
Cut the PVC pipe into these lengths.
- 1, 21-inch piece
- 3, 13-inch pieces
- 2, 11-inch pieces
- 1, 7-inch piece
- 1, 3-inch piece
Camera Screw:
Have you ever noticed the little screw hole in the bottom of your camera?
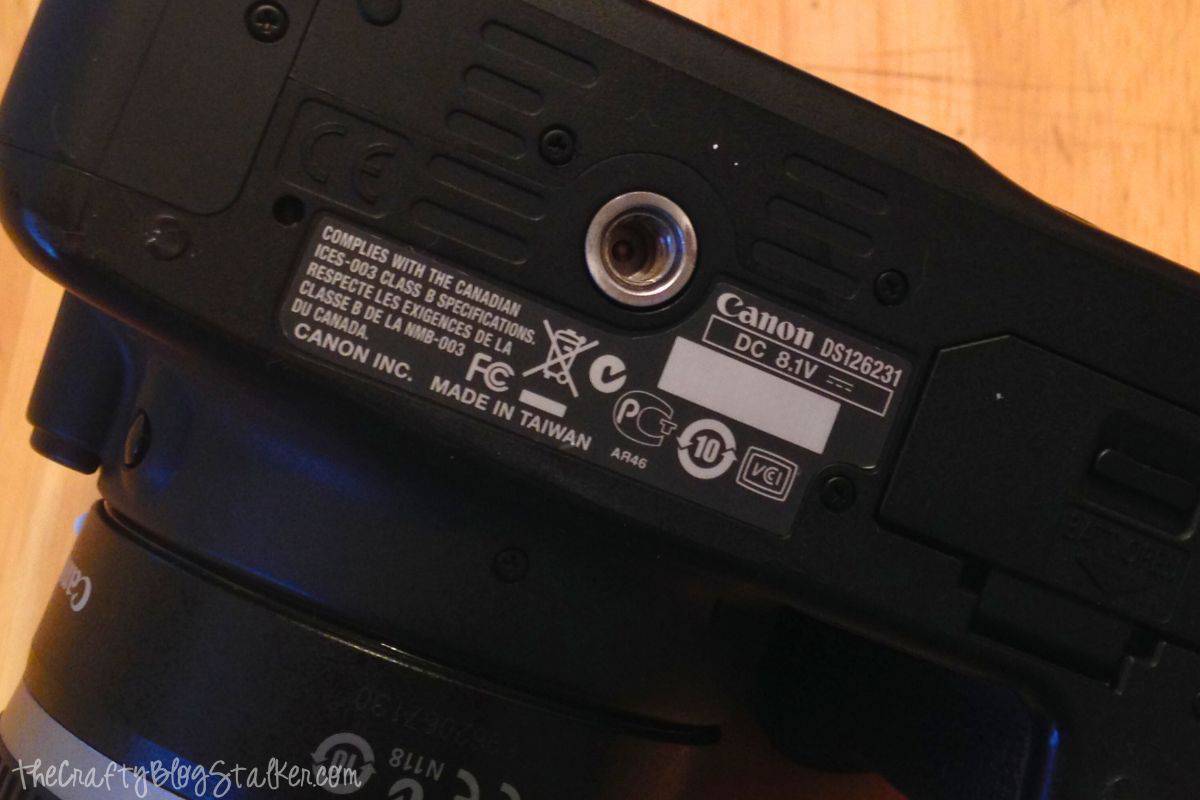
This is so you can screw it onto a tripod.
Regular camera screws are short and aren't long enough to go through the PVC pipe and still hold a camera.
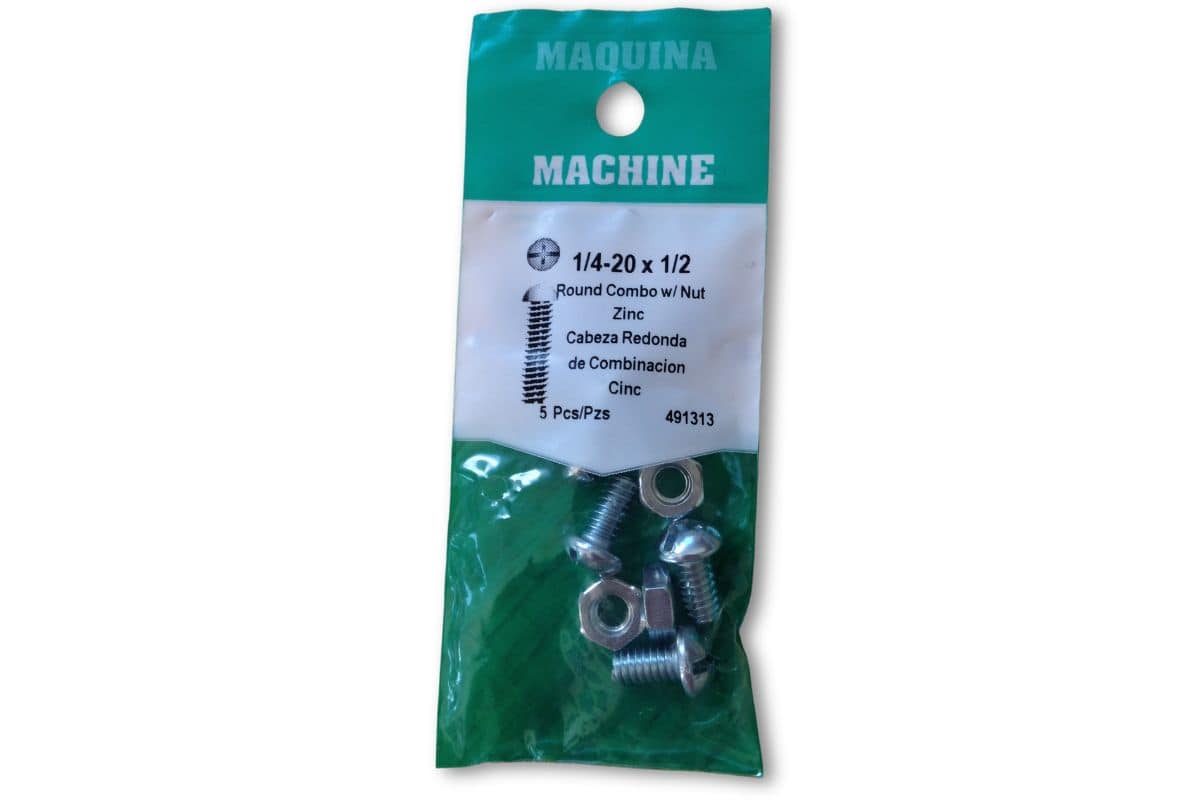
The bolt you will need is ¼ - 20 x ½. You don't want a screw with a point on the end, you want a bolt with a flat bottom.
Drill a Hole:
Place a mark on the back center of a pipe tee, I did this so I knew where to drill my hole.
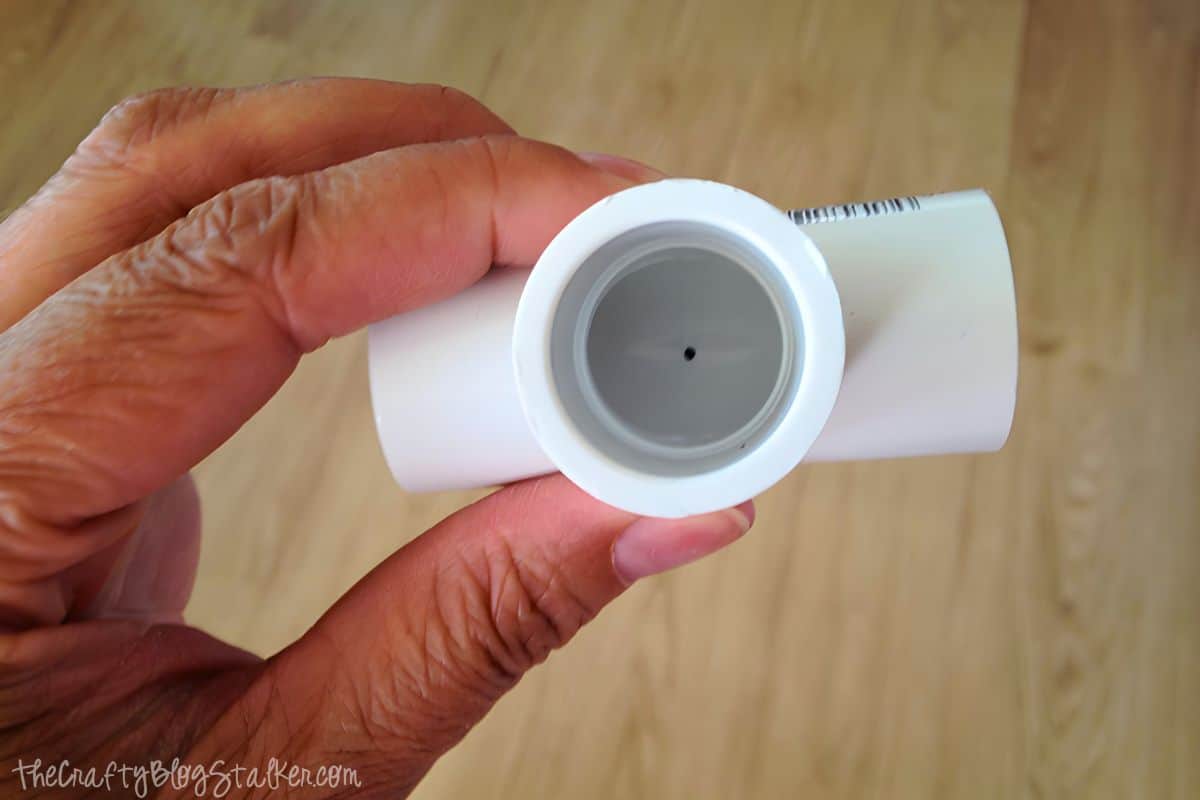
Using a 15/64 drill bit, drill the hole where that black dot is.
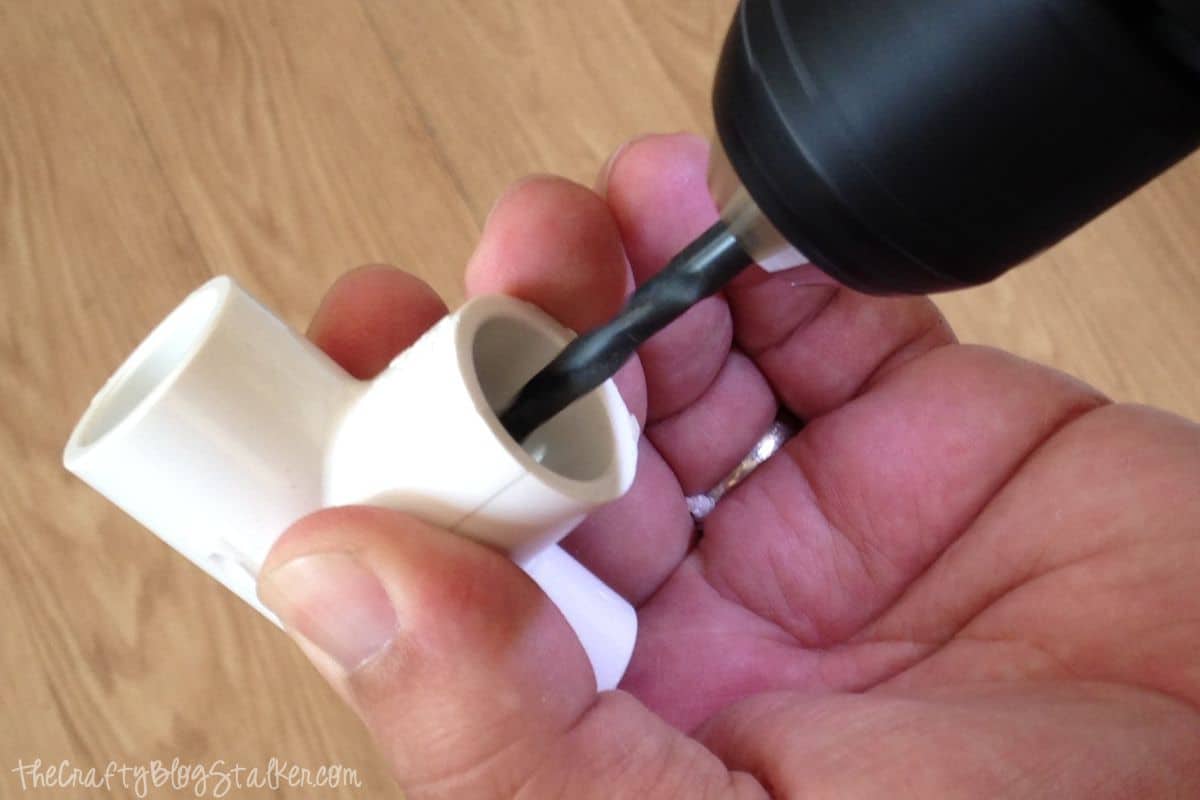
The 15/64 drill bit is the perfect size to hold the bolt with a tight fit.
Use a screwdriver to twist the bolt into the tee as far as it will go.
The end of the bolt should be sticking out of the pipe about .25 inch.
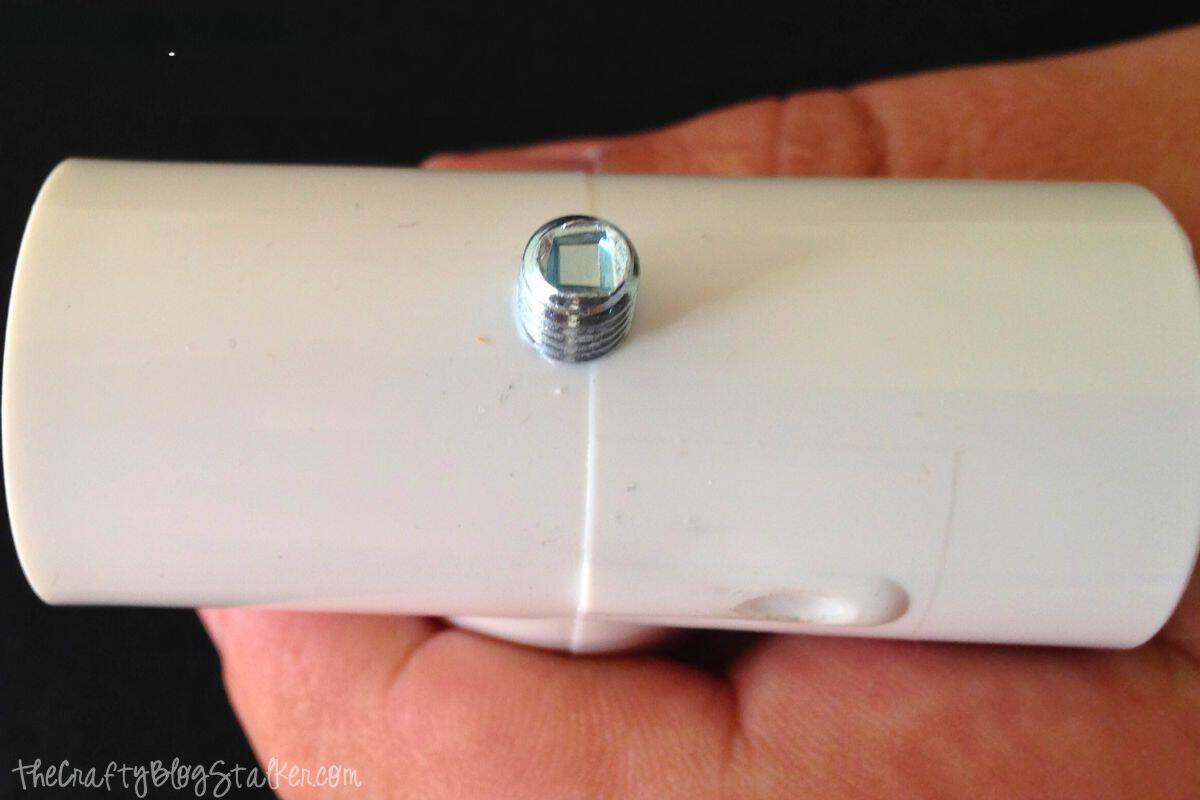
Drilling the hole is the hardest part of the whole assembly.
Assembly:
Place one end cap on the end of the 11-inch pieces of PVC, and top each piece with an elbow.
Push a 13-inch piece into each elbow section.
Connect the two sections with a tee, that points up.
Insert the other 13-inch piece into the tee section that points up.
Add another elbow, connect with the 3-inch piece, and place the tee at the end with the bolt.
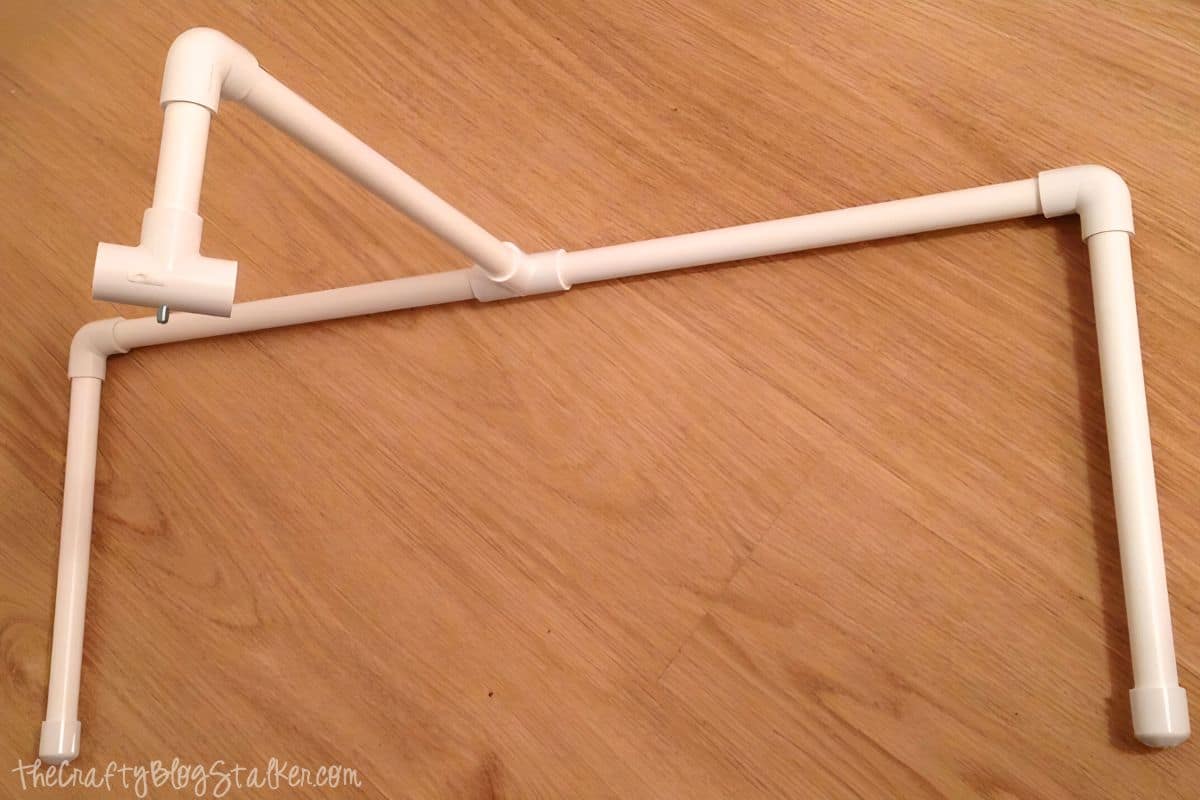
The two legs with the end caps act as the stabilizer, for the mount.
You can either twist your camera directly onto the mount or attach a smartphone clamp. Both methods work great!
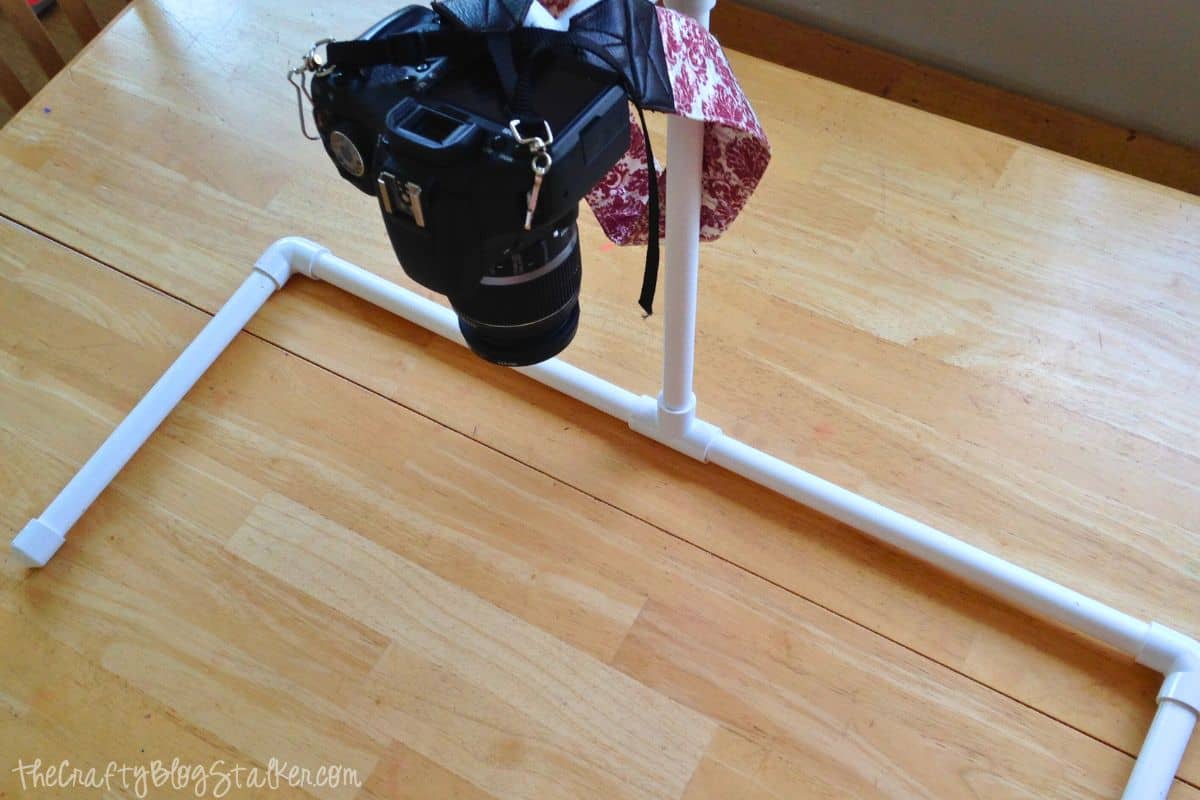
The tall 13-inch piece in the back can be switched out with the 21-inch piece, to make the camera farther from the counter.
Same with the 3-inch piece at the top, it can be switched out with the 7-inch piece.
Final Thoughts:
This mount is pretty expensive compared to some camera mounts.
I love that I can easily add new lengths of PVC pipes if I want to experiment with other setups and angles.
Plus this mount can easily be taken apart for storage or travel!
DIY PVC Camera Mount
Materials
- 1 10 foot ½ inch PVC Pipe
- 2 ½ inch End Caps
- 3 ½ inch Elbows
- 2 ½ inch Tee
- 1 ¼-20 x ½-inch Bolt
Instructions
Cut PVC Pipe:
- Cut the PVC pipe into lengths: 1 - 21 inch piece,3 - 13 inch pieces, 2 - 11 inch pieces, 1 - 7 inch piece, and 1 - 3 inch piece.
Camera Screw:
- The bolt you will need is ¼ - 20 x ½. You don't want a screw with a point on the end, you want a bolt with a flat bottom.
Drill a Hole:
- Place a mark on the back center of the pipe tee, I did this so I knew where to drill my hole.
- Using a 15/64 drill bit, drill the hole where that black dot is.
- Use a screwdriver to twist the bolt into the tee as far as it will go.
- The end of the bolt should be sticking out of the pipe about .25 inch.
Assembly:
- Place one end cap on the end of each 11-inch piece, and top each piece with an elbow.
- Push a 13-inch piece into each elbow section.
- Connect the two sections with a tee, that points up.
- Insert the other 13-inch piece into the tee section that points up.
- Add another elbow, connect with the 3-inch piece, and place the tee at the end with the bolt.
- You can either twist your camera directly onto the mount or attach a smartphone clamp. Both methods work great!
Notes
Our Crafting Essentials:
- The Cricut Cutting Machine is easily our favorite crafting tool. We use it in so many of our tutorials!
- These MakerX Crafting Tools are perfect for keeping in the craft room and are always ready when needed!
- This Fiskars Paper Trimmer is easy to use and cuts nicely without frayed edges.
- These Scotch Precision Scissors cut like a dream, and you get multiple pairs in a pack!


jyl from @momitforward
How cool is this? So glad you're inspired to do more videos! You are genius to figure this out. I love it!
And PS: Your video is adorable!
Cucicucicoo
That is so great! Yesterday I was looking at tripods and they are so expensive. And that video is just hilarious! Ha! 🙂 Lisa
Christine
OMG I PIN'd this....what a genius idea!!!
Jess @ Chaos & Love
This is SO awesome! I am definitely going to try to make one!
Barbra
How impressive and creative. I just can't figure out where you ( and your sisters) got all of your creative talents from.
Katie
It's a mystery to us too!
Just kidding, Mom. Love you!
Robin
Thank you so much for this posting on making a camera mount for hands only video making! I'm thinking this will come in handy - no pun intended! I am a constant viewer of your blog stalking. This posting just makes me admire you even more. You are one fantastic digital friend!
Katie
Oh, thank you for such a kind comment!
I haven't done a lot of videos with it yet, but I am excited about the possibilities.
Ricki @ The Questionable Homesteader
OK this is great. Really love it. I don't have much experience with videos (might need to do a retreat to learn) but I can definitely see this as being very useful.
Thanks for sharing at The Weekend Social. Looking forward to seeing what you have for us next week.
Ricki @ The Questionable Homesteader
Nancherrow
What a great solution for those hard to manage angles! Thanks for sharing at Fridays Unfolded!
Alison
Nancherrow
Nancherrow
...In fact, you're one of this week's features! Congrats!
Alison
Marti
I love this set up.....it's perfect for doing videos and affordable!! Pinning
Miranda @ Someday Crafts
This is such a great idea! It can be hard to get a good overhead shot, and this is genius! We'll be featuring this over at Someday Crafts tomorrow! 🙂
Carmody
What a clever idea!
Mandy @ Sugar Bee Crafts
GENIUS!!
Amy | The Happy Scraps
I love this! It is so inexpensive. It would also be great for taking tutorial pictures if you don't do video. 🙂 I'm assuming that you stand behind it, with your arms around the upright while filming?
Katie
Thank you, I am glad you like it. I put the straight up pole away from me when filming so I don't have to reach around anything, but I think either way would work.
Carrie Groneman
AMAZINGLY CREATIVE!!! Thank you for sharing this awesome tutorial. Wish I could have been to the retreat, it looked so fun. Maybe next year. Carrie, A Mother's Shadow
Patti
Pinned and stumbled!
Bobbie
Such a great idea I pinned for later and Shared it on this weeks The Creative Exchange Features. Thanks so much for stopping by!
I featured you this week on The Creative Exchange Link Party Highlights
Alexis @ Persia Lou
Oh wow! This is so smart! I need one! Off to pin... (If you had a second to come by and link up with us at The Makers link party, that would be great!)
Erlene
Omgosh this is so amazing. Pinned!
Randi Sowders
This is an amazing project! I did 31 days of crafting with PVC pipe last October and this would have been a great addition to my month of crafts! I would love it if you linked up with us this week, I could totally see something like this being featured!
Joy@aVintageGreen
Pinned Katie, great tutorial, great idea.
Joy
Katerina
Such a great idea! Amazing! Thanks for coming and linking up at The Weekend Social. Please be sure to come back next week starting Thursdays at 9PM EST on culinaryflavors.gr ! I hope to see you there!
Deb @ Cooking on the Front Burner
Great idea - thanks for sharing with us at BOTW! Pinned
Shanice
Thank you for sharing this post at City of Creative Dream's City of Links last Friday! I loved this post so much that I chose it to be featured for this weeks party. 🙂 Go grab a button you deserve it!
Ginnie
What an awesome tutorial! I take a lot of overhead photos for my blog, and my hands are so shaky that I have to take a million pics to get one focused shot;) Thanks for sharing this!
Kayla
Oh my gosh I love this! Featuring it on SSM this week. A few weeks ago I was trying to rig up something just like this to photograph the planners I make. Just one little nit-picky detail: flat ended screws are called bolts. That might help to make sure people understand what you're talking about! (I could totally see myself missing that detail and damaging my camera!!)
Katie
Thanks for the "bolt" tip. Good call!
Marni @ haberdashery Fun
Good work! You nailed this one 🙂
Chloe Crabtree
This is great! I am going to have to take on this project myself! Thank you for your inspiration and the detail in showing how to do make this!
Brandy dunaway
This is GENIUS! Thank you for sharing!
Jamie @ Love Bakes Good Cakes
Such a brilliant idea!!! Pinning for sure!!
Katie @ Upcycled Treasures
Wow, this is so clever! I'd love it if you shared this over at The Makers link party going on at my blog right now, UpcycledTreasures.com. Hope to see you there!
Natasha in Oz
Thanks for sharing at the Say G’day party. I’ve just pinned your posts to the Say G’Day Saturday Board.
Hope to see you again this weekend!
Best wishes,
Natasha in Oz
Helen bradley
OMG THAT IS TOO SIMPLE AND WHAT A SMART IDEA. I HAVE AN EXPENSIVE TRIPOD TO DO THIS WITH BUT IT IS HEAVY AND HUGE! THIS IS SIMPLE ENOUGH TO MOVE ON AND OFF THE DESK. IT'S JUST WHAT I NEED TO START DOING SOME DRAWING VIDEOS. I AM INDEBTED TO YOU FOR THIS.
C4G
Won't your video be upside down then?
Katie
It actually won't be, but you can flip it if needed when editing.
Joanne Perry
That was my concern too! So Katie, when you say "edit", what program do you use? Love how you came up with this set-up! I have a tripod small enough to put on my table, but was wondering how to get it to view from the same view as I see?
Katie
I have a mac so I started with iMovie to edit. It's really a good program and pretty simple to learn.
Christa Sterken
I see you posted this some time ago, but this is JUST what I needed today! Thank you
Johnny Self
you're amazing for sharing this! you have no idea..
Sherry
This is such a brilliant idea. Pinned and stumbled! Thanks for linking up and sharing with us at Funtastic Friday. Hope you join us again this week.
Sharnette
I started a blog, but haven't posted a whole lot. I have a tripod that I used to make my first video but the space underneath was very limiting. This is awesome. I will pick up some PVC pipe next payday. I want to do more videos.
Valerie W.
This is AWESOME! Thank you SO MUCH for doing this for us! I Pinned it!
Katie
Valerie, you are so welcome! I am glad that you found it useful.
ANGELICA
you blew my mind. I spent the longest time deciding what camera to get and researching on what overhead mount i had to buy/make. Now i dont need to buy a camera and saved myself more money with the mount. THANKYOU!
Katie
I am so glad that I could help Angelica!
Anny
This is so awesome, thank you for sharing. I'm planning on going out to get the materials soon!
Katie
I so glad that you like it, Anny! Thanks for stopping by.
Tuesday
I'm not pinning this, I'm MAKING IT TODAY!!! Thank you for this simple, yet genius design!
Katie
HA HA HA! I am so glad that you like this DIY camera mount. It has come in handy many times.
Patricia
I made this yesterday without the help of the Home Depot guy or my sons or husband. It was easy, even drilling the hole for the bolt.
I'm going to make another sturdier one for my DSLR camera.
Thank you for your clear instructions.
Katie
You are so welcome Patricia! I am So glad that it worked out well for you!
Kelli Hogg
Made this yesterday! SO easy! Thank you so much for your clear, precise instructions! I can't wait to get started shooting!
Katie
You are so welcome Kelli! I'm so excited for you! Will you use it for still shots or video?
Prerna Poojara
Absolutely what I was looking for. I just started creating some video tutorials and till is exactly what I need.
Katie
Happy to help!! I'm glad it you found the tutorial useful. 🙂
gary
OMG this is so simple and so brilliant
It will work well with a DIY PVC book "scanning" station
Katie
I am so glad you like my design! Thanks for stopping by Gary!
Connie W
I'm doing it!!! Yay!! An easy inexpensive starting solution!!. Sadly you didn't make a automatic desk cleaner. But I think I can use the kitchen table and leave my crafting desk au natural.
Katie
Do it, Connie! I'm sorry I can't help with the desk cleaner - I need one too! 🙂
Cyndi
Great idea!! I made it for less than $6. Thank you for sharing, it’s exactly what I needed! (I’ll post my photo after I screw the hole for the bolt).
Katie
Thank you, Cyndi! I am so glad this tutorial was able to help you!
Rachael Shedeed
Katie,
This is brilliant! I jut saw this last week and already made it today! I had to clean a little in my craft space first,LOL! But it is great! Like a lot of others, I just did not want to spend a bundle on an overhead set up! Because I purchased the pvc pipe cutting tool, I actually spent $28.35, without that I would have been in the $12.00 price range! Thank you so much, it has inspired me to star making videos! I might even send you my first one! Ha,ha
Thanks again
Rachael
Katie
I am so glad you were able to make your own camera mount so easily. I'd love to see your first video!
tjpk
is it just me or is your audio weird?
Katie
For whatever reason, it doesn't work on some devices. It works fine on a desktop or laptop but it goes wonky on some mobile devices. I'm sorry, not sure why it does that.
Danette
So many thanks!
My boyfriend found this for me today. We went straight to home depot after work, found all the parts and were out of there in 15 minutes, AND it was only $12! I'm so excited to try it out later!
-Danette
Katie
Yay!!! I am so glad it works for you too!
Sam
Awesome stuff, thanks for this, it gives me an idea on how to rig one up for an upcoming video I have to shoot soon.
Katie
You are so welcome, Sam! I am glad you found the tutorial helpful!
Alicia Simon
genius!!! I've been needing a top-down mount for months (years if I'm being honest) and kept putting off shopping for them because they seem so expensive. even shopping for one felt overwhelming! This is totally doable!!!! Thanks!!!!
Katie
Happy to help!
Rhonda S Hogarth
I am wondering, did you glue/cement any of the parts. I might have missed it, but did not see it when reading through again. I wondered if the camera would slip and pivot at the T if not anchored the T to the "pole"
Katie Adams
No I did not glue the pieces so that I could take it apart to for easy storage. I have not had any problems with the pieces slipping and have been using mount for years.