

Try this Easy Beach Waves with a Curling Wand Tutorial for soft, wavy hair. Includes a DIY beach spray for an easy summer look.

Beach waves are one of those styles that never really go out of style.
They're a little messy, a little polished, and they work for everything from running errands to heading out for the night.
The only downside is that air-drying doesn't always yield the same results.
This method uses a curling wand (or curling iron) and a DIY beach spray to help texturize and shape hair, so you get consistent beach wave curls every time.
Jump to:
Products Used
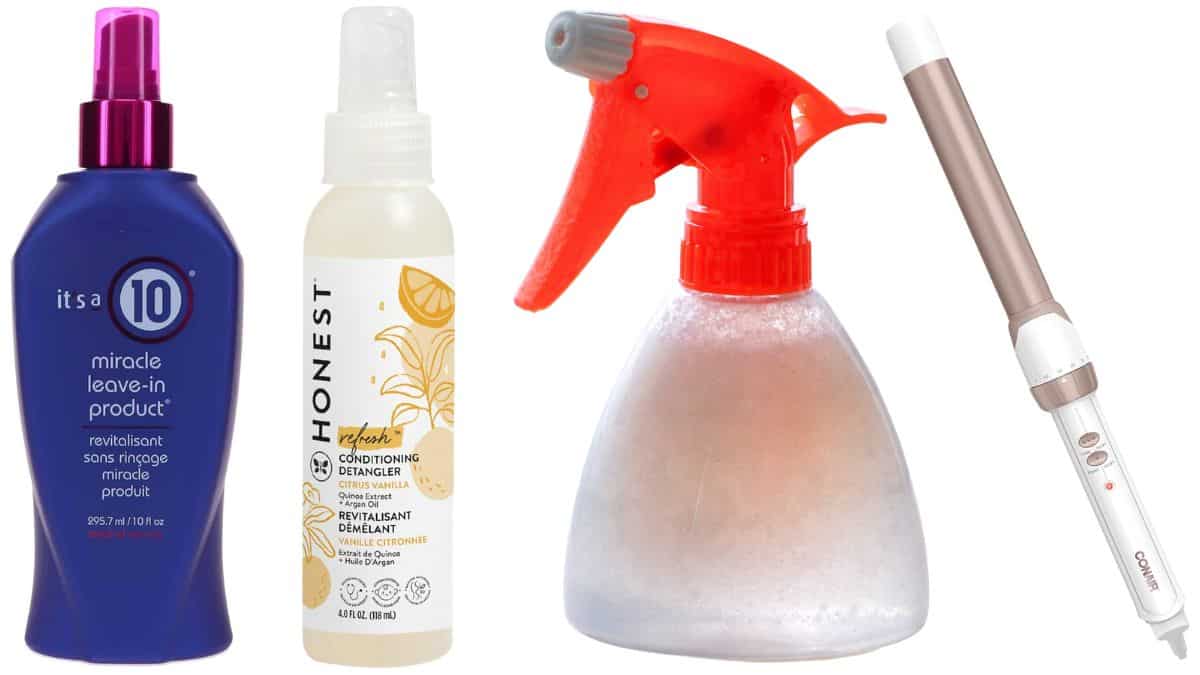
Here's what you'll need to create this beachy look:
- It's A 10 Miracle Leave-In Product
- Honest Conditioning Detangler
- DIY Coconut Beach Spray
- 1" Curling Wand
If you haven't tried the beach spray yet, you can find the full tutorial and recipe here.
Curling Wand vs. Curling Iron
No curling wand? You can absolutely use a curling iron or even a flat iron.
A curling wand makes it a little easier to get that relaxed shape, but the technique is what really matters. The same method works with a curling iron, and a flat iron can also create beach waves once you get the hang of twisting the hair as you glide.
Use whatever tool you're most comfortable with.
How to Get Beach Waves
The goal here is soft, undone waves-not perfect curls.
Step 1: Start with Dry Hair
Make sure your hair is completely dry before you begin. This helps the curl hold better and keeps the style from falling flat.
Lightly brush through your hair to remove any tangles.
Step 2: Add Heat Protection
Before using any hot tools, apply a heat protection product. This step is easy to skip, but it really helps protect your hair from damage.
Step 3: Prep the Hair
Apply a small amount of leave-in product or detangler to smooth the hair and make it easier to work with.
Step 4: Start Curling
Take small sections of hair (about 1 inch wide).
Wrap the hair around your curling wand or curling iron, leaving the ends out. Leaving the ends straight gives a more natural, beachy look instead of a polished curl.
Hold for a few seconds, then release.
Step 5: Alternate Directions
As you move through your hair, alternate the direction of each curl.
Curl one section away from your face, then the next toward your face. This keeps the waves from blending together and helps create that more natural, slightly messy texture.
Step 6: Work in Sections
Continue curling section by section until you reach the last section.
For the front pieces, it usually looks best to curl away from the face. This helps open everything up and keeps the style from feeling too heavy around the face.
This method works well on both short hair and longer hair. You may just need smaller sections for shorter styles.
Step 7: Break Up the Curls
Once everything is curled, let the hair cool for a minute.
Then run your fingers through the curls to loosen them. You can also lightly brush through with a soft brush for a more relaxed finish.
This is where the curls start turning into beach waves.
Step 8: Add Texture
Finish with your DIY beach spray.
Lightly mist your hair, then scrunch it with your hands to add texture and help the waves hold. This step really helps create that soft, beachy finish.
Watch the Full Tutorial
For a full step-by-step walkthrough, watch the video below to see exactly how to create beach waves using a curling wand or curling iron.
This is one of those hairstyles that looks like you spent way more time on it than you actually did. It's quick, easy, and perfect for those days when you want your hair to look put together without a lot of effort.

More DIY Beauty Ideas
Looking for more easy, everyday beauty ideas you can do at home? Here are a few simple favorites to try next.


Hi, I'm Katie!
I'm so glad you're here. Want to make something fabulous? I'm here to help!
Land Records
Looking good.