

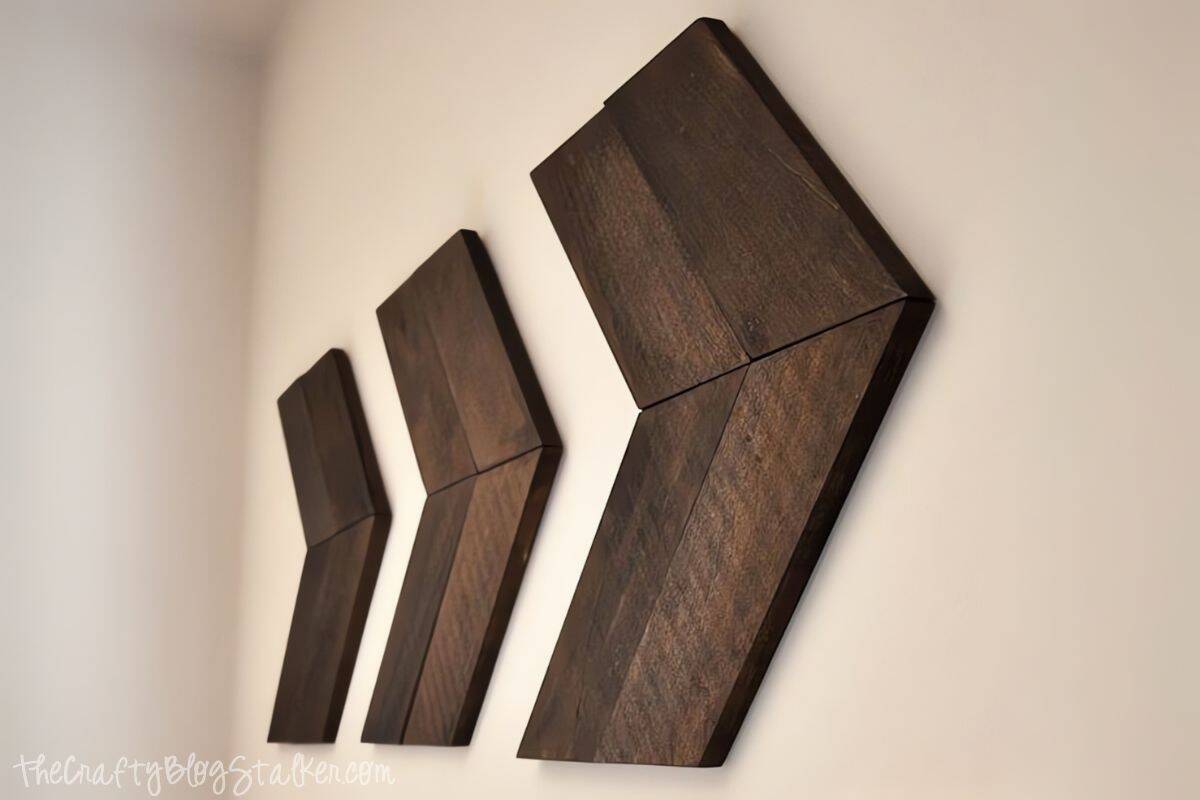
Learn how to make DIY wood arrow decor perfect for nurseries, gallery walls, or any space with a little rustic charm and personality.

I'm so excited to share this project-it might be my favorite DIY yet!
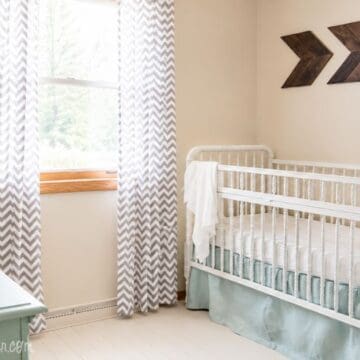
I made these wood arrows for Adam's vintage travel-themed nursery, which was even better than I imagined.
They're surprisingly easy to make, even if you've never used a saw.
It's the perfect beginner project to practice 45-degree angles and add a custom touch to any room.
Skill Level: Beginner
Drying Time: 1 hour
Active Time: 20 minutes
Total Time: 1 hour 20 minutes
Supply List
- Miter Saw
- Tape Measure
- Pencil
- Right Angle
- Safety Goggles
- Craft Wood or 1x4's
- Wood Stain
- Drill
- Mending Plates (½" screws if it doesn't come with them)
- Saw Tooth Picture Hanger

Cut Wood
First, you need to know how big and long you want your arrow wall decor.
I used some craft wood I found at Home Depot that was 24" long and a little thinner than a 1x4, but you can just as easily use 1x4s or scrap wood.
Since my wood was 24 inches long, I found the center and cut it in half.
Find the center both horizontally and vertically, and mark it. Then center your 45-degree angle on that mark.
I used two 24-inch boards per arrow, for a total of six 24-inch boards.
The picture below shows where I made my marks to take advantage of the entire board.

Place the board in your miter saw (set to a 45-degree angle) and make the cuts. Cut as many arrows as you need.
Once you've done this, you can lay it out as shown below.

Stain the Wood
Once you are done cutting, go ahead and stain or paint the wood to your desired color.
If you'd like, I have a recipe for homemade wood stain, but I used Minwax Dark Walnut for this project.
I applied the stain with a lint-free cloth. Since they are hanging on the wall, I chose not to seal mine, as I wanted them to have a dull finish (no shine).
But that is just personal preference. Some might argue that it must be sealed, but I'm not worried since nobody will touch them.
Assemble
After the stain has completely dried, begin assembling the wooden arrows.
Add mending plates to the back of the arrows to keep your wood together.
You can also use wood glue before using the mending plates to give it that extra strength, but just the mending plates worked for me.
I then found the center of the entire arrow (for weight purposes) and added a saw tooth picture hanger to hang on the wall.
Final Thoughts
That is all there is to it! Now you can sit back and enjoy your new beautiful wall arrows!
This DIY home decor came together so quickly, the longest part was waiting for the stain to dry!
My favorite feature of this project is that it is so easy to customize. You can easily make it bigger or smaller, and stain whatever color fits your style!
Where will you put yours? I think I want some in my living room now!
More Home Decor Ideas
Adam's nursery is finally finished! Here are some other projects I have completed for his room.

Hi, I'm Katie!
I'm so glad you're here. Want to make something fabulous? I'm here to help!
Crystal
I love it!! I would put it in my hallway. Thanks for sharing 🙂
Katie
Thank you Crystal! I think these would look awesome in a hallway!
Jessica @ Decor Adventures
These are great. I could see making all kinds of things for different rooms or seasons. Thanks for sharing!
Katie
Thank you Jessica! I know, would it be weird if I put them all over my house, lol!
Lindsey @ sisterstosons.com
I <3 this!! I have a wall that needs something and this just might be it. Thanks for sharing!
Katie
Thank you Lindsey! I would love to see how yours turn out if you make them!
Laurel (@abubblylife)
So cool! And congrats on the baby!
Ginger
Love this! So cool and pretty. I want this in my craft space. Thanks for the tutorial!
Katie
Thanks Ginger! These would be so cute in a craft space! You could paint them some fun colors! : ) Have a great day!
Lisa@ Creative Raisins
This is so amazing, it looks perfect above the crib. Newest FB Follower
Liz Fourez
I am OBSESSED with these arrows!! I want to make some for my house now! Awesome job, girl!
Amanda
I LOVE this! Thanks so much for sharing! My son has a camping theme room and I think this might look cool in there!
Mandy @ Sugar Bee Crafts
thanks for linking to Take-A-Look Tuesday over at Sugar Bee Crafts - you were featured today!
--Mandy, SugarBeeCrafts.com
Lisa at Mabey She Made It
Oh my goodness, these are adorable! I love the simplicity and how chic they are. I want to make them!
Stacy Risnemay
Darling! I love it 🙂 Off to pin!
Katie
I don't know how I missed your comment, but having you pin this.... I can go to bed happy ; ) I love everything you do!! Thanks for stopping by : )
Jessica @ The Junk Nest
I am already invisioning one of these in my bedroom! What a super awesome idea!
xoxoxo
Jessica
Katie
So glad you like it Jessica! Would love to see if you make some!
Chelsea
I already told you about my love for these arrows but I just had to tell you again. Love them so much, Katie. That dark walnut stain is perfect!
Katie
You're too sweet Chelsea! Thank you so much : )
Paulette
Love this Katie! So cool and pretty. I want this in my craft space. Thanks for the tutorial!
Johnnie Lanier
Love this! Pinning and making. xoxo
Katie
Thanks Johnnie! I had the idea in my head for so long and when I finally made them I couldn't believe I waited all that time, they are so easy!!
Anne
That looks so cool. I love the natural yet trendy feel to it.
Katie
Thank you, that is totally what I was hoping for too, that almost never happens for me!
Alexis @ Persia Lou
Okay. This is so cool! I love the way this turned out. Your nursery looks like it is really coming together. Definitely pinning this one ! 🙂
Katie
Thanks so much Alexis
Rebecca @ My Girlish Whims
Thanks so much for linking up to Your Whims Wednesday, I featured this on my blog tonday! Come stop by and grab a featured button!
Q @ JAQS
Hi - I featured your cool project!
Thanks for joining in the party :)!
Katie
Thank you so much! It's a pleasure to party with you!
Katie
Thanks so much!
Jenny
I've had this pinned for a while and just bought the stuff to make it. I'm confused on how I would use mending plates to hold all 4 pieces together for one arrow. Can you explain this please! Love the theme for your nursery. It turned out perfect!
Katie
Thank you : ) I used four total. One to hold the two top pieces together, one to hold the two bottom pieces together. Then I used two to connect the two separate halves. I will email you a picture so that makes more sense : ) You should have it in just a few minutes : )
Jeremy Bohnett
Could you email me a picture of the back of the arrows as well? Just want to see kind of mounting plates you used as well as where you put them. Thanks!
sheyenne
Me too please!
James
You should join then together using a kreg jig. I cut and sanded the pieces this evening using cedar and will join them with the pocket hole screws.
Kristin
love this project.... we are going to make them for a staircase wall.
Katie
Thank you so much!! I would love to see how it turns out : )
Kim
I know this is an older post but I too would love to see how you connected the back. I love these arrows and can't wait to try them out myself (but I am a serious beginner)! Thanks so much for the post.
Katie
Hey Kim, I will send you an email in just a few minutes, I'll have to go snap pic with my phone : )
Frida
I'm making this for my son's room. Please send it to me as well.
Thank you
Brad Grier
My wife saw this and has told me to make these for our preemie sons room. 🙂
Like the comment above, how is it connected to the wall? Can you send me a picture as well?
Also, if I don't have a Miter Saw. Any other recommendations on cutting these?
Thanks so much!
Katie
Hey Brad, So sorry for the delayed response. I just used one of the sawtooth picture hangers that you find on the backs of regular picture frames. They are less than a dollar at walmart. If you don't have a miter saw, you can always just draw a 45 degree line and use a circular saw... it just might not be as precise as the miter saw. They also have miter boxes that you can use with a hand saw. I just sent you an email of the back of the arrows : ) Let me know if you have any other questions! Have a great night!
Lila
Super cute idea.
Katie
Thanks Lila! : )
Triere Boyer
Hi! I am in the process of making these! I am obsessed with your idea- so cute! I too, am confused about the back. Could you send me an email with the back pictures as well? Thank you SO, SO much! You're amazing!
Katie
Hi! I just sent you an email with the picture! : ) Would love to see how yours turn out!
Amanda
I am curious where you got that size of mending plates. I can only find really long ones. Did you just cut them?
Crystal
I purchased the same burlap fabric to make the burlap crib skirt but now that I try to see the tutorial it says your site will be right back! Can you send me the tutorial if the link isn't working?
Cheers, Crystal
Carlton F Maxwell
Crazy cool thanks
Jamie
I LOVE these arrows! I want to make some (And I love wood work and would love to get into making things like you!) But I am also on a budget. Can you suggest another way to cut the wood? I don't have access to a table saw, or the funds at the moment.
Thank you!!
Crystal
Hello I am wondering approximately how much the cost of making your own arrows is? Everything included. Thanks. Their beautiful by th way!
Leticia
Hi Katie,
I just love your tutorial on DIY Wooden Arrows, they are awesome!!!
Thank you so much for sharing.
cadenaspe341
I am using stodoys instructions to make it and I do it already 🙂
Thornton
Thanks for sharing
Sofia Lam
Hi,
Thank you so mcuh for the great tutorial <3
This inspired me to update my room decor a bit before we are set free again haha. Here are some other awesome woodworking plans I'm checking out as well: http://bit.ly/woodprojectsfans I found really helpful for my wood projects.
Stay safe!
Sofia
Joseph
This is so nice, I love it.
Kristen
Love these!! How big is each arrow?
Yamini
I think this one is the easiest one "Wooden Arrow " and unique also . Thanks for sharing this one with us.
Alishka
Love this organic decorating Home decor stuff, this seems so perfect and amazing.
Girish Jha
Love this DIY Wooden Arrow Tutorial, this one seems super amazing. Super excited to try this unique wooden arrow tutorial , thanks for sharing this one with us.