

Create DIY ceramic coasters with a distressed look in just a few steps. An easy project that adds color and style to your home decor.
I love using small projects like this when I want to change things up without repainting a whole room.
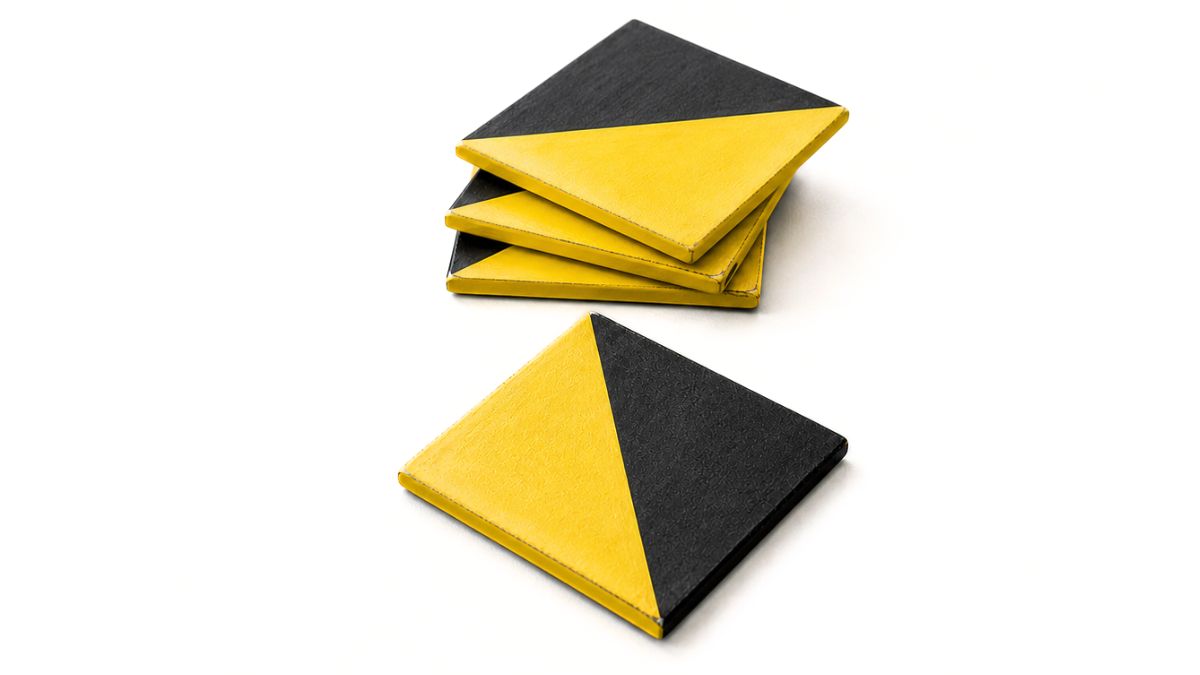
These ceramic tile coasters were a fun way to play with color for an afternoon, and they actually get used every day.
A friend handed me a stack of plain ceramic tiles and said I could probably make them cuter. Turns out, they were right. 😄
Skill Level: Beginner
Total Time: 30 minutes
Supply List
- Cheapo Coasters
- Spray Paint Primer
- Oil Rubbed Bronze Spray Paint
- Yellow and White Acrylic Paint
- Paint Brush or Foam Brush
- Painter's Tape
- Fine Grit Sandpaper
- Acrylic Sealer (optional)

You only need a few things to turn any coaster into something pretty! You can use any color combination you like, but I'll share how I made mine!
Instructions
Start by making sure your ceramic tiles are clean. Wipe them down with a little alcohol to remove any dust or residue so the paint sticks well.
Place the tiles on a protected surface and apply a light coat of primer. This helps the paint adhere better and gives you a smoother base.
Let the primer dry completely before moving on.
Next, spray each tile with the oil rubbed bronze paint.
Use light, even coats and allow each layer to dry before adding another if needed.
This color adds a subtle shimmer and creates a nice contrast with the top layers.

Once the spray paint is fully dry, tear off a piece of painter's tape and place it diagonally across the tile, lining it up from corner to corner.
Press the tape down firmly so the edges are sealed and the paint does not bleed underneath.
Mix your acrylic paint to get the color you want. I combined yellow and white to soften the brightness and create a more muted tone.
Use a paintbrush or foam brush to apply the paint to one side of the tile, covering the exposed section completely.
Before the paint dries, carefully remove the tape. This helps keep the line clean.
Set the tile aside and let it dry fully before moving on to the next step.
Once everything is dry, use fine-grit sandpaper to lightly distress the surface.
Focus on the edges and gently blend areas where the colors meet. This is what gives the coasters that worn, layered look.

For the final step, you can seal the coasters with an acrylic sealer for extra protection, especially if they will be used often.
A gloss finish will give them a slight shine, while a matte finish keeps them more subtle.
Final Thoughts
This DIY tile coaster project is one of those crafts that is simple but really satisfying.
You can make them in batches, try different color combinations, or even turn them into small pieces of artwork.
They are practical, easy to customize, and a fun way to use basic ceramic tiles from the store in a more creative way.

More DIY Coaster Ideas
Looking for more easy coaster tutorials? Here are a few ideas to try next.


Hi, I'm Katie!
I'm so glad you're here. Want to make something fabulous? I'm here to help!