

Guys! SPRING is here! I am so unbelievably giddy! When it's warm outside my kids get to run around like crazy and wear themselves down, it's great!! Every year when this fabulous weather rolls around we pretty much eat every meal outside. After being trapped indoors for the last 6 months there's no keepin' this family inside. We also like to invite people over in the summer to let their kids get worn down with our kids, maybe BBQ a little, maybe drink a little wine, ahhhh the joys of warm weather!
Today I'm going to share a tutorial with you so you can build this DIY Drink Dispenser Stand for your next gathering.

Let's be honest here. As a blogger I'm always looking for ways to stage things and have them look all professional and whatnot for each and every post, but we've talked about this right? My house is hardly ever clean and my life is completely and utterly disorganized. SO with that said, I had planned on photographing this little drink dispenser stand on my new outdoor table (yeah, that hasn't happened yet) with a cute summer tablecloth and food surrounding it placed in just the perfect place (didn't happen). Then I was going to have a fun little outdoor party with my kids. That didn't happen either.
What did happen is my daughter had the worst stomach virus I have ever had to take care of. She's was sick for 5 days, ended up in the emergency room and well... we won't even talk about the piles and piles of laundry waiting for me. I'll spare you all the icky details, but basically what I'm saying here is that I didn't have time for all the things I wanted to do. But, this doesn't stop me from building something.... just all the little extra details ; )

This Drink Dispenser Stand is sturdy way to get those glass jugs off the table so everyone can easily access the drinks!
Supplies:
1 - 1x12
1 - 1x2 @ 8 ft
Elmer's Wood Glue
Minwax Jacobean Wood Stain
Shellac
Natural Bristle Brush
Sander
Finish Nailer
Impact Driver
Kreg Jig
Cut List:
1x12 @ 22"
2 1x2's @ 23 ½"
4 1x2's @ 11 ¼"
4 1x2's @ 9.5" (legs)
How to Build a DIY Drink Dispenser Stand
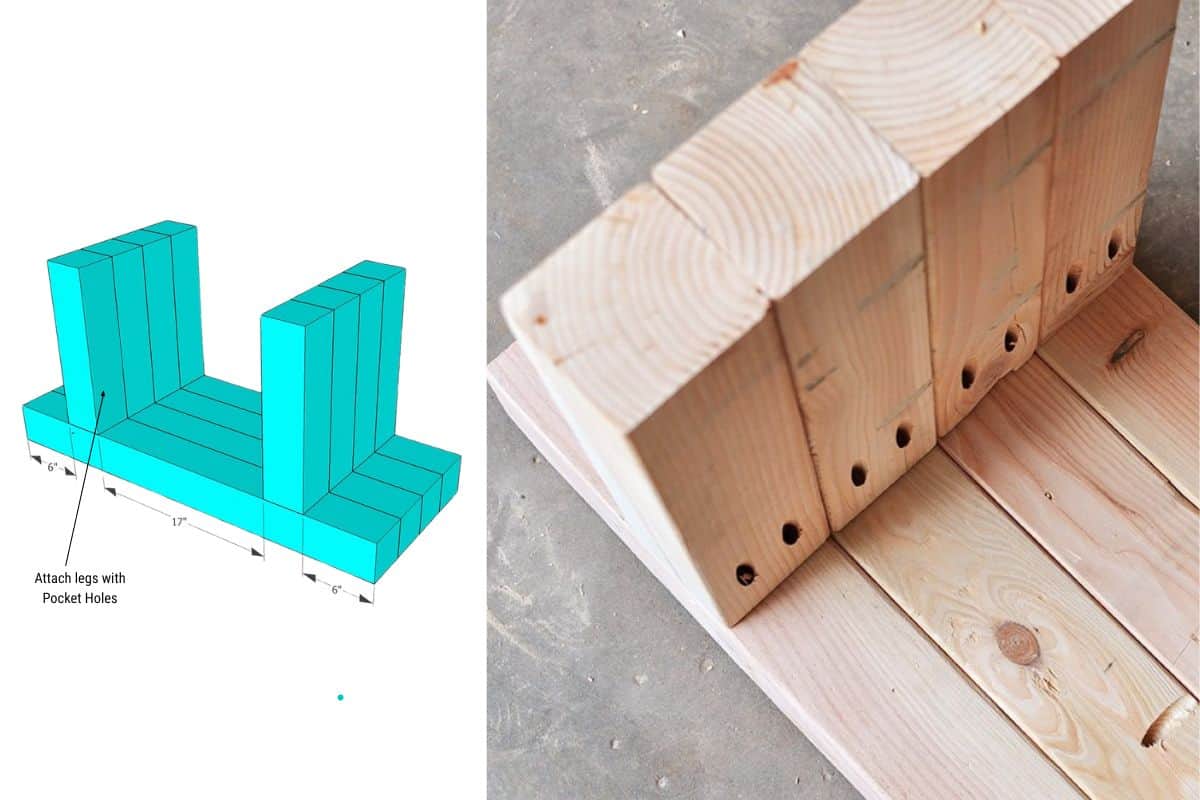
After you make all your cuts, the first thing you are going to do is attach the legs to your 1x12 using pocket holes and your Elmer's wood glue. I aligned the legs right on the corner of the 1x12. Don't skip out on the wood glue here. Since we are only using one screw the leg will swivel slightly, so once you get it attached make sure you have it all lined up so the glue dries properly.

When you are done, you will be left with this. It kinda looks like a mini side table ; )

Now we will add the trim around the front and sides. I attached my two side pieces first, then the ones along the front and back.

I left about a ⅜" lip around the top to make sure the jugs wouldn't slide off the edge. Using wood glue and your finish nailer, attach your trim pieces around the edges of the 1x12.

After you get the top trim all the way around, I added a second row of trim on the front and two sides. You can do the back if you want, but I ran out of wood and it's in the back so you will never see it right? I used a small scrap piece of 1x2 to get even spacing.

It's all put together and time to stain. I used one coat of Minwax Jacobean and wiped it off pretty quickly. Then I followed up with some shellac. You can use a poly if you prefer, but on little craft projects like this I like to use shellac purely because it dries so quickly. It's usually dry in less than 30 minutes.
Once that's dry you are ready to use your new Drink Dispenser Stand. I snagged these glass jug's from WalMart the other day for less than $15. They will be perfect for all our outdoor gatherings, birthday parties, etc.


Looking for more outdoor projects? Check out my DIY Outdoor Bench
Linda@MixedKreations
Your drink table turned out really nice. Great Idea, I know we could use one, we are always running out of space when we have cookouts, so a little table like this would come in really handy. It does look really sturdy with the extra trim added. I like the color of stain you used. I do like the darker stain, I use to like really light stain but as I've gotten older I prefer dark. Thanks for sharing your tutorial, it does look easy. Pinning, stumble, and google, that way I'll be sure to find it later. (-;
Katie
Thanks so much Linda! Yes, we are always running out of space too. People have to eat somewhere, lol! Hopefully this gives us some extra space and keeps people from pulling it to the edge to put their cups under it ; )
Cheryl
Love your idea!!
Katie
THanks Cheryl!