

This post is sponsored by Frigidaire and Lowe's. All opinions expressed are my own.
When we decided to have our Frigidaire Professional Appliances installed, we had a few things we wanted to change in our kitchen. I already shared with you how I altered our kitchen cabinet next to the stove and opened things up. I also took out some of our cabinets that were attached to the wall and built a walk around DIY kitchen island, therefore making it much easier to move around in the kitchen.

In the winter we use the back door in the kitchen to enter our house, but there is never a place to take off our shoes since the door would open straight into the cabinets. Now we can fully open the door and make room for everyone. The kitchen is also the room where everyone seems to congregate, so it's nice to have a place were people can gather around and eat snacks or serve meals!
Building an Island might sound a little scary, but it's not as hard as you might think! I'm going to walk you through the whole process. You just have to take it one step at a time!
Supplies:
- Circular Saw
- Kreg Rip Cut
- Miter Saw
- Kreg Jig
- Pocket Hole Screws
- Clamps
- Drill and/or Impact Driver
- Sander
- Finish Nailer
- Wood Filler
- Painting Supplies
Lumber Shopping List:
- (2) 4'x8'sheet ¾" Plywood (ripped down)
- (1) 1x4x6
- (5) 1x2x6
- (1) 4'x8' sheet ¼" Plywood (ripped down)
- (1) 4x4 (make sure it's untreated)
- (2) 2x3x8
- (1) 2'x4' sheet of ½" plywood (ripped down)
- Cut List: (I recommend cutting as you go to ensure a square project)
- Cabinet Base (¾" plywood)
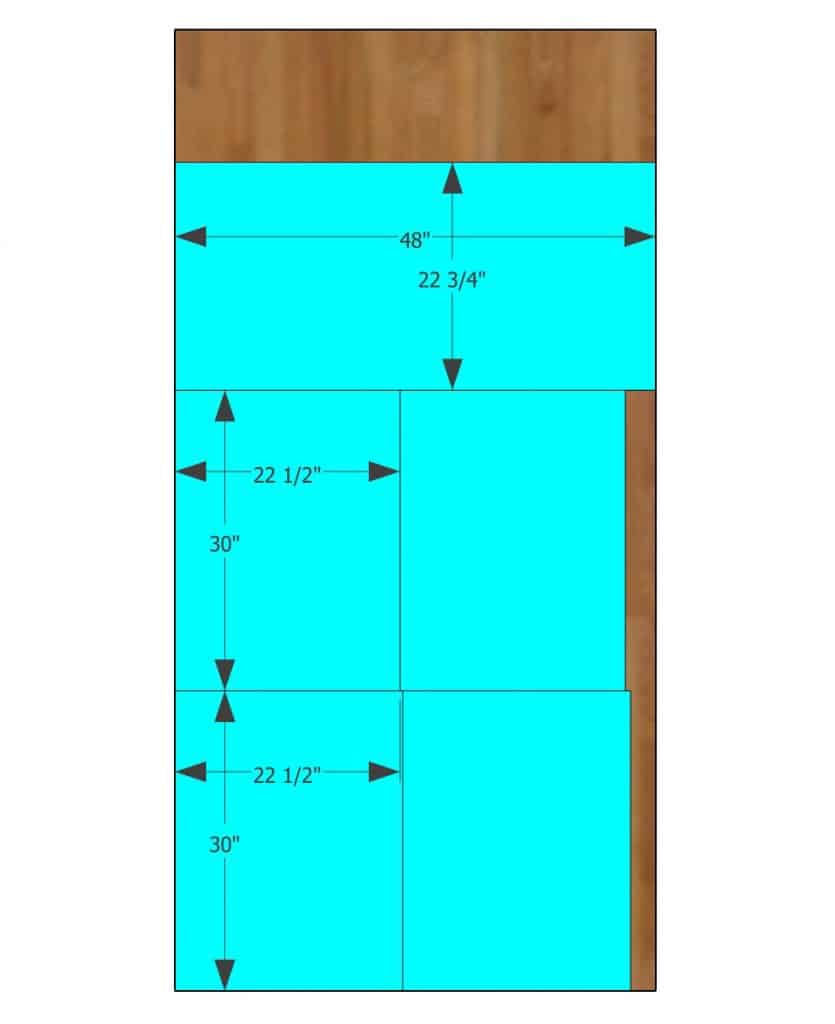
- Shelves and Drawer Boxes (¾" Plywood):
- (2) 1x4's @ 15 ¾"
- (1) 1x4 @ 13 ½"
- (4) 1x2's @ 22 ½"
- (2) 1x2's @ 48 ½"
- (4) 1x2's @ 27 ¾"
- (3) 1x2's @ 13 ½"
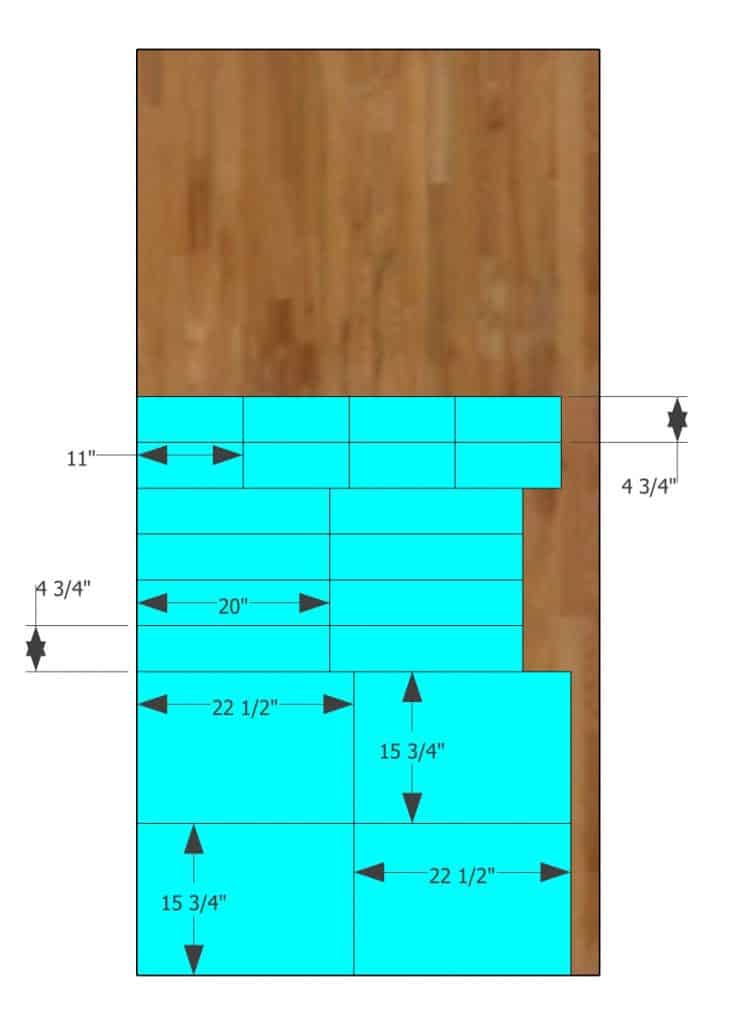
- (1) ¼" sheet of plywood @ 46 ½" x 30"
- (4) ¼" strips @ 2 ½" x 22 ¾"
- (6) ¼" strips @ 2 ½" x 25 ¾"
- (2) ¼" strips @ 2 ½" x 48 ½"
- (2) ½" plywood @ 15" x 28 ¼" (doors)
- (4) ¼" strips @ 2 ½" x 23 ¼"
- (4) ¼" strips @ 2 ½" x 15"
- (2) 2x3's @ 40"
- (4) 4x4's @ 3 ½"
- (2) 2x3's @ 14 ¼"
- (4) ½" plywood @ cut to size for the drawer faces with a minimum of ¼" extra around the perimeter of the opening.
Notes:
The majority of this island is put together with pocket holes to which I will refer to as "PH" in the plans below. I used my Kreg Jig to create these pocket holes along with the appropriate size Kreg pocket hole screws.
Before we get started I want to mention that I think it's best to make cuts as you go. Sometimes you might get off a 1/16", and it will throw off the rest of your cuts. That's just a tip of mine. If you cut with awesome precision then you might be able to make all your cuts first, but I'm not that good!
How to Build a DIY Kitchen Island
First, make the cuts for the island's box.

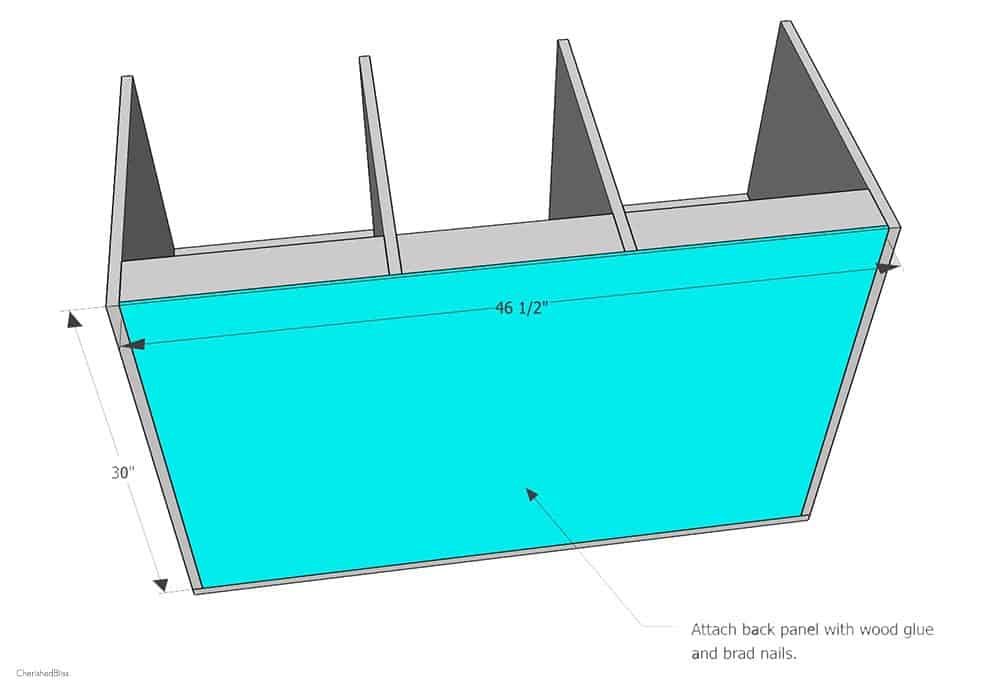
Then I moved on to the dividers which will hold the drawers. For this step I made sure my pocket holes were facing towards each other on the inside. That way I don't see them since the drawers fill that space. Also the dividers are ¼" shorter from from to back that the sides of the island. This leaves a recessed space where I placed the back panel. See image below. It doesn't matter what side the recess is on, but once it's in place, that needs to remain the back side.

Once I had my dividers in place I attached the braces in the back to insure that the dividers didn't bow or break off.

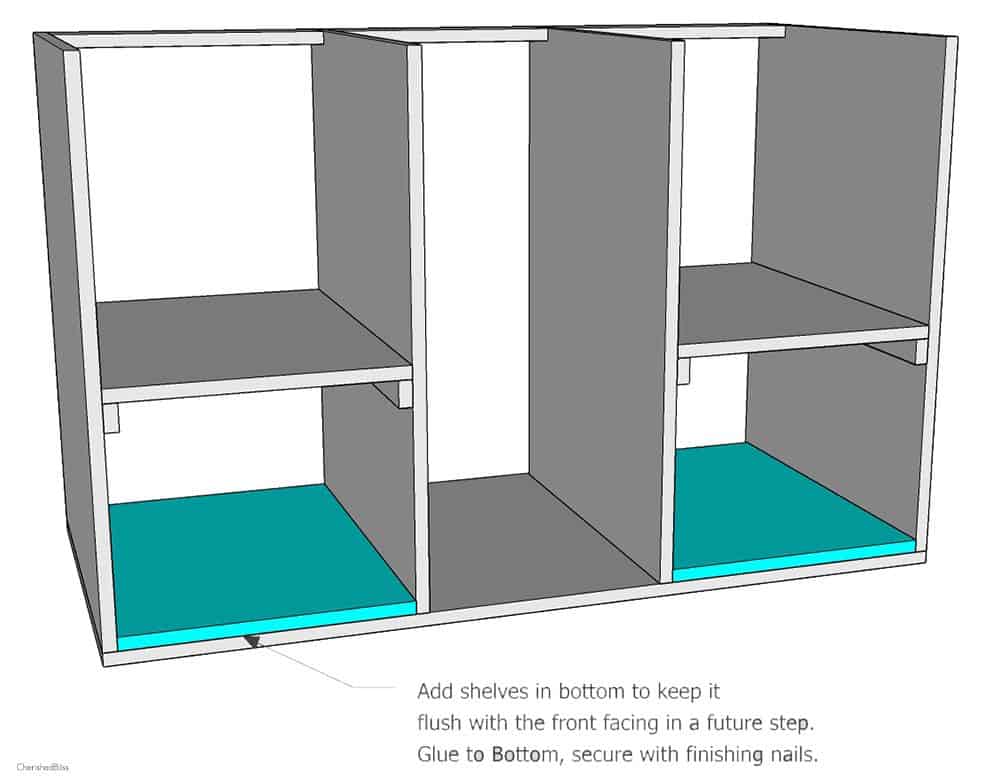
Adding Shelves
Next up I added the shelf brackets with my nail gun and wood glue. I didn't permanently attach the shelves just in case I ever wanted to remove them.

Because I wanted to have the bottom of the cabinet flush with the face framing, I added another shelf in the bottom of each cabinet space. Just a little note, before I completed this step it would have been easier to install the leg frame here, but I actually changed up some of my ideas mid way so it didn't work out for me, but it could for you! That way the screws could be hidden by the extra shelf rather than countersinking and using wood filler.
Back Panel
I added my back panel in. Then I decided to recess this to avoid all the extra unfinished edges on the sides of the DIY Kitchen island. Next I nailed into the braces on the back, around the sides and bottom, and then on the vertical drawer dividers and the actual shelf brackets.
Decorative Moldings
I attached the side trim first using wood glue and brad nails. This is definitely important to cut to size because I wanted it to be flush with all sides. I repeated the same process on the opposite side.
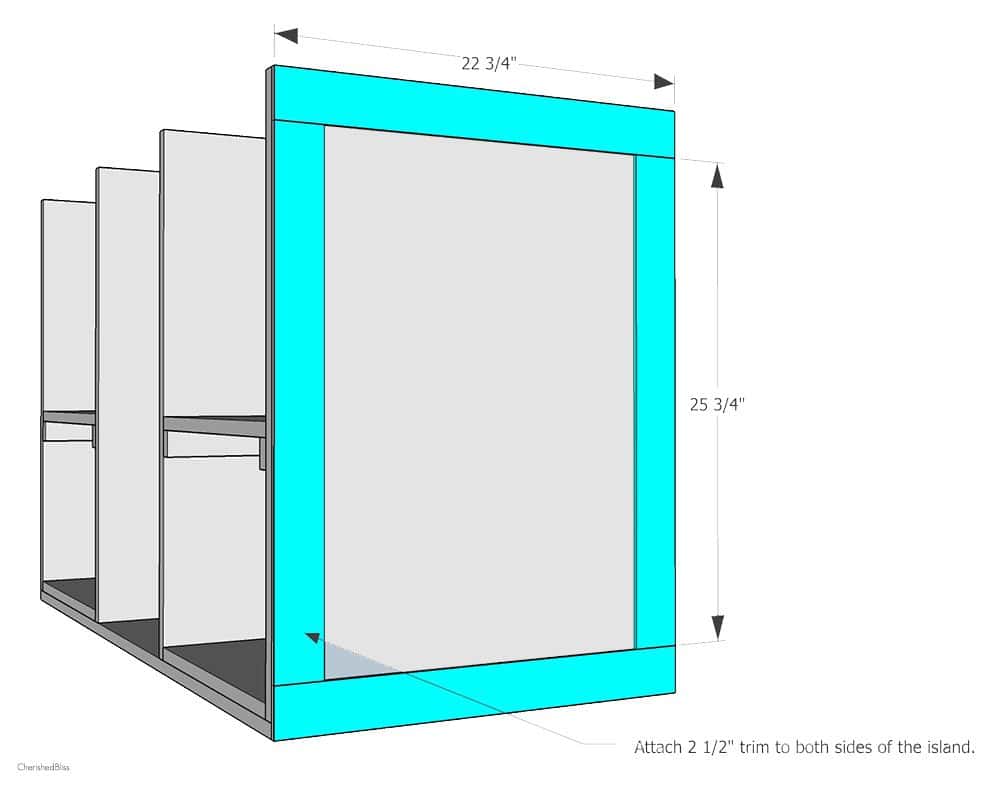
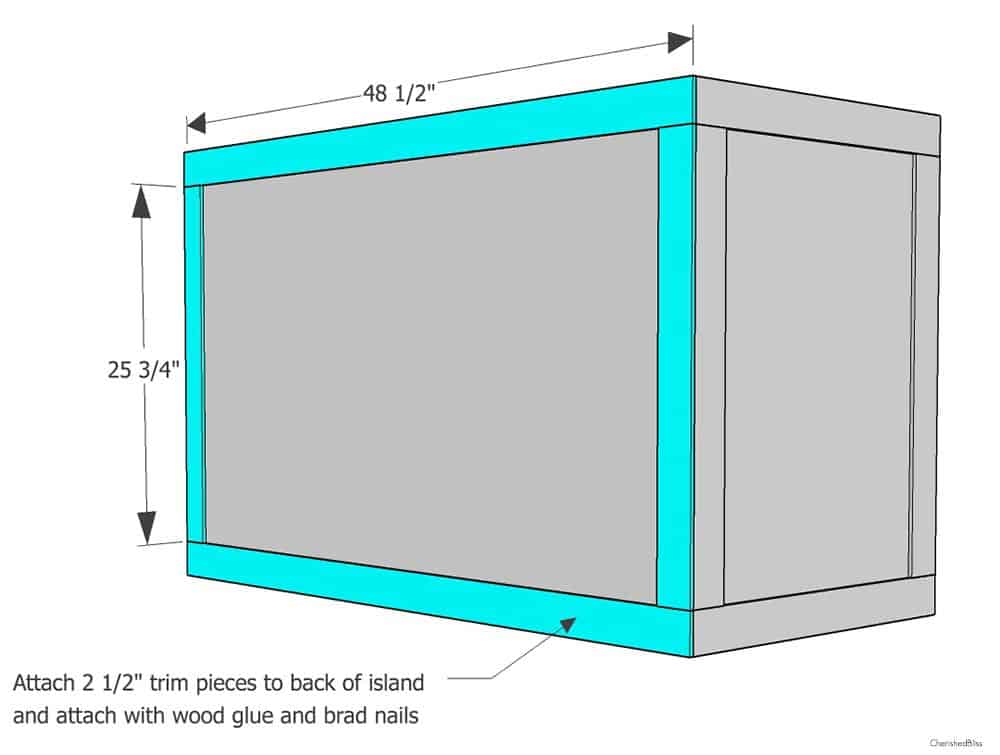
Then I added the trim to the back. I made sure to fill all spaces and gaps with wood filler and sand flush.
Face Framing
I built my face frame separately to make sure it was sturdy when attaching it to the cabinet. Next, I attached all pieces with PH's and wood glue. Since these are 1x2's I had a little bit of a hard time not splitting the wood. With pocket holes it needs to have two on the ends so that it doesn't just twist, but that was the cause of splitting the wood. So what I did was put the pocket holes on opposite sides so one on the top part of the 1x2, and on the other side it went on the bottom part so that it wasn't able to pivot. I also used wood glue to help it set. When building this facing I was constantly checking the measurements to keep it all flush. It's always better to measure 3 times and cut once!

Once I built my face frame, I attached it to the front of the cabinet base with wood glue and brad nails.

Base Support
Next I build the leg frame. I built this separately so again, I made sure I had all my measurements correct before making the cuts. I built the frame with pocket holes on the back side of the 2x3's. When attaching I countersunk screws from the bottom shelf of the cabinet base straight in to the 4x4's. But it is an option to complete this step before installing those extra shelves in the bottom.

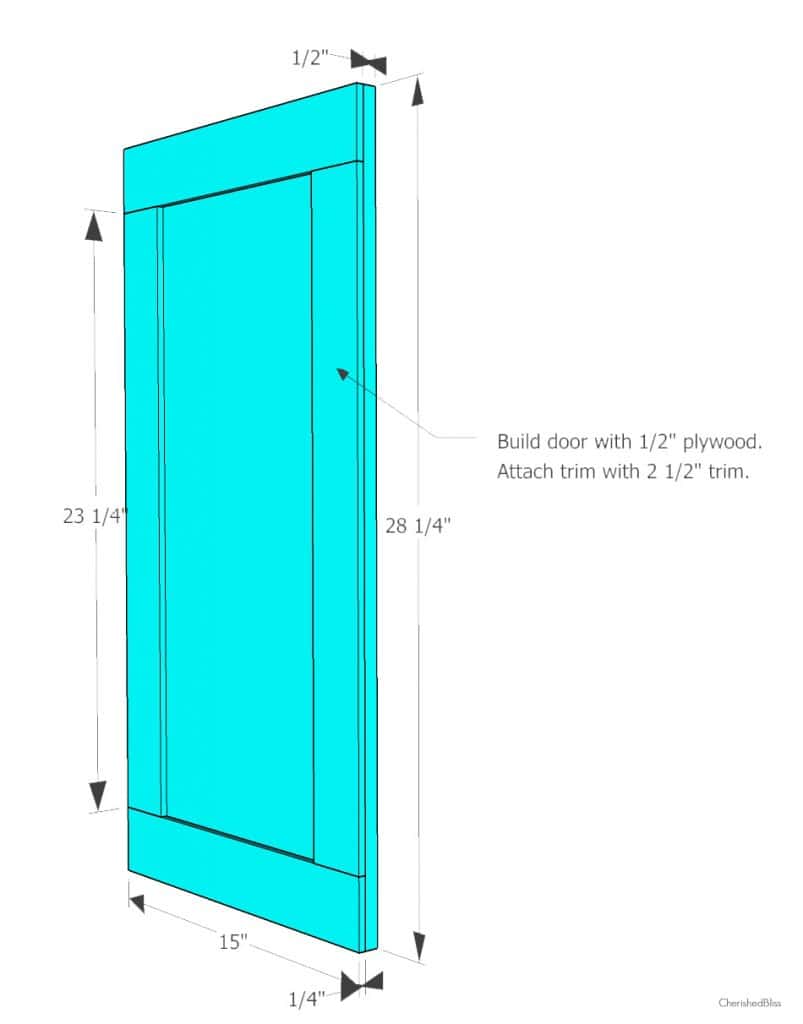
Doors
I used the doors from our previous cabinet, but they are easy to build if necessary. I actually had to build the one on my new cabinet by the stove. It's just made with ½" plywood and then using the ¼" trim pieces to obtain the shaker style.
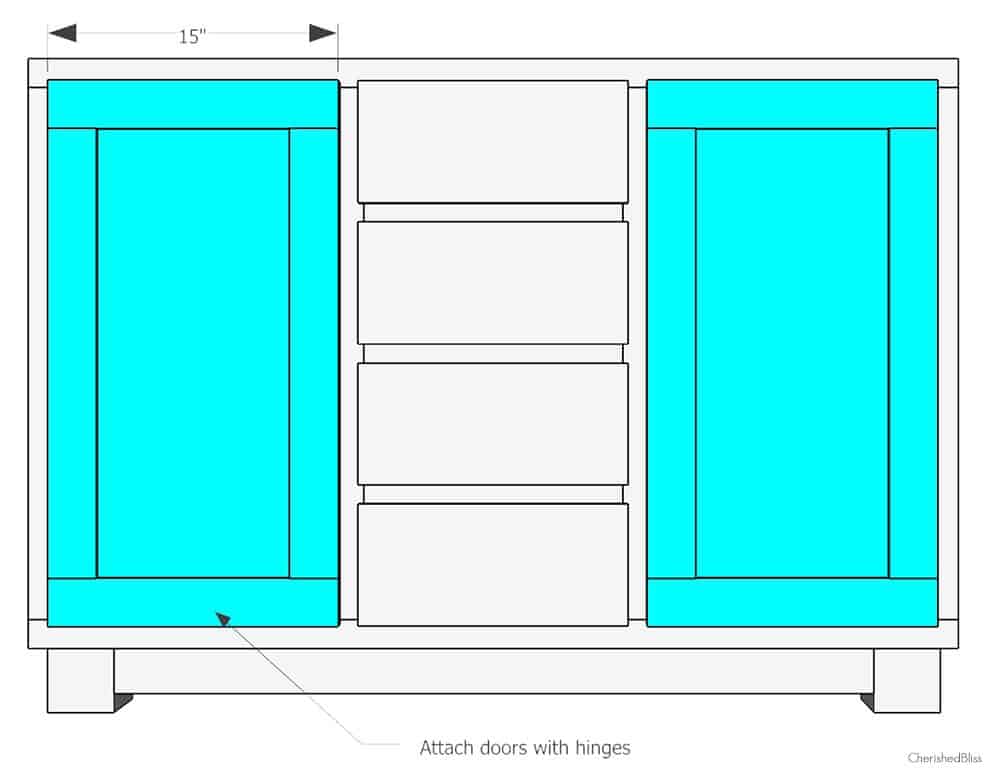
Attach your doors with hinges.
Installing Drawers
Next I built the drawer boxes. I basically followed this tutorial from Ana White, except I did not leave a space for the drawer face. I wanted my drawer face to be in front of the facing of the cabinet to match the rest of my kitchen. The I attached my drawer faces to the drawer boxes, once they were installed in the DIY Kitchen Island to make sure nothing was crooked. Drawers are probably the hardest part because the measurements do need to be pretty exact. I especially recommend cutting as you go here. No matter how much I squared the island along the way, nothing about the drawers turned out perfect. It's an art that gets better with practice. By the time I installed my 4th drawer I had it down! Practice makes perfect!

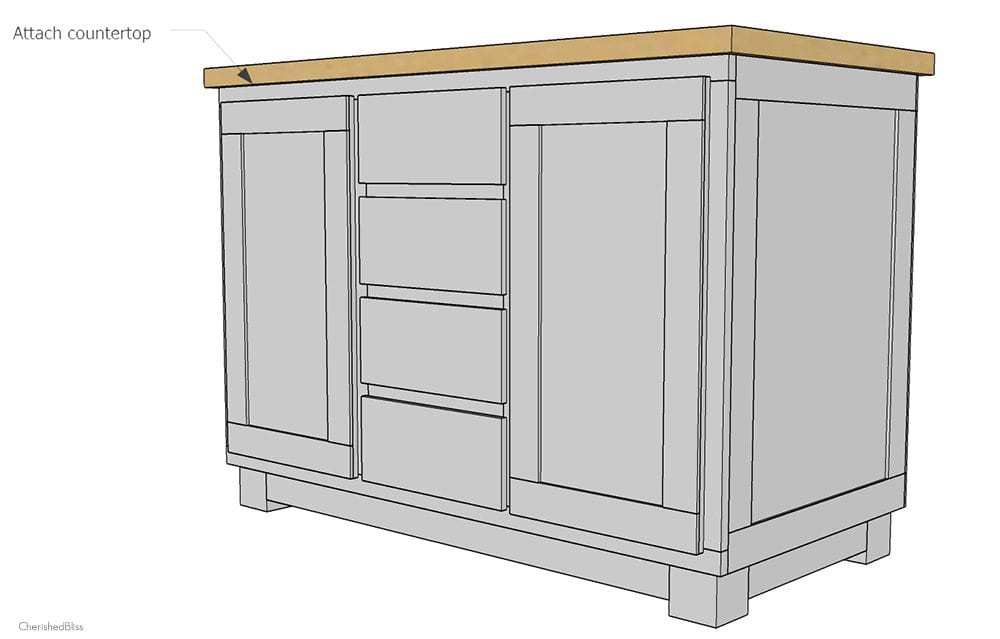
Countertops
Now all that's left is to install the countertop. We used the butcher block we had on our previous cabinets.
We love everything about this DIY Kitchen island! It's great storage and we love having a place to stand around.
DIY Kitchen Island

Be sure and check out my other kitchen renovation posts, and leave me any questions in the comments!
How to Alter Kitchen Cabinets
DIY Shaker Style Cabinets
How to Paint Kitchen Cabinets
Industrial Farmhouse Kitchen Reveal
Kelly
It turned out AWESOME! Woo Hoo.
Meegan
Your kitchen looks amazing. The island is the perfect add
Lucy Akins
Holy wow...it looks amazing...thank you so much for the detailed plans...those are really helpful.
Valerie | From Valerie's Kitchen
You are such a rock star to build that yourself! It looks fabulous!
Lu
I love the kitchen island. I would love to build this for my craft room. Do you have the plans in a PDF file? I could not find the plans. Thanks for sharing. Blessings.
Amy Anderson
This is GORGEOUS! I am so impressed. I want to make immediately.
Darla Acton
I would like for my son to build this for me in Woods class at school. Is there a PDF version of the plans? Thanks Darla Acton
Taylor
@The Average Dan, thank you for your photos!! 🙂
Katie
Hey Dan! Thanks so much for sharing the pictures with me! It makes me so happy to see what others create with the plans! Love the changes you made, genius way to hide the trash can, and that drop leaf creates so much more space! I LOVE it! Happy Building!
kathy
Dan..tnx for the pics..it helped me understand a little more what was going on.. You did a pretty good job with the plans but never having built anything before the pics & close ups would have been more informative for me
Kely
How much did you spend on the materials? Thank you!
Katie
Hi Kely, I'm not entirely sure. I bought the materials with this along with a bunch of other items. If I had to guess I would say around $150 ish depending on what you already have on hand.
Madison
Wow! This came out great! I always wanted a kitchen island, and since we're moving, we'll probably have enough space for one! Thanks for another great blog post!
LJ
What did you do so the drawers would slide out ?
Alissa
What was the size of the butcher block top you put on? Curious how much overhang there is on all sides and what size top to order. Thanks! Looks great!
Kelsey
I'm looking at building a island for our house. Just out of curiosity, how much did this cost you? I would love this if I was in my budget.
Katie
Hi Kelsey, I'm not completely sure. I had quite a bit on hand. Probably $150ish for the lumber, plus all the hardware/screws, drawer slides and paint. Maybe around $200-$250 total depending on the hardware you choose and what you might already have on hand. That's my best guess. Sorry I don't have a more definitive answer! 🙁 But if you have any more questions please let me know!
Neal
Hi Katie, well done. What I found incomplete is the draws and doors. Theirs no mention of the type of hinges for example, they are overlay hinges but how much overlay?
The draws, are their draw guides? I wouldn't want a small child to pull a draw out and have it land on them ya know. Like I said, great job, but missing some component information an average DIYer would need.
chicken legs
Hey, you used to write magnificent, but the last several posts have
been kinda boring... I miss your tremendous writings. Past several posts
are just a little out of track! come on!
Kelly
Hi is there a printable link??
Kelly
Hi I printed this out. The cut diagram for the plywood doesn’t seem to match the list. And I’m not sure where the 11”x4 3/4” pieces come in??
Would like to get this project started so any insight would help! Thank you!!
Kelly
Hi did you build this?? Some cuts on the diagram seem to be extra or some missing. Any help would be appreciated!
Andrew Thill
How heavy of a countertop can this island support?
Katie
I'm not sure of the exact weight limit, however I don't see why it wouldn't be able to support any standard countertop.
Frenchie
When we decided to have our Frigidaire Professional Appliances installed, we had a few things we wanted to change in our kitchen. I already shared with you how I altered our kitchen cabinet next to the stove and opened things up. I also took out some of our cabinets that were attached to the wall and built a walk around DIY kitchen island, therefore making it much easier to move around in the kitchen.
Grant
Thank you for sharing the plans!
What's the size of your butcher block countertop?
I see some common butcher block countertops come in 4' width, but that would be a hair too narrow for your island, right?
Thanks again!
Chase
Really helpful post and I want to try it in my kitchen as I’m planning to do some renovations. Did you secure the island with the floor or the weight of the island will just hold it in a permanent position? Thanks.
Andy
Is there a way to modify this plan for a smaller kitchen? I'd love to build an island but don't have a lot of space
Allie
I absolutely love this DIY kitchen island idea! The step-by-step instructions are super easy to follow, and I can't wait to try it out in my own kitchen. Thanks for sharing such a beautiful and practical project!