

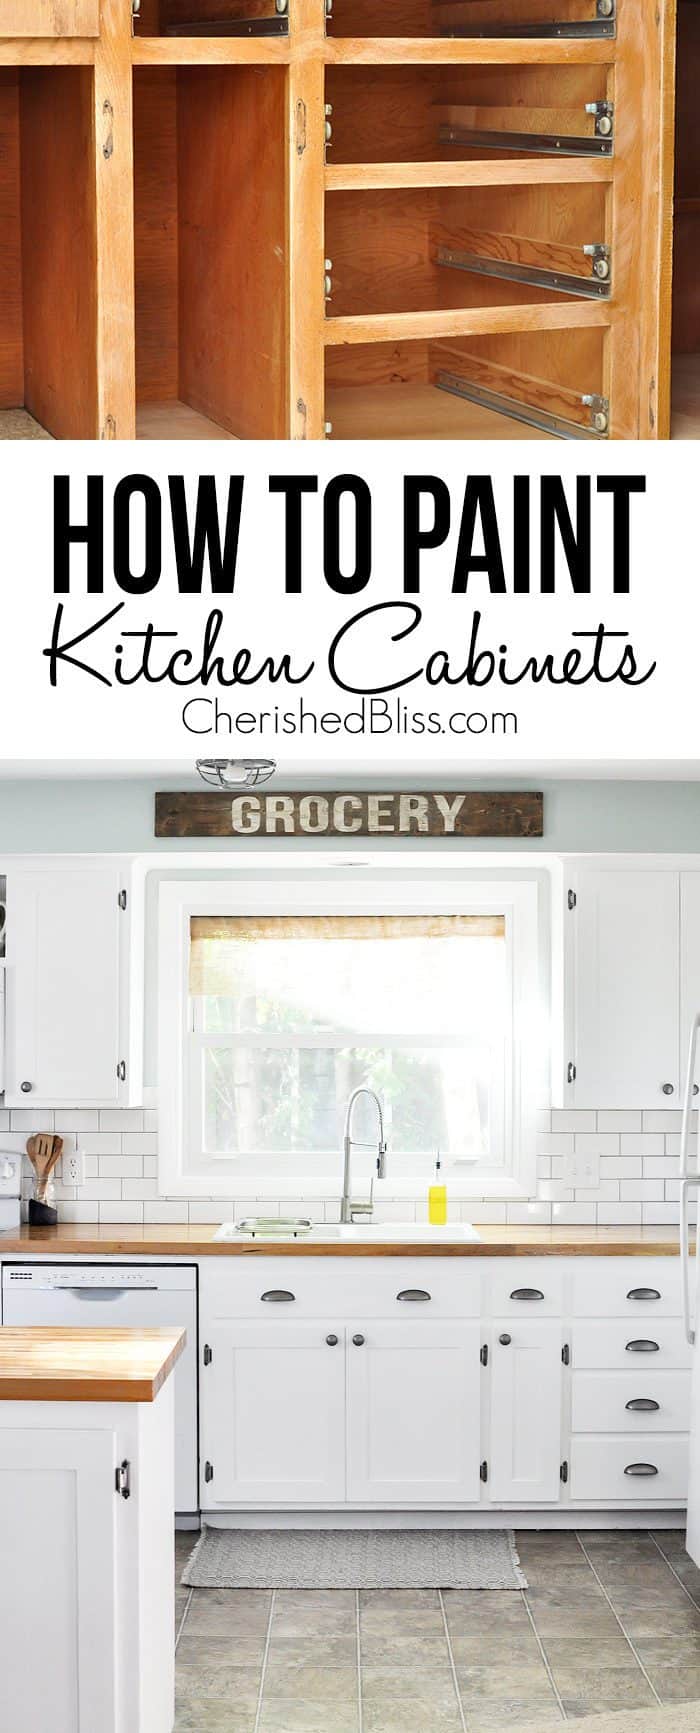
This kitchen remodel has been my biggest undertaking yet, and definitely the most fun! When we were looking to buy this house I knew without a doubt something had to be done with the kitchen. On the bright side the cabinets are solid oak and were in overall great condition, but they were coated, and I mean coated in grease. This house was a foreclosure, but I'm pretty sure that whoever lived here before us fried food in the kitchen daily. I bleached it twice, but it just need to be completely redone. Since I was starting off with flat doors, I had to turn them into shaker style cabinets somehow. I have always loved Shaker Style Cabinets.
UPDATE: See my latest kitchen renovations HERE.

After lots of research and planning - I created a plan. I briefly considered making completely new doors, but as you might expect, that can cost quite a bit. What I ended up doing is transforming my flat doors into shaker style cabinets by simply adding trim to the doors. I was shocked how easy this came together. It is time consuming, but not difficult... I promise. This might get a little lengthy, so let's jump right in shall we. You will need some supplies. It took me about 100 trips to the hardware store, so maybe I can help you reduce that number a little! ; )
This tutorial will be for how I actually transformed the doors into shaker style cabinets. I will be sharing with you my process for painting kitchen cabinets and doors tomorrow.
Shaker Style Cabinets Supplies: (This post contains affiliate links)
- 1 or 2 sheets of 4x8 ¼" plywood ripped down into 2.5" strips
- Miter Saw
- Nail Gun
- Orbital Sander
- Detail Sander
- Wood Filler
- Putty Knife
DIY Shaker Style Cabinets from Flat Doors
DISCLAIMER: I am a DIYer, not a professional carpenter. This is a budget friendly solution I found to transform my kitchen without breaking the bank. These doors are NOT perfect, but you would have to look pretty hard to find a problem with them. I very often notice my mistakes, and when I'm in my kitchen, I see nothing I regret. Please use this as a guide and as suggestions. Use all tools with caution! I am not responsible for any errors you might encounter when using this tutorial as a guide.
To get started you will first need to remove all the doors and hardware from your cabinet bases, clean them with a pretty strong cleaner, and sand them down. I started with 80 grit sand paper, then 150, and finished it with 220 grit sandpaper using my Ryobi Orbital Sander. Like I mentioned my cabinets are oak. I'm not personally a fan of the wide grain in oak, so I was trying to smooth it out as much as possible. Be sure to wipe it clean and so that there is no dust left on the doors.

Once they are all sanded it's time to work on the trim (plywood strips). The super nice people at the hardware store ripped down my plywood for me. This saved me tons and tons of time and most likely lots of frustration. I measured all my doors and decided on going with a trim width of 2.5" and I'm very happy with that size. So once you have this done you will leave with lots of 8' strips of plywood. Measure each of your doors individually before cutting your trim to the size of your door. I like to go with the whole measure twice cut once theory! ; )

I did full length strips vertically first, and then filled in the tops and bottoms between those two strips. Be sure to take this under consideration when you are measuring for your horizontal strips. My doors have a slightly rounded edge, so I measured right were the rounding started, this does leave a small lip on the outside of all my trim.
When you have your pieces cut you will notice that the inside of the plywood isn't solid wood. I took all my pieces, stood them on their sides and sanded that part down as much as I could with the 220 grit sandpaper. It won't be perfect, but when you apply the primer and paint, it will fill that in petty well.

Once you have your pieces cut and the edges sanded, using your Ryobi Airstrike Nailer, nail each trim peace onto the door starting with your two vertical pieces, and then your horizontal pieces. Nail in the center first, then move to the ends.

As soon as you have all your doors build it's time to get out the wood filler. Become friends with this stuff. You will be using it A LOT! Fill in all the spaces between the trim pieces and the nail holes in the trim. If you have any deep scratches or holes in your doors, now is a good time to repair those as well. Following the directions on your container let dry, and sand with 220 grit sandpaper until smooth.

I chose not to caulk the inside and outside edges of the trim. There weren't any gaps between the trim and door, so I skipped it. It worked out well for me, but if you're a super perfectionist, you might want to caulk here. I did take my detail sander and sand the edges of the plywood again in any spots where it looked a little rough. It is soft on the inside and I wanted it to be as smooth as possible. Again, caulk if you want, but the primer and paint did a great job of hiding it for me.

You will get the hang of where to sand once you get in the rhythm of building these doors.
Make sure you have all your holes filled/sanded and the doors wiped down free of any dust.... then it's time to move on to painting the doors.
I will be sharing how I painted my Shaker Style cabinets and doors tomorrow, so be sure to stop back by for my tips on that!

FAQ
- What type of plywood did you use?
I used ¼" oak plywood. I went with oak because that is what my cabinets are. I personally prefer something with less of a grain. It will depend on your cabinets for what you should by.
- How did you line up the trim pieces?
To be honest, I measured as best I could, but I did have to do a lot of extra cutting. I always leaned to the longer side so I could just trim it off if need be. Trying to find an exact measurement on rounded corners is a little hard. I did one door at a time. There was no way to set up an assembly line without making tons of errors.
- Why didn't you glue your trim down?
You can glue it down as well as nailing it, but I'm a firm believer in nails so I wouldn't skip out on those. I didn't do the glue because I just felt it was an unnecessary expense. The plywood is extremely light and I didn't think it needed it. I'm no expert, so feel free to glue away if you want : )
- How long did it take you to build the doors?
I wish I could tell you. I planned on building all the doors in one weekend, but come to find out... kids are very good at distracting you and needing your attention. I also did lots of stuff in different phases so I could take pictures for you guys. I did all my lower cabinets first and painted them before building my top ones. Sometimes a blogger's life isn't all it's cracked up to be ; ) I also had a walking 1 year old so I couldn't just leave my bottom doors off while I finished up all the top ones. With that said, I can't really answer this question. It is definitely time consuming.... I would plan for several FULL days of working. If you can work from morning til night and you are familiar with the process of building, you could probably do it in one day depending on the size of your kitchen.
Where did you get those awesome countertops?
You can read all about my countertops here.
Still have questions? Leave them below and I will do my best to answer any questions you might have.
Looking for more Kitchen Tutorials?

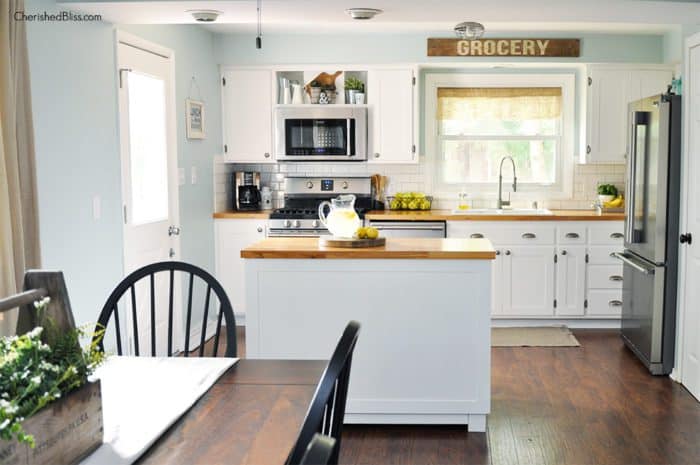
Want to see our kitchen progress? You can check out our full journey here!
Kelli Philpot
I'm still so impressed with your kitchen. You did a fabulous job!
Katie
Thank you so MUCH Kelli!!!
Melinda
I did this in my kitchen!! The doors were the same as YOURS!! Let me know if you want to see the before and afters! I shared your site with my friends! They LOVE IT!!!
Marie@The Interior Frugalista
What a difference to the cabinetry, so worth the effort rather than the $$$ alternative of replacing them!
Katie
Thanks Marie! We are loving them so far!
Tanya
I love your kitchen!! I cannot wait to do something like this with our cabinets, yours look AMAZING!!
xoxo,
Tanya
Katie
Thank you SO much Tanya! xoxox
Crystal
Shaker style is my favorite!!! When we remodeled our kitchen several years back, I couldn't afford shaker which was sad. My cabinets are nice, but not my favorite. Love your cabinets & hardware 🙂
Katie
Thanks Crystal! I think next time I just want to install new ones, lol. It took me so long since I had to work in 30 minute increments with my kiddos calling me name all the time ; )
Megan
Love your kitchen transformation! I have been planning on doing this same project the year but have not had time to complete it. Thanks for the great tutorial, makes me want to start the project right now!
Lauren @ Bless'er House
Wow! I cannot even believe where these cabinets started! You are a magician. Awesome tutorial! I definitely can't wait to tackle my own cabinets.
Katie
Thank you SO much Lauren! It was a lot of work, but SO worth it!!
Katie
Thank you SO much Lauren! It was a lot of work, but SO worth it!!
Katie
Thanks Megan! It's lots of work, but so worth it in the end!
Sharon B.
What a great transformation! Looks so updated and fresh now! Glad I saw this over at Tatertots and Jello's link party!
Katie
Thanks Sharon!! : ) So glad you stopped by!
Chloe J
Hi there! Love the transformation -- just curious, did you just do the doors or did you do something with the insides of the cabinets as well? What do they look like when they are opened?
Katie
Thanks so much Chloe! I painted the bases and the insides of the cabinets as well, so when they are opened everything is white... well except for my mess of dishes ; ) Have a great night!
Kylie
I have similar cabinets that I want to change up and your tutorial is exactly what I was looking for. I had a question about the drawers - did you trim them out or leave them flat? Most of my bottom cabinetry is drawers so I was trying to decide what to do.
Katie
Hi Kylie! Sorry for the late response. I've gotten so behind lately! I actually left mine flat because I don't have very many and the ones I do have are pretty small. If I had larger drawers I probably would have trimmed them out as well. If it takes up the majority of your lower cabinets I'd probably go for it ; ) You can always make your trim a little less wide if you nee to. Let me know if you have any other questions!
Megan
Your tutorial is amazing! I have the same type cabinets with the rounded edges. You mentioned that in the tutorial but I was wondering if you filled in the gap between the door and the new trim? Thanks for the inspiration to redo my own 🙂
Rachel Harwood
I am interested in this as well. Have the rounded edge cabinet and would LOVE to do this. Has anybody tried?
Jenny
I realize this was posted quite a long time ago and the OP, followers or blogger may not see this, but I am interested in the answer to this question or to seeing pictures of what the inside of that external edge looks like when you open the door. Would wood filler work for that? I know you said yours are slightly rounded, mine are noticeably rounded. I don’t want to end up ruining my cabinets.TIA
Nora
I LOVE YOU! I have these exact same doors and have been playing around with the idea of doing this exact same process with them for years. I was worried that they would not look good enough. Now I am totally inspired and have decided to go ahead with it. Thank you so much for all your wonderful information. I know I will be using your blog a ton to help me with this project. Thanks so much!!!
Ted
I'm currently planning renovations in the kitchen at our home away from home. These are stunning and will certainly be part of the project.
Thanks!
Kathy
Can u tell me if you primed and painted the inside of your boxes? Looks like you did from your prep/sanding photos. Is that something you regret either way?
Katie
Hi Kathy, I did prime and paint the inside and I'm very happy I did! The inside of ours was not pretty at all. I just lined the bottom of the shelves with a removable shelf liner to keep them from getting scuffed and it's been great so far!
Petronella Blankenbehler
Which pulls did you use for the cabinets?
Natalie
Did you have to buy new hinges since the cabinets were thicker after adding the trim?
Katie
Hi Natalie, I did replace the hinges, but only because mine where hideously ugly and very old... but with most hinges you aren't actually hanging it from the front so adding that small amount of width to the front won't affect anything. Hope that helps! Thanks for stopping by!
Sarah
About how much did this cost you? I know our kitchens are not the same size or can probably be compared but would love some idea for our tiny kitchen!
Katie
I had to buy I believe 2 sheets of plywood in order to get all of the trim around the doors, and when I did this I had doors on both sides of my island (so a lot of doors), which was around $50, plus paint was probably another $50. I'd say you could add the trim, paint, and get all the little supplies you need for less than $200. It's hard to say though cause I had all the tools on hand already so if you don't have wood glue, the nail gun, etc, it might run you a little more. But it's still a very affordable option to other Kitchen cabinet options ; )
Desurae
Hi! We are currently doing this exact tutorial on our cabinets. I'm wondering if after time the plywood ever seemed to peel or flake up around the edges? We are sanding everything as smooth as we can get but the nature of the plywood is to peel so it has me worried! Wondering how they held up over the years 🙂 thanks! And thanks for making this tutorial for us to follow!
Printable Calendar 2019
Can u tell me if you primed and painted the inside of your boxes? Looks like you did from your prep/sanding photos. Is that something you regret either way?
John Reagan
i stumbled upon this site as I'll be doing the same to sell my home. I'm opting to use 1 1/2" MDF (medium density fiberboard) lath from Home depot. It's 1/4" thick and is pre-primed with a very paintable surface. it glues and nails well and is pretty inexpensive. It will save a fortune and many hours of filling and sanding as well. The only thing I'm concerned about. are very small drawers. I have a couple that are 4" x 8" and that lath will pretty much take up the complete face. Oh yeah. Another thing. Buy your handles from Amazon. You can buy bulk packs (25 ea) for about 30% of the cost of the same stainless cup style or barrel style handles from your local retailer.Same is true of self-closing stainless hinges. What I'll pay for $150 worth of hardward from amazon would cost me over $450 locally.
Heather
I'm planning to do this, too. How did the MDF work out for you?
Christina Armstrong
I love this! We are in the process of buying a home built in 1934 and we are redoing the kitchen. Same flat doors with rounded edges except ours look like they have about 10 coats of paint on them! I love the character of the home and really didn't want to get rid of the cabinets because they are solid and will probably outlast all of us. So I was searching on how to change them and came across this blog!
I will be trying this for sure!
FYI, in our home we are presently renting, I updated our kitchen with some inexpensive changes. I found these sites and will always go here first for all my hardware, knobs and pulls. I get them from either 99 cent knobs or knob deals. I found my $4 (each at Home Depot) cabinet pulls for $1.50 each (same manufacturer and item number!). Well worth it!
Thanks for posting this!
Katie
Love your kitchen redo! Just wondering why you didn't do the trim on the drawers? Don't the cabinets doors stick out farther than the drawers then?
Robin Truett
That is my question too. No one ever talks about the draws.
Nate
It looks beautiful! I have been thinking about updating my cabinets for a long time.
Heather
I'm finding this post late but maybe I'll still get a response! I'm planning to do this to my cabinets. i can't seem to find nails for my finish nailer that are short enough. What size did you use and how thick are your cabinets? I'm also wondering about using MDF instead of plywood because of those fuzzy edges. did you find the plywood smoothed out OK?
George Sportel
Hi I am doing the same to my kitchen cabinets - converting flat doors to shaker style - I have glued the strips, but may have to nail as well - after gluing the strips are cupping (warping) at the edges and the glue is letting go - how do I prevent this cupping/warping from occurring?
Thanks, George
Jane
I love this idea and want to do my kitchen. However, I have rounded edges on my doors and haven't yet seen a reply to people asking about how you did your rounded edges. You say, " My doors have a slightly rounded edge, so I measured right were the rounding started, this does leave a small lip on the outside of all my trim." I'm not sure I understand exactly how you lined the trim up with the rounded door edges. Did you line it up with the top of the rounding, leaving a little door showing outside the trim? Or did you line it up with the edge of the door? Wouldn't that leave a gap between the door and the trim that would need to be filled in? Mine are pretty rounded, so I'm thinking leaving some door showing outside the trim would look odd.
Sophia Krieg
I am also wondering this exact thing. I am thinking i am going to fill it but i am not sure if that will make it look right. From the pictures it almost looks like she left the rounded edge, but its hard to know for sure.
Jenny
I’m very late to this blog but I’m wondering if you, Sophia (or followers), went ahead and figured out how to best handle the edges. I realize I may not get a reply, but if I do, TIA. I really appreciate it.
Julia
Hi I am trying to do something similar to my cabinets but my plywood is just not smoothing out as much as I would like, did you have a problem with your plywood strips not ending up smooth enough? I'm trying to see if anyone has any advice on how to do that, thanks your kitchen is beautiful!
Katie
Hi Julia, I didn't have that issue, but something that does help with that is when sanding, start with a lower grit, and work your way up to the very fine. This helps the smoothing process! Let me know if that helps or if you have any more questions! Thanks so much!!
Recca
Thank you! You have great tutorial here! I have been wanting this shaker style cabinet for long. Now, I am thinking to pursue remodeling my kitchen, at first I decided to just repaint my cabinet with white color but I have change my mind, I will now try my favorite shaker style. I hope my family will like this.
Katie
Yay! So glad this is going to work out for you! : ) Good luck!
Katie
Yay! So glad this is going to work out for you! : ) Good luck!
Sam
What size/kind of nail did you use to add the trim?
Amy
I was wondering the same thing so I did some searching. I am seeing that most people use a brad nailer, 18 guage for the trim. Not sure if that is what she used though.
Jacquie
Thanks. Following your guide. I was going to go with 2 1/4 but Home Depot cut it to 2". It still looks good. I used cabinet grade birch. It's sanded on both sides, of course I am in the process of sanding the edges....big job. My carpenter is putting on the strips and I will go from there.
Thanks so much. I'm pretty excited
Mitzy
I decided to be a DIYer and turn my cabinet doors into the Shaker style. I've been working on this for over a month now and still not finished. I work full time and then come home to my 2nd job of the kitchen remodel. I had Lowes cut the strips. I have to sand all the edges. I then glued and clamped them to the door. Next night, I have to prime with 2 coats of BIN as the doors are stained dark brown. Then, the next couple nights painting both sides of the doors. I have 18 doors to do. I only have 11 finished. Well, over the weekend, I started putting the handles on the drawers. Took me 3 attempts to get them on straight. TIP...use a nail to start a little whole before drilling the whole. Otherwise, the drill has a mind of it's own. I then tried hanging a couple doors...UGH!!! The first one I did was fairly large. When I open the door, it rubs on the bottom big time. I tried another door. There are supposed to be 2 doors together in this particular cabinet. I hung one and now I can't get the 2nd one in. No room! This project is much bigger then I ever imagined. I'm beside myself and extremely frustrated.
Katie
Hey Mitzy, I'm so sorry for your frustrations. DIY projects can definitely take up quite a bit of time, but it's all about saving money ; ). Hanging doors can be quite a pain. Especially if yours are like mine and have to sit in there perfectly. There are different methods for hanging doors depending on what type of hinges you have. As for installing the hardware, I have a tutorial on my blog for that using a cabinet jig. Once you have found the center this tool really helps keep it consistent on drilling the actual hole. You can find that here: https://thecraftyblogstalker.com/how-to-install-cabinet-hardware/. But my mother in law recently had new cabinets installed by professionals and they had to come out and fix the hardware because even they couldn't get it perfectly straight the first time! Good luck with the rest of your renovations!
Lily
Hi, I saw a few people ask but I didn't see a response so I hope you don't mind me asking again, but what did you do about the edges? I'm desperate to update my flat cabinets with rounded edges (and have very little money as a college student) and this tutorial is perfect, but I'm not sure how to deal with the curved edge meeting with the end of the plywood. Did you attach the plywood so that it stopped before the edges started to round, or did you somehow fill in that gap? It seems like the gap would be pretty large (at least for my cabinets) so I'm not sure how we would fill that whole gap in.
Thanks so much!!
Lily
Andrew
Great project idea! I have probably even worse looking cabinets in my most recent rehab property. This post really turned the creativity light on for me. I think I'll adapt you idea to fit my style cabinets.
Thanks and you've found a new follower!
-Andrew
Tiara
This is a such a simple and creative way to update your cabinets. I just saw a blog where someone did the same thing only they used yard sticks. The problem she ran into was that the numbers were really hard to sand down. Anyway, this is a great transformation!
Tina Barrett
I used 1/4'" poplar wood that was about 2 1/2 inch wide and 45 inches long from home depot. Paid less than $ 60 for wood and about $30 for knobs they are beautiful
Jim Brown
Can you please respond to the many questions about how to handle the rounded cabinet door edges? Thanks
Lindsey
Hi! Just wanted to say we're currently doing this to our kitchen (rectangular cabinets covered in tan and brown Formica.... so beautiful.) Such a great tutorial! Luckily I didn't use chalk paint after taking to a guy at the paint store and instead bought XIM plastic/vinyl primer and then a Benjamin Moore advance paint for cabinets that they highly recommended. Only bummer is how bad our workmanship is! Haha! Just slid the finished drawers into place, and from afar, they're great! ...up close, holy cow, we did a terrible job at patching the nail holes. Advice to others, if the paint guys suggest using Bondo putty instead of wood filler, DON'T LISTEN! (at least for the doors). It dries super fast and gets frustrating trying to apply it before it gets too thick and crumbly, which resulted in poorly filled holes. Oh it's also sturdier than wood filler, so it's harder to sand, which means we used even less than we should have over each nail/crack. You can see the majority of the holes now! You've been warned! My cabinets are going to look very beautiful with this makeover, just don't go closer than 3 feet from them! Also, who knew that there are inset and flush hinges, not I! Time for a return to Amazon(after installing half of them on the doors before my husband convinced me to try hanging one up) and a trip to Lowe's! Haha fun, right? 😉 Happy Easter weekend of kitchen remodeling!
Katie
Sure sounds like an adventure Lindsey! I hope you love your end result, and I have totally made the same mistakes with product choice! You can always go over it with some simple wood filler, sand it, and do some touch up painting if you aren't happy with it!
Good luck!
Katie
Sure sounds like an adventure Lindsey! I hope you love your end result, and I have totally made the same mistakes with product choice! You can always go over it with some simple wood filler, sand it, and do some touch up painting if you aren't happy with it!
Good luck!
Katie
Hi All,
I apologize for the delay in response. This is an older post so sometimes I miss the comments. For the rounded corners on my doors I did not fill the gap in. I just set the trim pieces to the edge of the door right before it started rounding off. It wasn’t an exact science, but you really didn’t noticed it at all once the doors were all hung. Just make sure you are laying the trim pieces consistently across all doors. You can measure it if you want to know the exact difference. For my doors it was about 1/8″… but obviously all doors will be different. Good luck!
Cindy
I know this is an older post, but gearing up to attempt a cabinet makeover. I am starting with a half bath to see how difficult it is and how it turns out, before attempting my whole kitchen! I have question though and saw some others had the same, (I hope I didn't just miss the response) about the drawers. My will be just a drawer front because it's a bathroom cabinet, but how do you address the depth difference? I don't necessarily want to add the trim but to the drawer but then the doors will stick out farther, what about a layer of the plywood over the whole drawer, or does this even matter??
Thanks for your help!!
Katie
Hi Cindy, so I actually just left my drawer fronts as is. It's only 1/4" and after I was done I didn't ever even notice it! You could certainly add a sheet of plywood to the front of your drawers if you do want them to all be the same. Just make sure you sand the edges really well and I'd use caulk so it's not obvious you just added plywood to the front. : ) Hope that helps!! Let me know if you have any other questions! Thanks for stopping by the blog!
Will
Thanks for the great idea! My wife and I are in the process of doing this to our cabinets now, as a temporary upgrade until we can afford new cabinets in a few years. All for less than the cost of 1 cabinet door! So far they are looking great, hopefully we will have them done by the weekend.
rikki
what length nail did you use on these? we love your DIY skills on this one and have decided to go this route on our recently purchased 1943 sf Bay Area home.
Will
We used 1/2" brad nails in our nail gun, with a little bit of glue. They came out great!
Cindi Bruce
Did you have the oak plywood cut at one of the big box stores? All we have in Richmond, VA is Home Depot and Lowe's. I know how to do it, but I can't afford the saw.
Your cabinets are beautiful! I plan on starting on mine very soon.
Tanya
Thank you so much! I love this look, and I'm in process of doing my first door right now. (The glue is drying...)
They were willing to cut my 4'x8' plywood at HD. The guy wasn't super careful about it, so it has rough edges that need to be sanded, but I knew I'd need to use wood filler anyway -- and mostly I was glad he didn't just laugh in my face (or charge me an extra $30) when I told him what I wanted.
I'm going to try to do the drawers in the same style, btw. Fingers crossed...
Chris
Nice Tips. I must bookmark it. Thanks for sharing
Chris
Nice Tips. I must bookmark it. Thanks for sharing
Kacie
I see in the original pictures that there is detail on the faux drawer directly beneath the sink. Mine has this as well and I HATE it. Did you just fill in those grooves with wood filler and then sand and paint right over?
Katie
Yup! That's exactly what I did ; )
sheraton interiors
Thanks for sharing..nice post!
Katie
Thanks!!
Kate
I'm not a regular reader but used ypur tutorial to add trim to my kitchen cabinets (and your painting tutorial) and it turned out great. Thank you!
Chris
Thanks for sharing nice cabinet door design. Keep sharing such kind of content!
Katie
Thanks Chris!
Sue
What did you do for any adjustment on hinges? My doors won't open all the way once the trim was added.
nannettebattista
You can use woodprix plans. The best handbooks and very detailed instructions. You can learn much from them and make it yourself.
Linda Peck
Hi. My husband and I are doing this to our kitchen right now. I hope they turn out just as nice as yours did! I'm so excited!! Did you paint the inside of your cabinets?
Linda Peck
Hi. My husband and I are doing this to our kitchen right now. I hope they turn out just as nice as yours did! I'm so excited!! Did you paint the inside of your cabinets?
Kate
Wow looks great! Im about to start working on my 1950s kitchen :-/ what Nails did you use to nail the 2.5” pieces to your cabinet doors?
Katie
I'm not sure exactly, that was a few years ago... but I just measured the depth of the door and the trim and made sure it would go at least halfway into the door. Hope that helps! : )
Mike Steffens
I love the photo shopped pictures that eliminate the gaps at the joints.
robert kienzle
I want to do the same thing in our kitchen but the door are all formica . i wonder if i will run into problems because there hardly no gap in between doors and droors. Also what if i use glue and clamps but no nails since i dont have a nail gun?
Hugo
Hi,
I wish To try this. However, i'm really curious about the finish. Did you manage to get rid of the grain of your wood or do you still see 2 different textures on your doors once all the job is done ?
Many thanks !
Hugo
Katie
You can still slightly see the wood grain, but you could not see a noticeable difference between the wood grains.
Mercer Lynda
I want to renovate my home, but I’m not sure how to go about it. It makes sense that making my cabinets look nice would be a good idea. I’ll have to see if I can get a professional to remodel it for me. That way, they can ensure that it ends up looking nice.
Kristin
Just wanted to pop on and say thank you so much for this tutorial! I just did this in my kitchen, except re-stained instead of painted, but I am so happy with the results! I wish I could add pictures on here to show you. Your instructions gave me the confidence I needed. Thank you so much!
Alicia
I am so happy I found your blog and I absolutely love your information about kitchen hack diy shaker style cabinets. I liked and it is wonderful to know about so many things that are useful for all of us! Thanks a lot for this amazing blog!!
Daniel
What size nails you used?
Axton
I was recently diagnosed with Celiacs and I would love to win this book. There is so much information I need to learn and I would love to have my own reference guide.Thanks for the opportunity
Axton
I was recently diagnosed with Celiacs and I would love to win this book. There is so much information I need to learn and I would love to have my own reference guide.Thanks for the opportunity
Lawrence
We use carpenter's glue on plywood sides to fill it in. Let dry. Sand.
Lawrence
We use carpenter's glue on plywood sides to fill it in. Let dry. Sand.