



This post is sponsored by xTool. All opinions expressed are my own.
Learn how to create stunning inner engraving projects with the xTool F2 Ultra UV. This step-by-step tutorial makes 3D laser engraving easy.
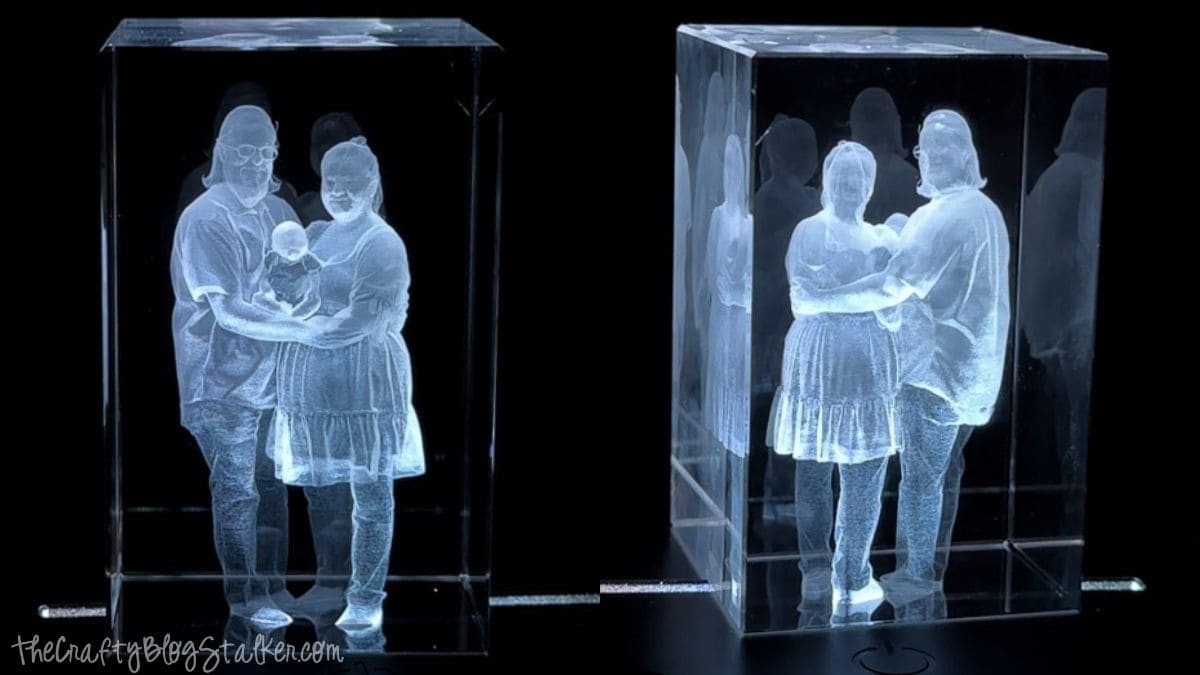
Seeing a design appear inside a crystal block feels almost like magic, but the xTool F2 Ultra UV makes the process surprisingly approachable.
Instead of engraving the outside of the crystal, this machine creates thousands of tiny fracture points beneath the glass surface to form a detailed 3D image with incredible depth.
From creating a 3D model in xTool Studio to setting up the machine and engraving your finished piece, I'll walk you through every step of the process.
By the end, you'll have a personalized keepsake that looks professionally made and is sure to impress.
Jump to:
Skill Level: Intermediate
Estimated Cost: $20-$40
Total Time: 3 hours
Craft Tutorial Video
If videos are your thing, you're in luck-I've got a full tutorial ready for you!
Subscribe to my YouTube channel and stay inspired with every new project.
Before You Begin
Before starting this project, there are two things that will make a big difference in your finished results.
The first is using the correct crystal. Inner laser engraving requires a K9 crystal block, not standard glass.
K9 crystal is designed specifically for this type of engraving and allows the laser to create tiny fracture points inside the material while leaving the outside perfectly smooth.
Using another type of glass can lead to poor results or even unwanted cracks, so it's worth making sure you have the right blank before you begin.
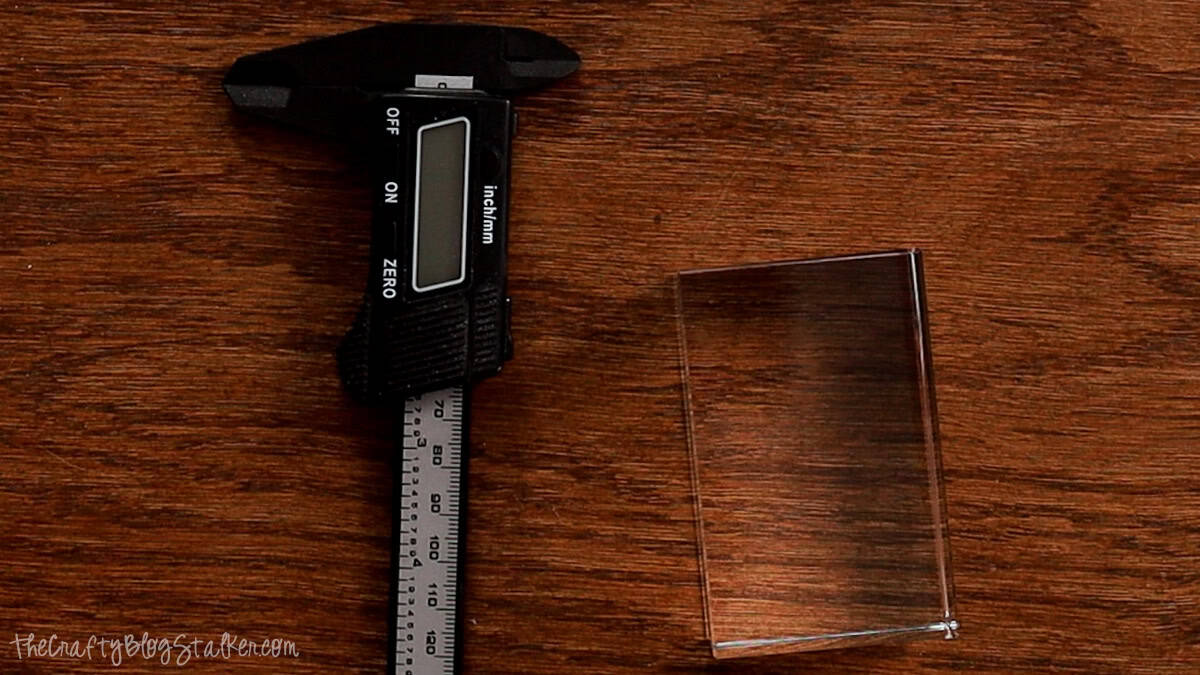
The second is measuring your crystal with digital calipers instead of a ruler. Since this project relies on high precision, even a small measurement difference can affect where the design is placed inside the crystal.
Taking an extra minute to get accurate dimensions helps ensure your finished engraving is centered exactly where you want it.
Create Your 3D Design in xTool Studio
One of my favorite features of the xTool F2 Ultra UV is how easy xTool Studio makes it to create a 3D model.
The built-in AI tools can turn a single photograph into a complete 360-degree model that's ready for engraving.
Start a New Project
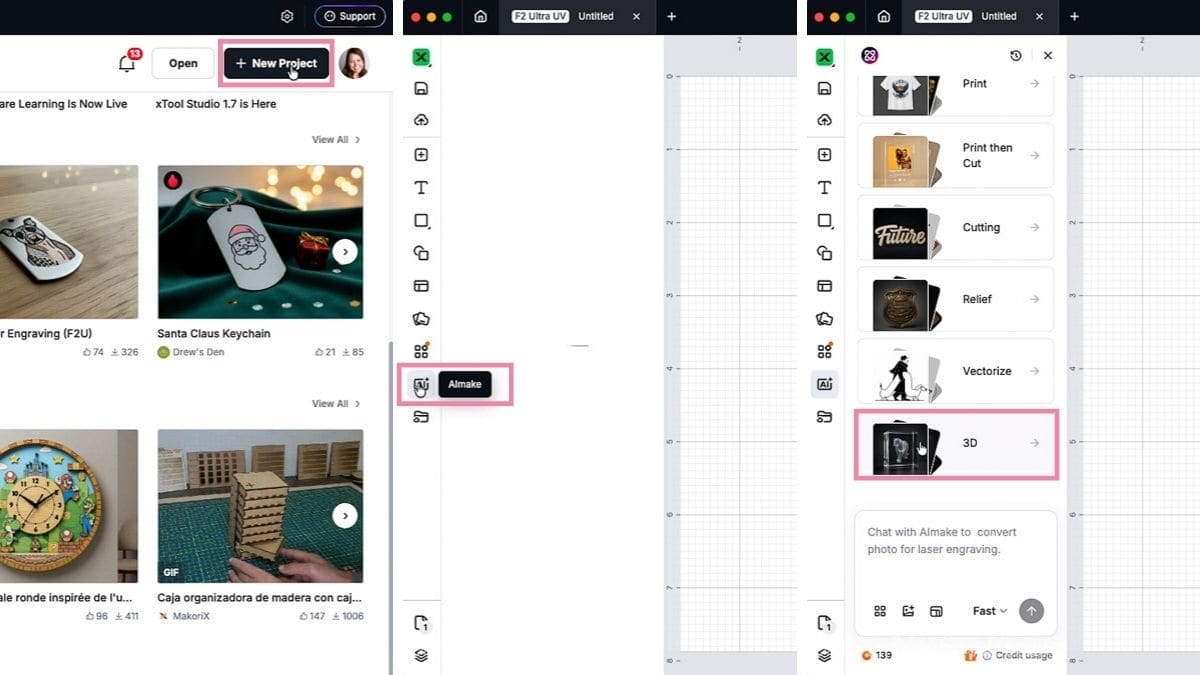
Open xTool Studio and create a new project.
From the toolbar, click AI Make, then choose 3D Photo.
This feature generates a complete 360-degree model from a single image, making it a great option for family portraits, pets, and other meaningful photos.
Upload Your Photo
Select the image you want to engrave.
For my project, I used a family photo and entered the following prompt:
Please create a full 360 3D image using the uploaded image.
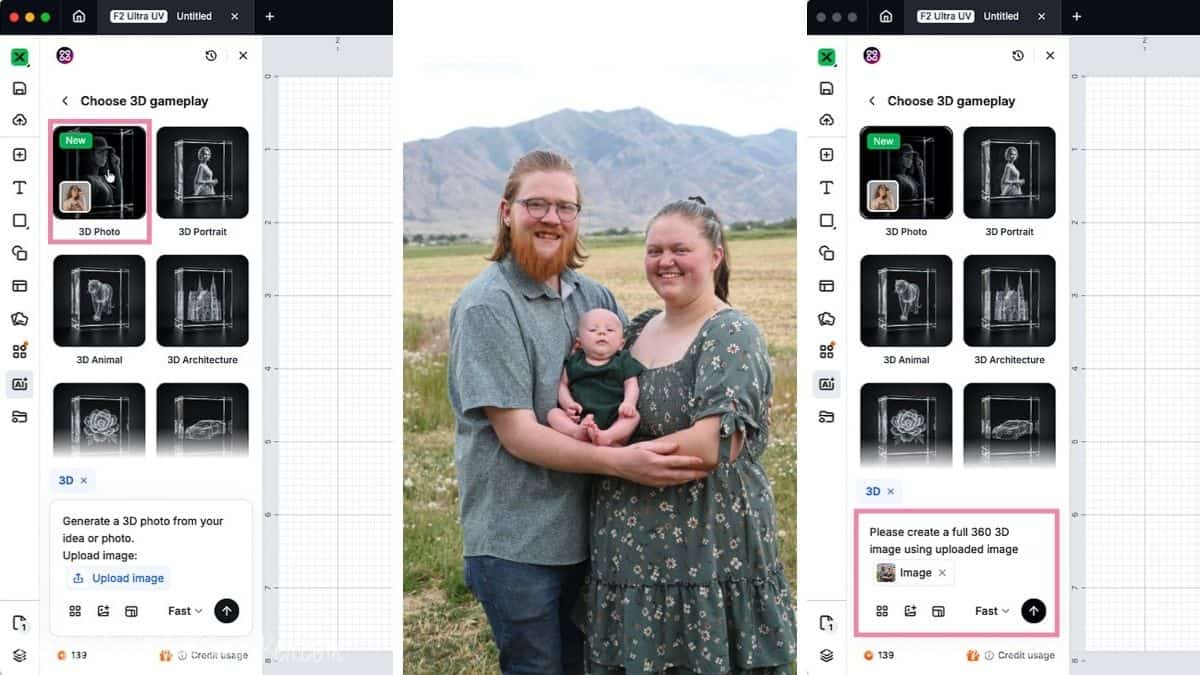
Click the upload arrow to begin generating the model. Processing usually takes a minute or two, so don't worry if it doesn't appear right away.
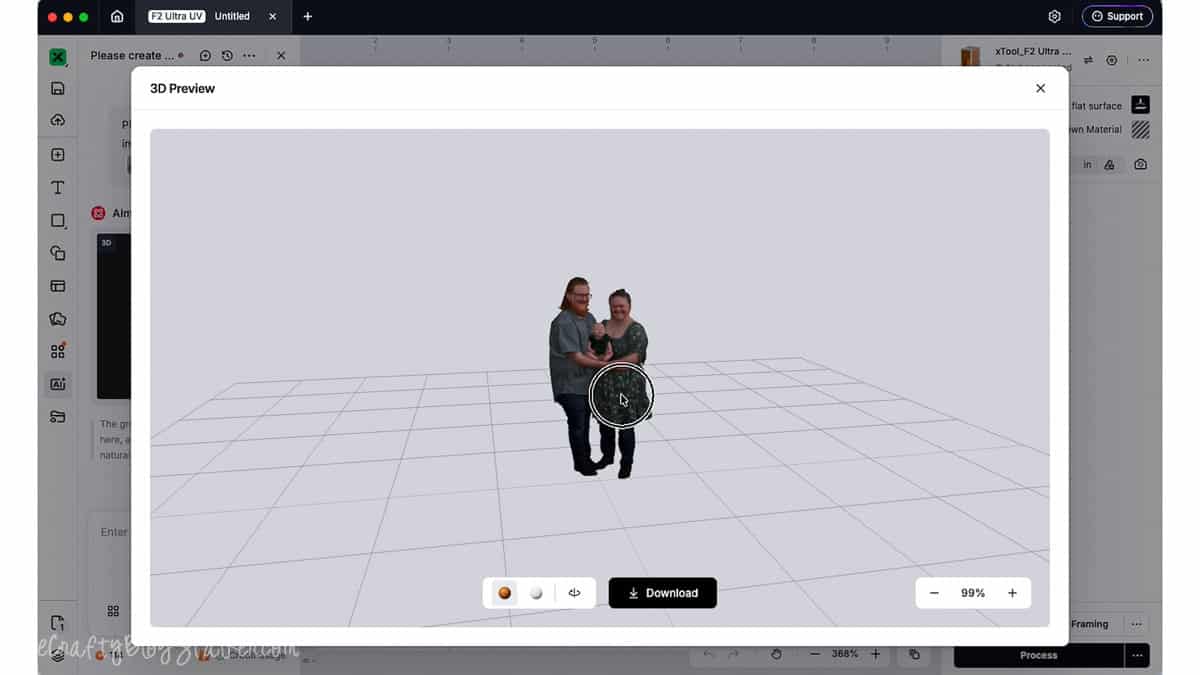
Import the 3D Model
When your model is finished, click directly on the generated image to add it to your project.
Because the model uses a different canvas size than your current project, xTool Studio will prompt you to adjust it.
Simply choose Scale to Fit, and the design will automatically be placed into your workspace.
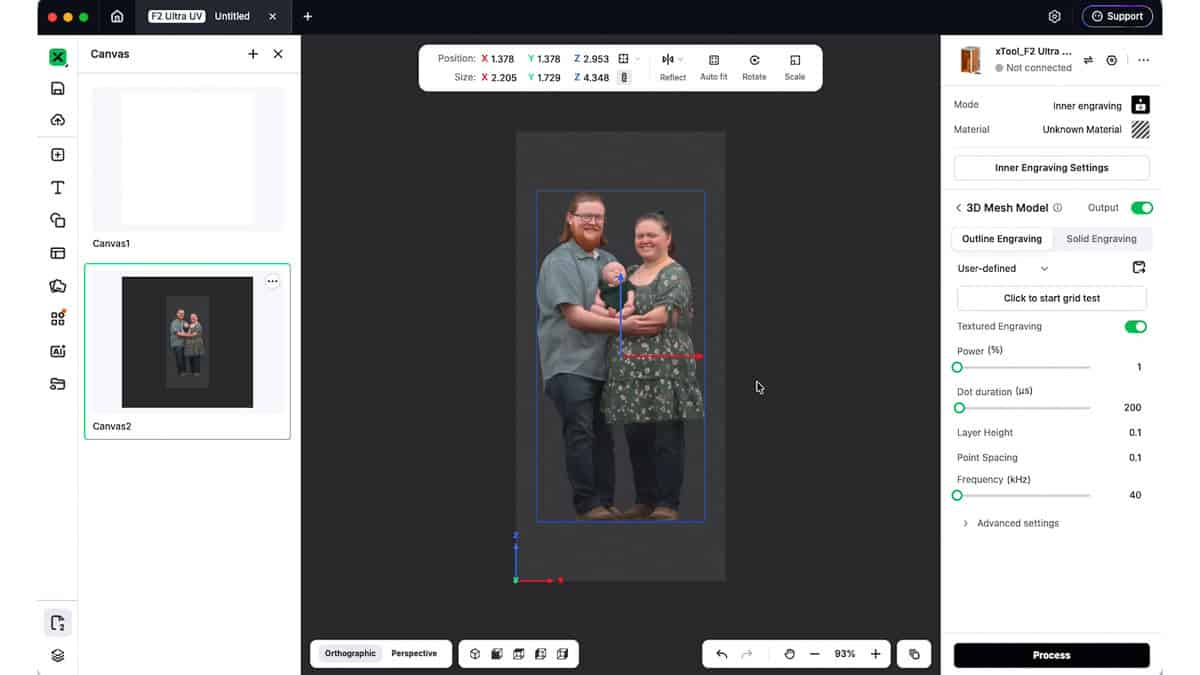
Inspect the Model
Before moving on, spend a few moments rotating the model and viewing it from every angle.
It's impressive to see how AI Make creates a complete 360-degree design from just one photograph.
Looking at the model from all sides also gives you a chance to catch anything that might need adjusting before you begin engraving.
If everything looks the way you want, you're ready to prepare the project for engraving.
Select the Material
Once the model has been imported, the processing mode should already be set to Inner Engraving.
Click Material and choose the crystal blank you'll be using. xTool Studio includes several K9 crystal options with settings already optimized for each shape.
For this project, I selected the Rectangular K9 Crystal and clicked Apply.
With your design complete and the material selected, it's time to prepare the machine for engraving.
Prepare the xTool F2 Ultra UV
The next section of xTool Studio walks you through preparing both the machine and your crystal.
Taking your time here helps ensure everything is aligned correctly before the engraving process begins.
Install the Inner Engraving Lens
Open the lid of the xTool F2 Ultra UV and remove the standard laser lens according to the machine's instructions.
Replace it with the Inner Engraving Lens, making sure it is fully seated and securely locked into place.
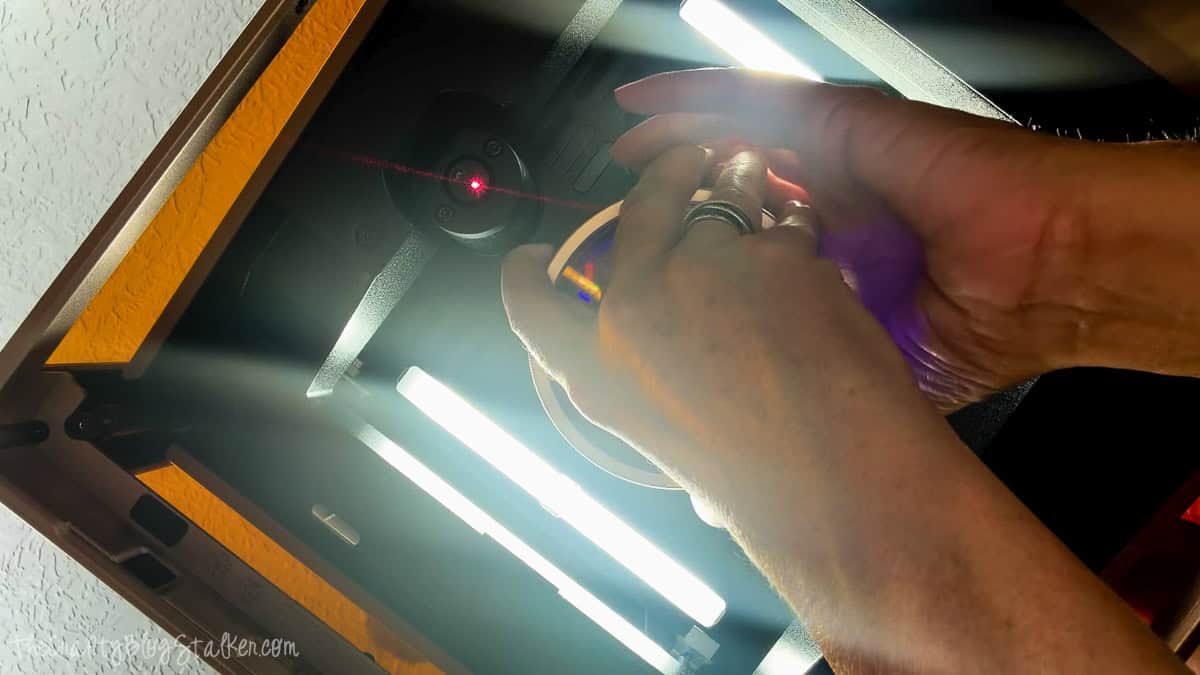
This specialized lens focuses the laser beneath the glass surface instead of on it, allowing the machine to create the tiny fracture points that produce the finished 3D image.
Install the Riser
Crystal blocks are much taller than many laser materials, so you'll also need to install the xTool Riser.
The riser provides additional clearance, allowing the crystal to fit comfortably inside the machine while positioning it at the correct height for engraving.
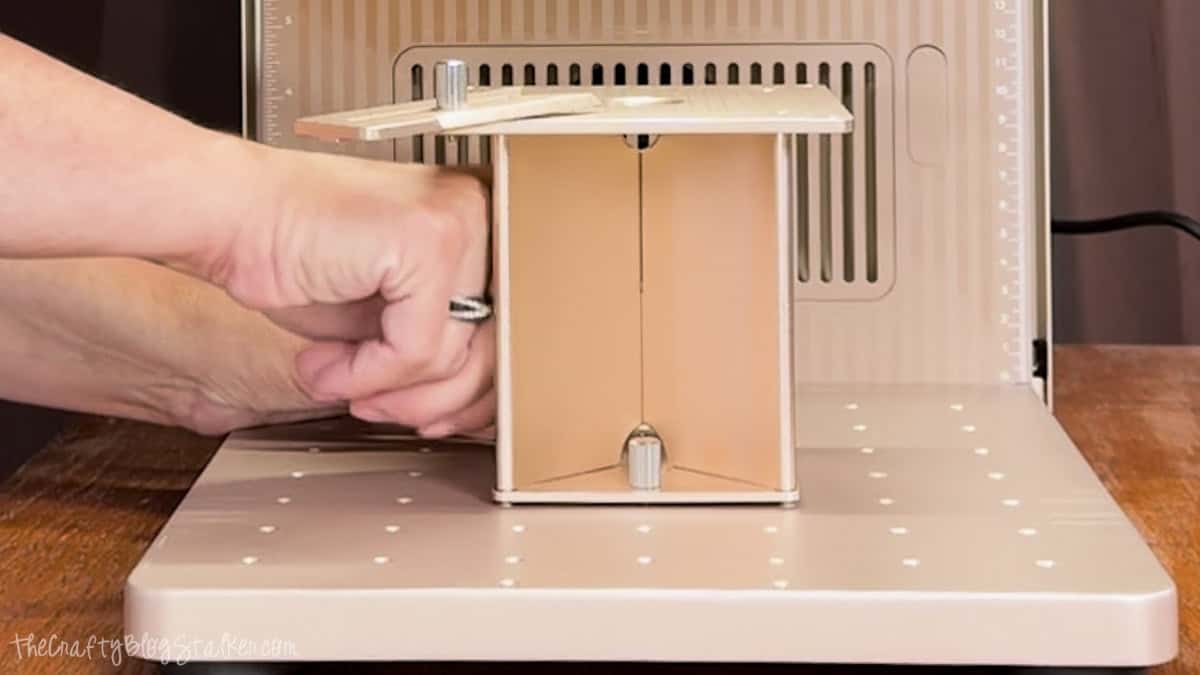
Once the riser has been installed, return to xTool Studio and click Next to continue.
Measure the Crystal
The next screen prompts you to enter your crystal's dimensions and even shows exactly which measurements are needed.
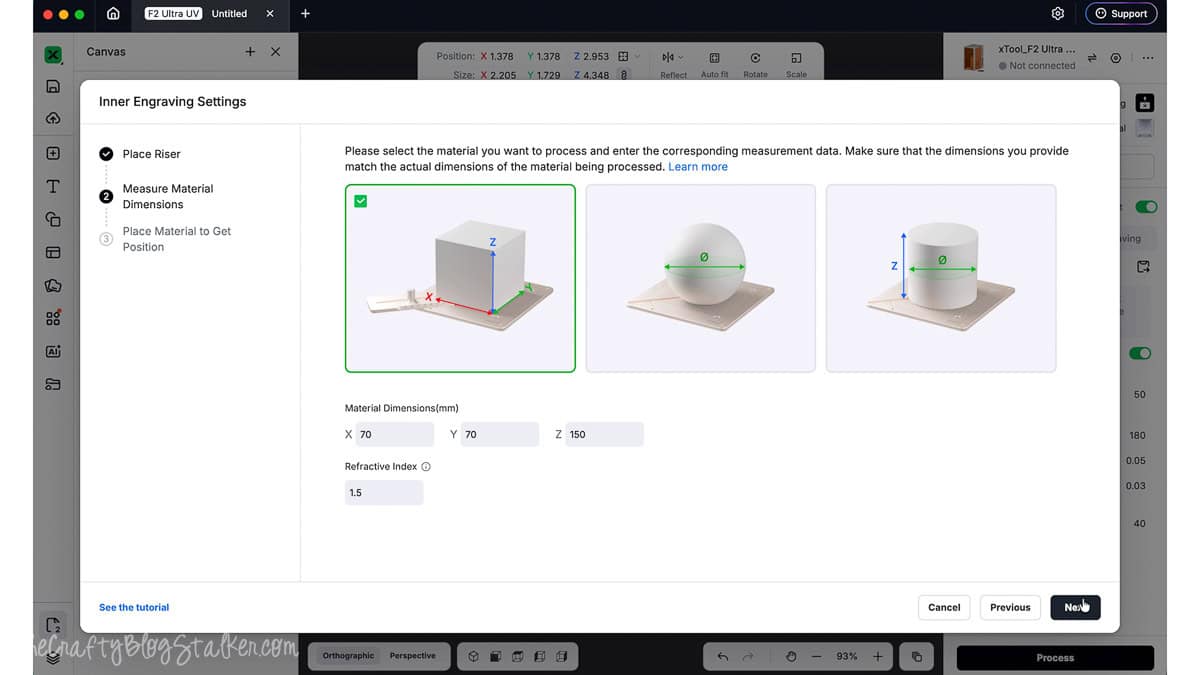
Using your digital calipers, carefully measure the length, width, and height of the crystal.
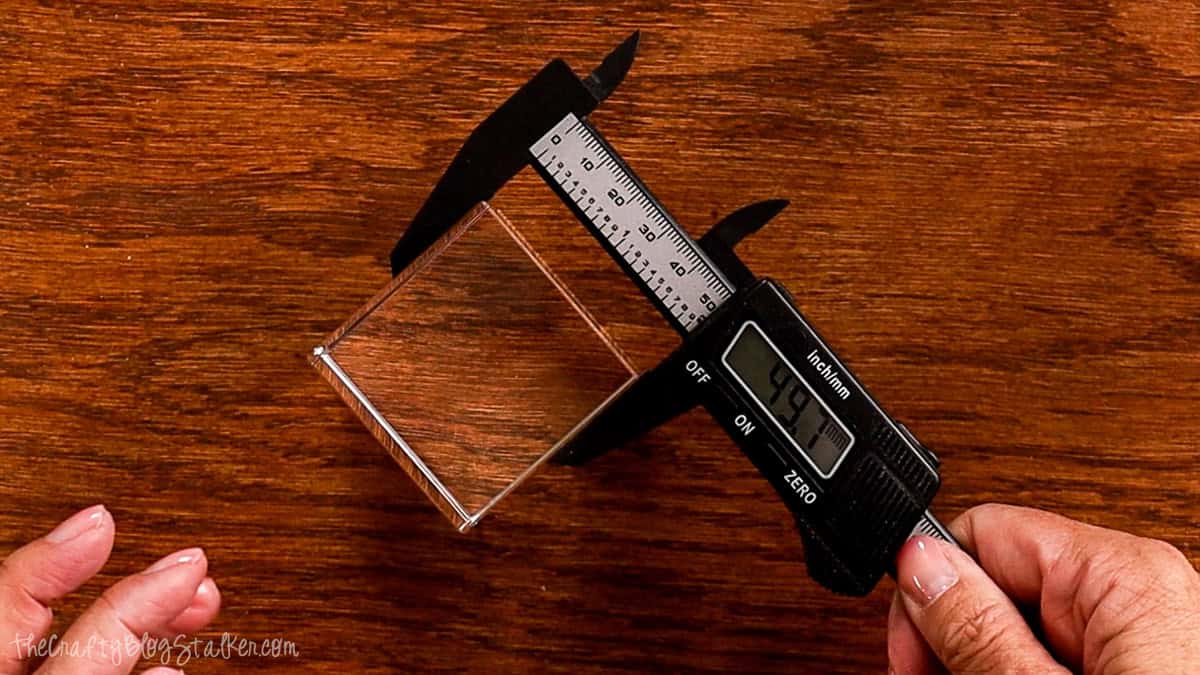
Take your time with this step. The machine uses these measurements to calculate the position and depth of the engraving, so accuracy here has a direct impact on your finished project.
Enter each measurement into xTool Studio, then click Next to continue.
Position the Material Stop
The following screen shows where to place the adjustable ruler on the riser.
For my crystal, xTool Studio instructed me to set the ruler to 35.
Slide the ruler into position, then tighten the screw to secure it in place. This helps position your crystal consistently inside the machine for accurate alignment.
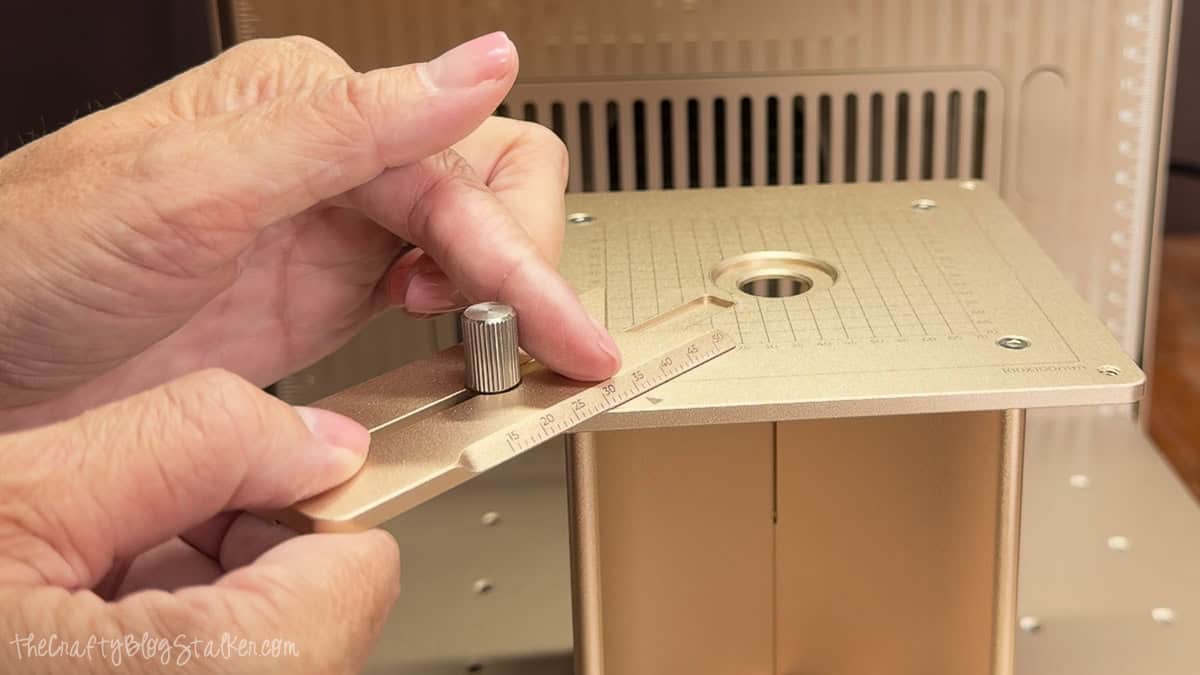
Now that the machine is configured and the riser is set, it's time to prepare your crystal and let the xTool F2 Ultra UV do the hard work.
Taking a few extra minutes during setup helps ensure the engraving is positioned exactly where you want it.
Place the Crystal in the Machine
Before placing the crystal in the machine, wipe every side with a clean, lint-free cloth.
Even a small amount of dust, fingerprints, or smudges on the glass surface can make it harder to accurately position the crystal and may interfere with the preview while setting up the project.
I like to hold the crystal under a bright light after cleaning to make sure I haven't missed any spots.
Starting with a perfectly clean surface helps the machine capture the most accurate positioning possible.
Set the crystal onto the riser, matching the orientation shown in xTool Studio.
Make sure it sits flat against the material stop and doesn't rock or shift. If the crystal is even slightly crooked, the engraving may not line up with the virtual workspace, which can affect the placement of the finished design.
Once you're happy with the position, close the lid and continue to the next step in xTool Studio.
Start the Engraving Process
The xTool F2 Ultra UV will automatically locate the crystal and prepare it for engraving.
Watch the preview on the screen and verify that the design appears where you want it inside the crystal. If something doesn't look right, now is the time to make any necessary adjustments before starting the job.
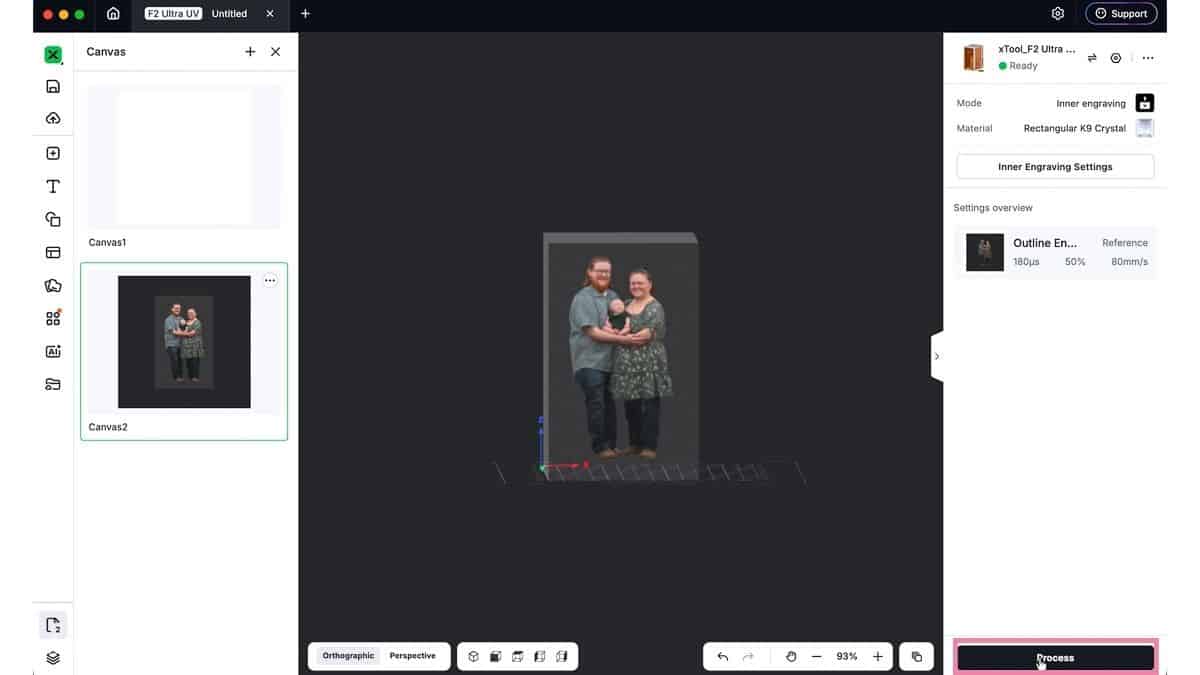
It's always worth spending an extra minute checking your alignment. Once the engraving process begins, the design can't be repositioned.
When everything looks correct, click Process in xTool Studio.
Before clicking Start, take one last look through the settings. Verify that the correct laser module, material, crystal dimensions, and Inner Engraving mode are all selected.
After confirming your settings, click Start.
The xTool F2 Ultra UV begins to create thousands of microscopic fracture points within the crystal. Instead of engraving the outside, the laser focuses at different levels within the crystal, gradually building the design layer by layer.
This is what gives the finished piece its incredible depth while leaving the outside completely smooth.
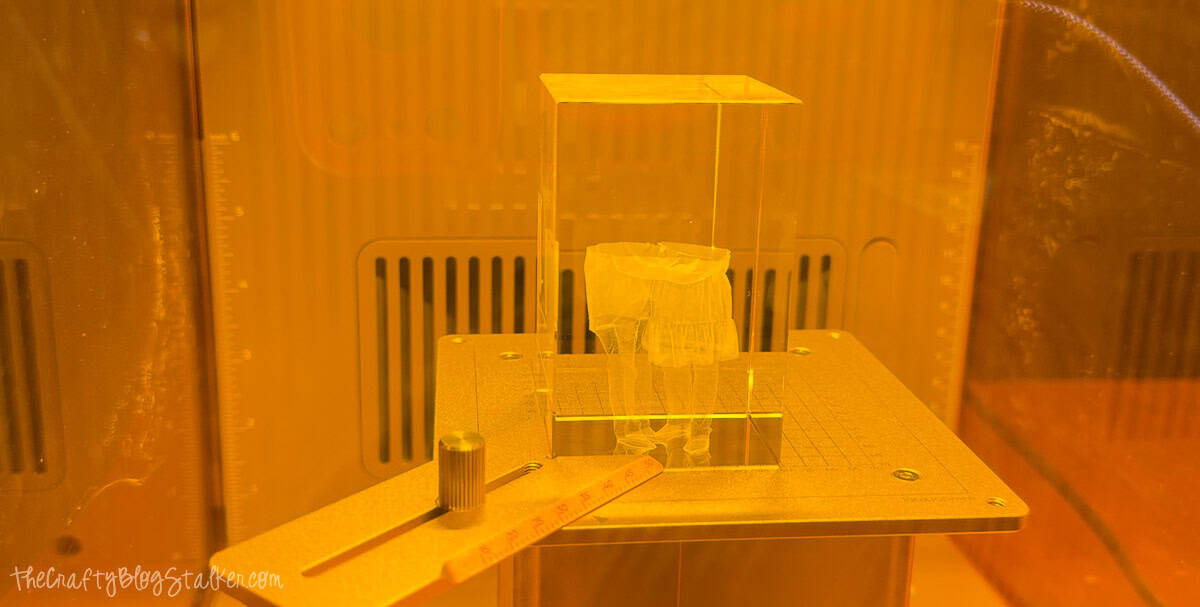
Depending on the size and complexity of your design, the engraving process may take a while. It's tempting to keep checking on it, but the machine handles everything automatically once it gets started.
Crystal Reveal
Once the engraving is finished, open the lid and carefully remove the crystal.
At first glance, the design may appear subtle. As soon as light passes through the crystal, though, the details come to life.
Try holding the crystal at different angles or placing it on an LED light base. The changing light makes the three-dimensional effect stand out and really showcases the amount of detail captured inside.
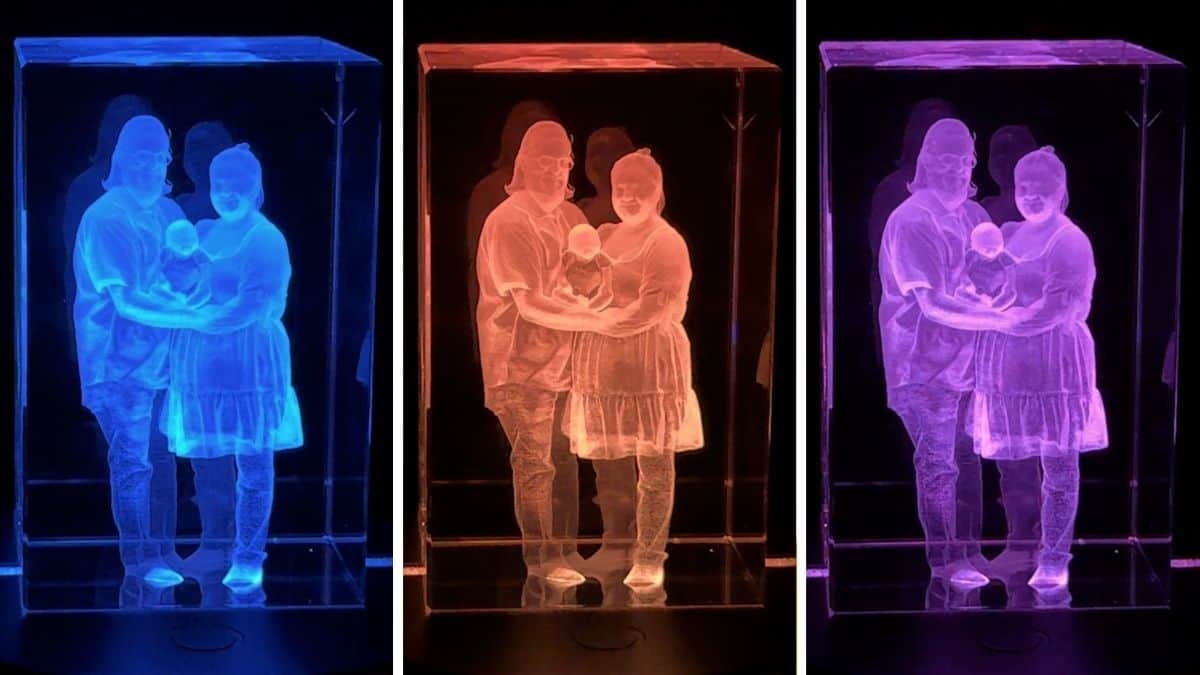
One of my favorite parts of this project is that the outside of the crystal remains perfectly smooth. All of the detail is suspended inside the crystal, creating a floating effect that's always fun to show someone for the first time.
Whether you're creating a family keepsake, memorial gift, wedding photo, or pet portrait, the finished result looks polished and professional without requiring years of experience.
Frequently Asked Questions
Use a K9 crystal designed for inner engraving. Standard glass isn't intended for this type of project and won't produce the same results.
Most photos work well, but images with good lighting, sharp focus, and a clearly defined subject usually produce the best 3D models.
Yes. The specialized Inner Engraving Lens is required to focus the laser inside the crystal rather than on its surface.
Yes. After importing the model into xTool Studio, you can resize, rotate, and reposition it to fit your crystal exactly the way you want.
Need Help With This Project?
Click a button below to ask AI what other gifts to make with the xTool F2 Ultra UV.
More Laser Crafts
If you enjoyed this project, be sure to check out more of my laser tutorials. There are plenty of beginner-friendly projects to help you get even more out of your laser machine.



Hi, I'm Katie!
I'm so glad you're here. Want to make something fabulous? I'm here to help!