

Learn how to sew a simple fabric strip rag quilt using jelly rolls. An easy DIY craft tutorial idea that is perfect for beginner quilters.
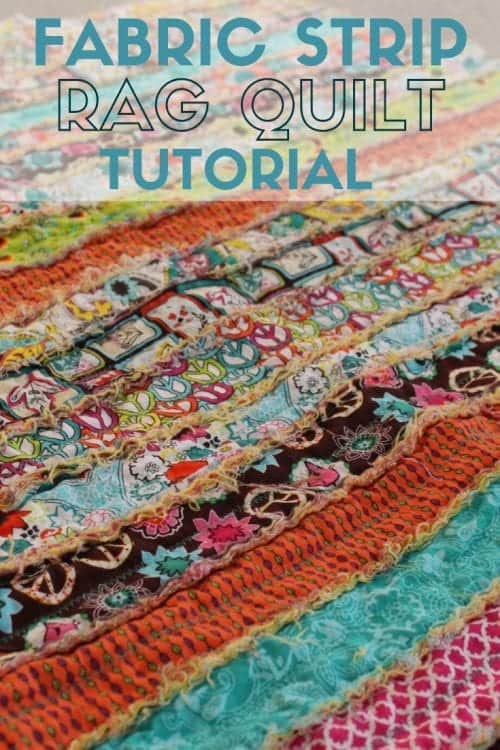
Do you love gorgeous quilts but the idea of quilting is a little bit overwhelming? That is totally how I felt when I began my first rag quilt too. But I am here to tell you that you can do it. Rag Quilts are great for beginners and become gorgeous quilts!
I had made a Minky Rag Quilt before and I absolutely love how it turned out so I wanted to try a quilt with strips of fabric instead of squares.
Supplies Used to Make a Fabric Strip Rag Quilt
Some links may be on similar items when exact items couldn't be found online.
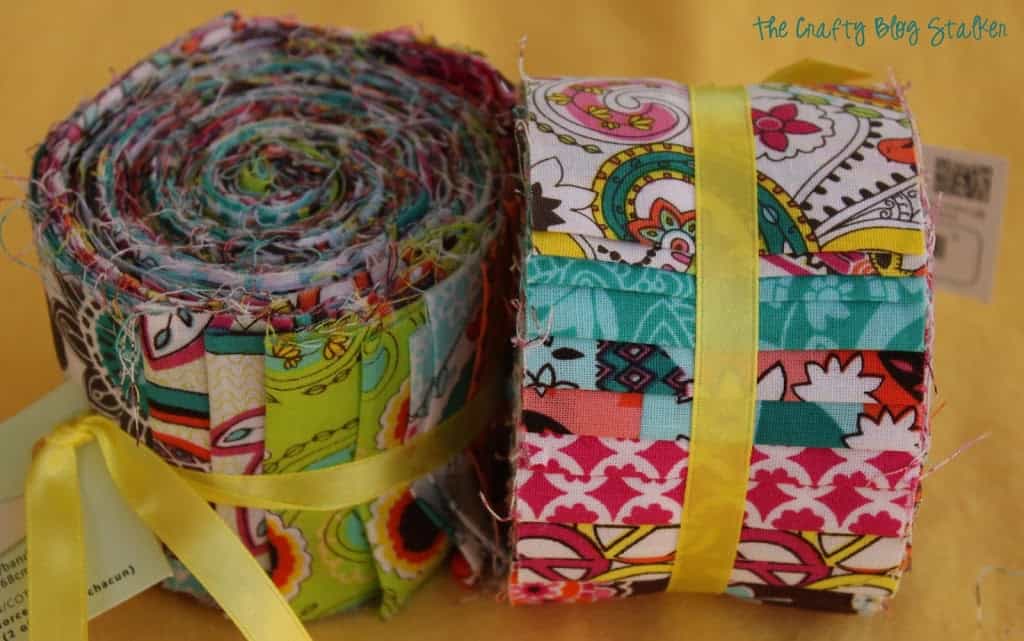
- 2 Cotton Jelly Rolls
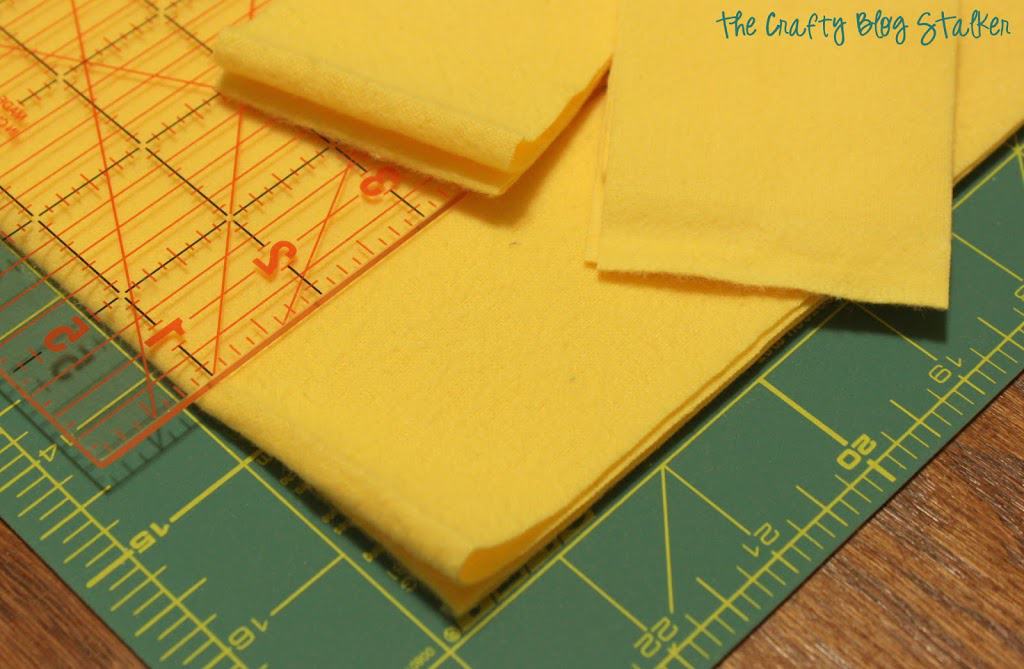
- 1 ⅔ Yards Flannel
- Cutting Mat
- Quilting Ruler
- Rotary Cutter
- Sewing Thread
- Sewing Machine
How to Make a Fabric Strip Rag Quilt
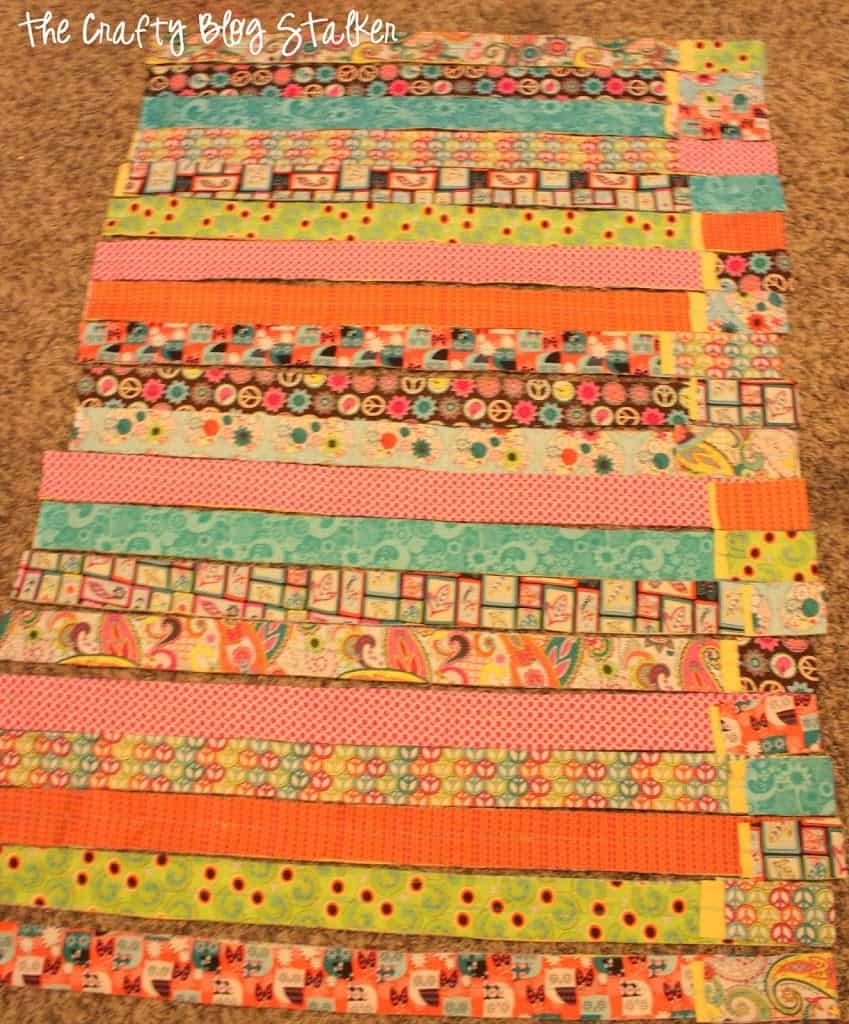
For the strip quilt, I picked up a couple of Jelly Rolls. For this type of quilt, they really are a very easy way to go. They have lots of variation and the fabric is pre-cut into 2.5-inch width strips - Perfect! (Sadly, these exact rolls have been discontinued and are no longer available.)
Flannel fabric is used for lining. Flannel gives the blanket some nice warmth and frays nicely when washed. Cut the strips of flannel to the same 2.5-inch width.
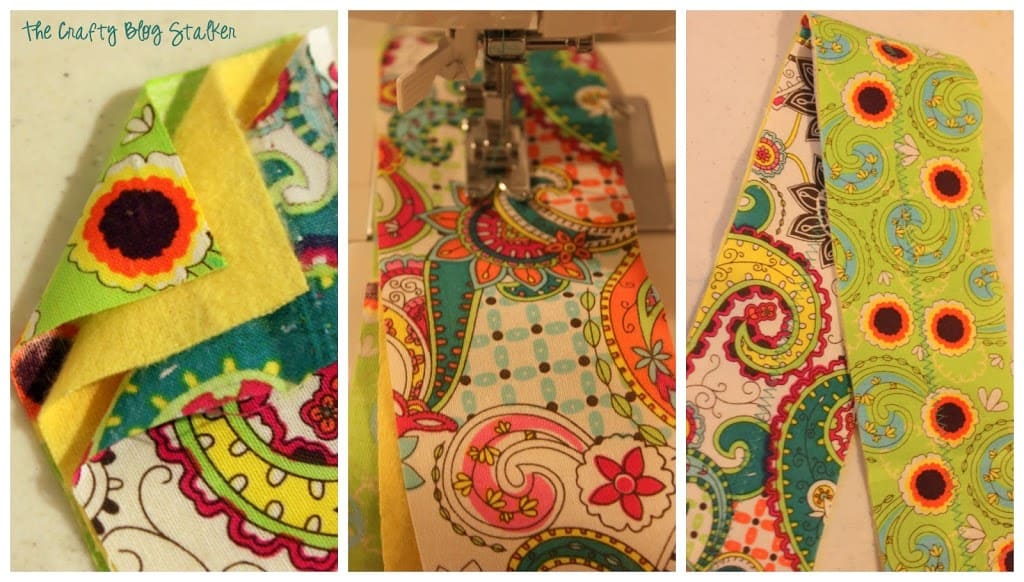
Layer each strip with a piece of cotton fabric facing down, flannel, cotton fabric facing up and sew down the center of the strip. It is easiest to sew all of the strips first.
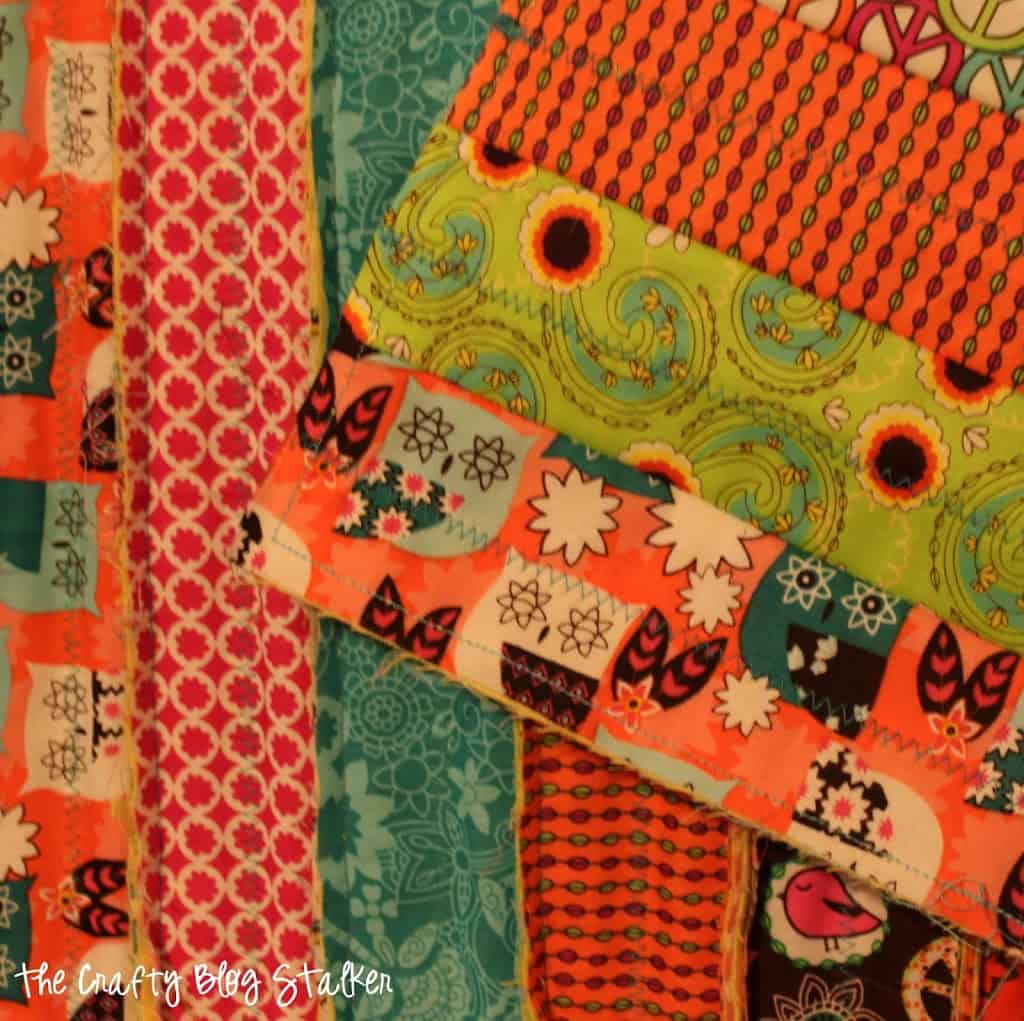
When all of the strips are sewn, lay to arrange the order of the strips making sure none of the same fabrics are next to each other.
Sew the strips together using a ½-inch seam.
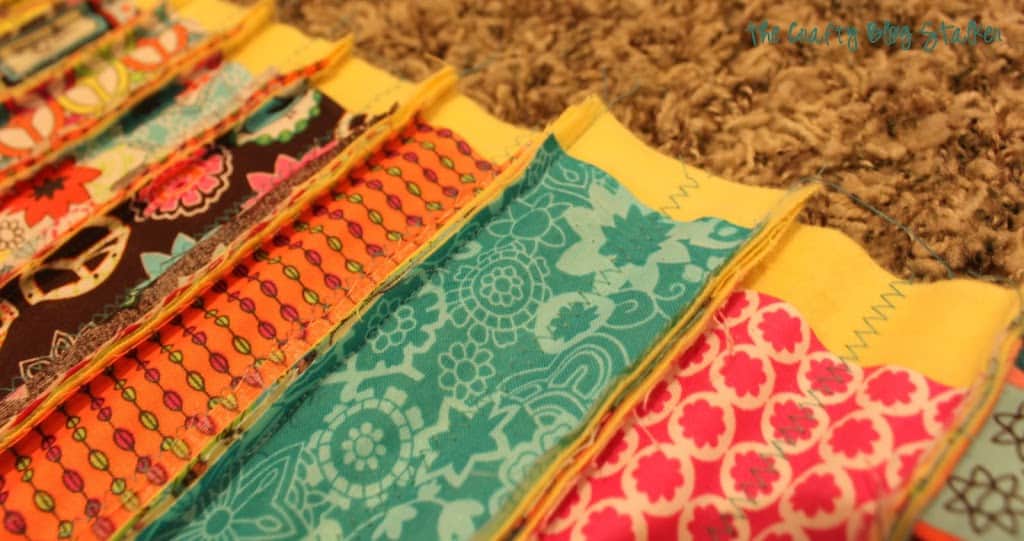
Trim the sides of the blanket to make sure they are nice and straight after sewing the strips together.
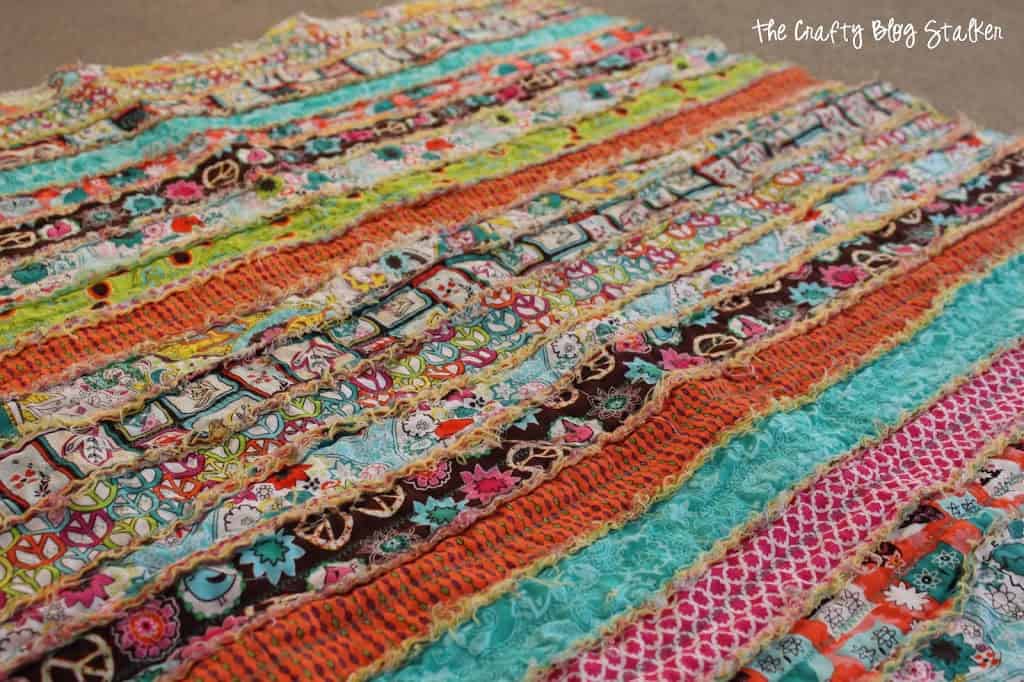
Sew around all 4 edges of the quilt using the same ½ seam.
Isn't it cute? It is just about done! All that is left is to wash and dry a couple of times so you can get the nice frayed seams.
This strip quilt is pretty easy to make! I think I may help my 10-year-old daughter make one next.
Have you made a quilt before or will this be your first? Share and leave a comment below!
Sewing Essentials
- The Sewing Machine I use is a Singer Fashion Mate and has been great!
- An 18" x 24" Self-Healing Cutting Mat is a must. You will use this way more than you think you will.
- This Rotary Cutter cuts easily and is very comfortable to hold.
- And one can never have enough Measuring Tapes! I'm always misplacing mine.
Vickie @ makingoursustainablelife.com
So cute! It looks easy enough that even I might be able to make one! Thanks for sharing this one!
Anna-Marie Field
Hi Katie, Nice!!! Very, very nice!!! I love your choice of fabric!!! Great job!!! Have a fab weekend!!!
Love
AMarie
Deborah@Green Willow Pond
It turned out so cute! I love how easy it is too. Great job!
Happy New Year
Deborah
srpprcrftr
I have to pin this, will print it out after I get new ink cartridges. I've wanted to make a quilt but the backing and padding scared me away. This looks like I might be able to actually make one to completion. Love idea of flannel strips. I'll have to peruse more of your projects, and subscribe. Glad I found your post. Can you buy the jelly rolls at someplace like Jo-Ann's or would I have to go to quilt shop? Happy weekend
Rose Tree Originals
Joann's does carry jelly rolls (or at least my local one does)... unless you have a coupon the ones at the quilt shops are about the same price and nicer, if you are lucky enough to have a quilt shop nearby. Fabric.com is a great affordable place to buy fabric too
~Andrea (lifelong sewer and quilter)
Susie
Also try Missouri Star Quilts- they have a different special everyday!
marieLourie
Thanks, that's very helpful especially. since JoAnn's closed. I bought some nice flannel there at times but you had to be careful because they mixed the nice with the lesser. Yes, Fabric.com is a good place to start.
You can also cut the strips from fabric yardage that you might have pr find at a thrift shop.
Emily Thompson
wow!!!! I've made the square rag quilt and the kind you sew it all together then cut... but I love sewing the strips like this.... Pinning and totally going to make this! I've got a stash of fabric and flannel for baby blankets! Emily
JoAnn SweetPepperRose
Yep, a strip quilt is next on my list to make 😉 Great Job!
KElli
I've purchased 2 jellyrolls so how much flannel should I purchase for it to use the 2 rolls? Will this be a queen size with two rolls ?
Thank you
Kelli
Katie
I used two rolls and the finished quilt was about 40 by 40 inches. So a perfect baby quilt size. A queen size blanket usually measures 92 x 96 inches. So to do the front and back in jelly roll strips you would need 12 rolls and about 6 yards of flannel.
Deborah L Melian
I really enjoyed your Fabric Strip Rag Quilt that you shared at my Shine a Spotlight Linky Party this week. Pinned it! Thanks for stopping by and sharing and be sure to stop by again on Saturday. Your craft might just be one of my featured posts!—Deb at DialMforMoms.com
Accidentally Wonderful
I used those exact fabric strips to make a rag wreath for my daughter's nursery! I'd love to have a quilt to match =)
Claire @ A Little Claireification
Sorry this is belated but thank you SO much for linking up to our "Best Of The Weekend Party last week!! I featured this awesome project tonight when the party went live. 🙂
Have a great weekend!! xo
priscilla
Love this ! Thanks so much for the instructions !
Natashalh
Fabulous colors! I tried to make a quilt last year...it still isn't finished. =(
Kim Hood
I love your quilt! I'm not a quilter, but I think I could do this. 🙂 Thanks for sharing the instructions - and the tip about buying the fabric rolls.
Blessings,
Kim @ Curtain Queen Creates
Sarah Jane
Your quilt is amazing! I have only done baby quilts and I'm hoping to do one for my queen sized bed. I have purchased jelly rolls, but have no idea where to start. Any tips?
Sarah @ Sugar Cookie Cottage
Katie Adams
There are lots of different types of quilts you can makes with Jelly Rolls. The strip quilt is pretty easy and is great for a beginner because it is just straight lines. But if you wanted to get a little more difficult I would suggest looking on Pinterest for more ideas. I hope that helps!
Gina
For a queen size I'm guessing two strips across so if you do it as this tutorial states you need more fabric. So 4 jelly rolls and whatever each roll measures in yardage is how much you need for middle. I was considering using jelly roll top muslin center and maybe a solid cut into 2.5 strips or do o e size backing but do top with 3 strips which duvet maybe if I do it that way and borders. Do you think that would work?
Samsambo
What size of quilt doe s 2 jelly rolls make?
Katie Adams
This quilt was about 40 inches square. That was using the strips on the front and back.
Maria
I have to send this to my sister who quilts she will love this post! you are truly a talented all around crafter! and Baker too
Thanks Maria
Marti @ SewLicious Home Decor
It's super cute and using flannel sounds perfect! Thanks for sharing it with us...Pinned to the party board and my sewing board! 🙂
Marti
~The Bargain Babe from *Zucchini Summer Blog*
Gorgeous strip quilt, I love it! Still trying to finish two quilts I have in progress...eek!
Sandy Campbell
Visiting from Hookin on hump day, and I love this!! Thank you for sharing!!
Natalie Buehler
Love your quilt, something I have ever really tried - well, not as an adult anyway 🙂
Thanks for sharing your tutorial on Tutorial Thursdays Linky Party this month.
I look forward to seeing you again in the next month's linky.
x
Natalie
keri
What was the size of the flannel piece that you bought to make this quilt?
Cecilia
Hi there! Visiting from Kate's link party & I love your quilt! The fabric choices are just beautiful!
Shanice
Very creative! Thank you for sharing this post at City of Creative Dream's City of Links on Friday! I appreciate you taking the time to party with me. Hope to see you again this week 🙂
Jennifer dee
Could you use only one jelly roll if you don't use one for the back?
Katie
Yes, if you only wanted to use a jelly roll for one side of the quilt you would only need one.
Gina
You still need the middle too, right and either strip back or solid then maybe it can be duvet
Katie
Yes, that would totally work too! Thanks Gina.
Terra
I'm new, so forgive me for this dumb question, but, if the quilt strips are sewn together and then the border is stitched, where does the flannel peek out? I feel dumb but I'm sleep deprived and I want to buy my supplies, I just can't figure this one thing out! Lol thank you! ❤️
Katie
Not a dumb question at all Terra. With this quilt, you will have one side that is nice and finished, and the other side the seams will be exposed. If you look at the first image in the post you will be able to see that.
Belle
I just linked back to this post in my blog post. I plan on making one similar to this soon!
Heather H
I plan to make this quilt for 3 of my close friends having babies this year. My question is, I was at Joann and they have cotton strips and also flannel strips. Which one do you suggest to use? Thank you so much!!
Katie
Either would work just fine, I think it comes down to which fabrics to you like better? The flannel will be a little bit warmer so consider that as well when making your purchase. Cotton or fabric strips would work great for this type of quilt.
Terri
Would love to see the back of this quilt! Love the front!
Katie
The front and the back look the same. I sewed strips together for both sides.
Debbie
Thank you! I've always wanted to make a rag quilt. Now I have. It's a bit different, I didn't use jelly rolls. I had a lot of coordinating flannels so I cut varying strips. It's so fast, and very cute. Thanks for making it so easy
Katie
YAY! Way to go! I am so happy I was able to help!
Heather
How much flannel did you buy for the middle?
Katie
The package of jelly rolls says how many total yards of fabric there are, so I just bought the same amount of flannel for the center. Sorry. I don't remember exactly how much that was.
Gina
Jelly roll are usually 42 strips I think. You can look for jelly rolls you like and description will tell you how many are in pkg
Sharon - Her Organized Chaos
This is so great! I love rag quilts. I started one recently, not knowing what I was doing and my sewing machine ended up breaking go figure. This makes me want to get it fixed sooner! The hardest part for me is just coordinating fabric. I see so many cute things but when I go to look for fabric I'm so lost. LOL I would love if you linked this up on my blog for Craft Chaos Tuesdays! Thanks so much for sharing!
Melissa
Do you prewash any of your fabric types? Such as the flannel to prevent uneven shrinking?
Katie
For this quilt, I only prewashed the flannel before I cut it into strips. I did not prewash the strips.
Brenda Z
Hi! Love the quilt! Just wondering don't you clip the edges for the fraying part? Maybe it frayed without cutting it!
Katie
Yes, you can clip the edges if you would like. For this one, I did not clip the edges of the seams because I liked the look of the long frayed seam. But you could do it either way.
Dee Malingre
Hi Katie, do you think I could do this quilt with only polar fleece as the backing and only the jelly roll as the front with nothing in between?
Katie
Dee,
Yes, I think it would still turn out great without the center layer of batting. Good Luck! I'd love to see it when you are finished with it!
Dee Malingre
Thank you Katie, will let you know how I go 🙂
verley olson
I would like to sew two layered jelly roll strip sets together so they have a fringed edge on both sides of the quilt. I think I could place the two sets side by side - move them together, overlapping them by one inch along the 42 inch side, pin and sew a half inch seam all the way down this one inch layer, that way you would end up with a ragged edge on both sides of the quilt. I don't know if you would have to add another layer of flannel to the middle layer. Have to try this. Bought some winter children's flannel on 65% off so would like to make this. Will vary the width of the strips from 2 1/2" to 8 inches. I like the idea that I can quilt the middle of the strips as I go with a fancy design if I want without having all the bulk of a larger quilt. The kids would love the soft fringe.
Katie
That sounds awesome! I would love to see your finished project.
Betty
Quick question...do you really have to sew down the middle of each strip? Would love to try this! Thanks for a great idea!
Katie
Great question Betty! The purpose of sewing down the middle is to keep the three layers of fabric together. This makes it easier to quickly sew the strips together. Plus it gives the quilt that finished stitched look. If you chose not to do the center stitch, the quilt could still be done, but for me, I think I would spend more time fumbling with the layers of the different strips than it would be worth. I hope that helps!
Sherrie Kizer
I just made my first rag quilt like this and it is super cute! I am giving it to a friend's son and his wife for their new baby. I have washed it twice and naturally, it has frayed something fierce each time. I hate to give it to them knowing it will be a mess of strings after it is washed. Did you wash yours numerous times to get the majority of the fraying over with after you made it?
Katie
How exciting! I bet your quilt is super cute!
Yes, the quilt did shed for several washes after. I think if you told them that was going to happen when you give it to them, it will be all right. I have never met a minky quilt that didn't shed. 🙂
Cheri
Thank you for youf tutorial. ?
Katie
You are very welcome Cheri! Happy to help!
Heidi Maurer
What is the name of the jelly rolls you used? And you washed all fabric before you used them?
Katie
The Jelly Rolls I used are no longer available, it is a discontinued collection. Since it is discontinued I can't look up the name of the collection. I'm sorry. For this quilt, I did not prewash the strips, but I did prewash the flannel for the center batting layer.
Lee MacArthur
One year, we made a quilt for the grandparents 60th anniversary. Everyone provided a square. Some squares had family pictures reproduced like their wedding picture, pictures of the grand kids, etc while other squares were embroidered with important memories. It was put together and given to them at the party. It meant so much to them.
Katie
That is such a fabulous idea!!! I am sure that quilt is full of treasured memories. Thank you for sharing Lee.
Michelle
Oh my soul Katie, this is so, so gorgeous.
Katie
Thank you, Michelle! Are you a quilter? I wouldn't consider myself a quilter because I don't do it regularly but I can see how fun it is.
Megin
That is EXACTLY how I feel about Quilting, Katie! This might be the way for me to start. Thank you for the great Tutorial!
And thank you for sharing this week at Brag About It link party on VMG206 (Mondays at Midnight). I plan to feature you next week!
~ Megin of VMG206
Patty
This is my kind of quilting project. At one point in my life I really knew how to sew. Now my skills are limited to sewing on starts to my daughter's karate shirt and patching holes in my son's pants. Straight lines are a great way to get into quilting!
Thanks so much for posting at the Wonderful Wedesday Link Party for me to find!
Katie
I am so glad that you like this rag strip quilt Patty! I have added your link party to my list! Thanks for the invite!
Leah
I am so so glad I ran across this tutorial. I have made made 5 rag quilts using flannel strips.(I am a beginner at all this and do not claim to Ben a seamstress, quilter or any of those things). I have only used flannel, because that's what the others used. Excited to try this with cotton fabrics! The fabric choices are endless!! Thank you!
Katie
You are so welcome Leah! I am happy to help! Have fun mixing and matching cotton fabrics!
Claudia Ronnebeckd
Hi there...you didn't mention if you snipped the edges prior to washing? This is really pretty!
Katie
I actually didn't snip the edges on this quilt. I left them unsnipped so they would roll more during washing instead of fray!
Lori
you did NOT cut the seams, correct? but you could, right, and if so what would the outcome look like
Katie
HI Lori! I did cut slits in the seams. That is what creates the ragged look after it is washed.