
Stitch a cute fabric crown with this simple crown tutorial. Great for birthdays, pretend play, or a fun beginner sewing project.

I had so much fun making this fabric crown, and it might be because my serger and I are becoming best friends.
Don't worry, you don't need one to make this project.
I'll show you how to sew it with or without a serger, so everyone can join in.
This fabric crown is perfect for birthdays, dress-up days, or just a little make-believe fun at home.
Skill Level: Beginner
Total Time: 1 hour
Supply List
- ¼ yard Fabric
- ¼ yard Medium Weight Interfacing
- 2 x 64-inch Fabric (for ruffled tie)
- Coordinating Fabric for Flower
- Mini Ric Rac
- Invisible Thread (optional)
- Serger (optional)
- Ruffle Foot (optional)
- Elastic (optional)
- Basic Sewing Tools
Instructions
Please read all instructions first, because the triangle size varies when using a serger compared to a sewing machine.
To begin, you need to decide how big to make your triangles.
My daughter's head is about 18.5 inches around, and I wanted the crown to be about half of that, so 9 inches.
Also, consider how high you want the crown, and be careful not to make it too tall, or the tips will start to fall and won't stand up straight.
I decided to make my triangles 4 x 7 inches.
Cut 6 triangles out of the main fabric.
Then cut 3 triangles out of your craft interfacing that are slightly smaller than your fabric triangles.
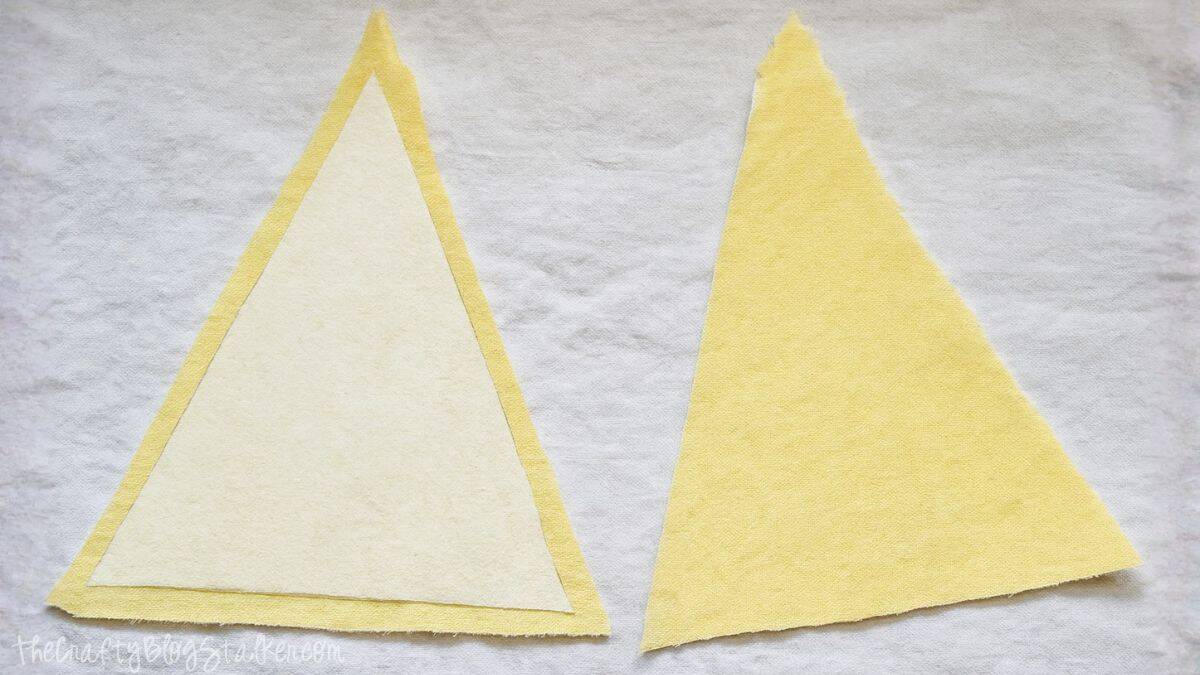
Lay the interfacing on a triangle with the shiny side down and iron according to the instructions included.
Then, put another triangle on top of the interfacing. Serge around all three edges.
**If you do not have a serger, instead of "sandwiching" the interfacing, iron the interfacing to one triangle just as we did above, but then take your other triangle and put them right sides together, sew around, leaving a gap to turn.
Turn the fabric right side out and top stitch around.
This will eat up some of your width and height, so make sure you include it if you aren't serging the edges.**
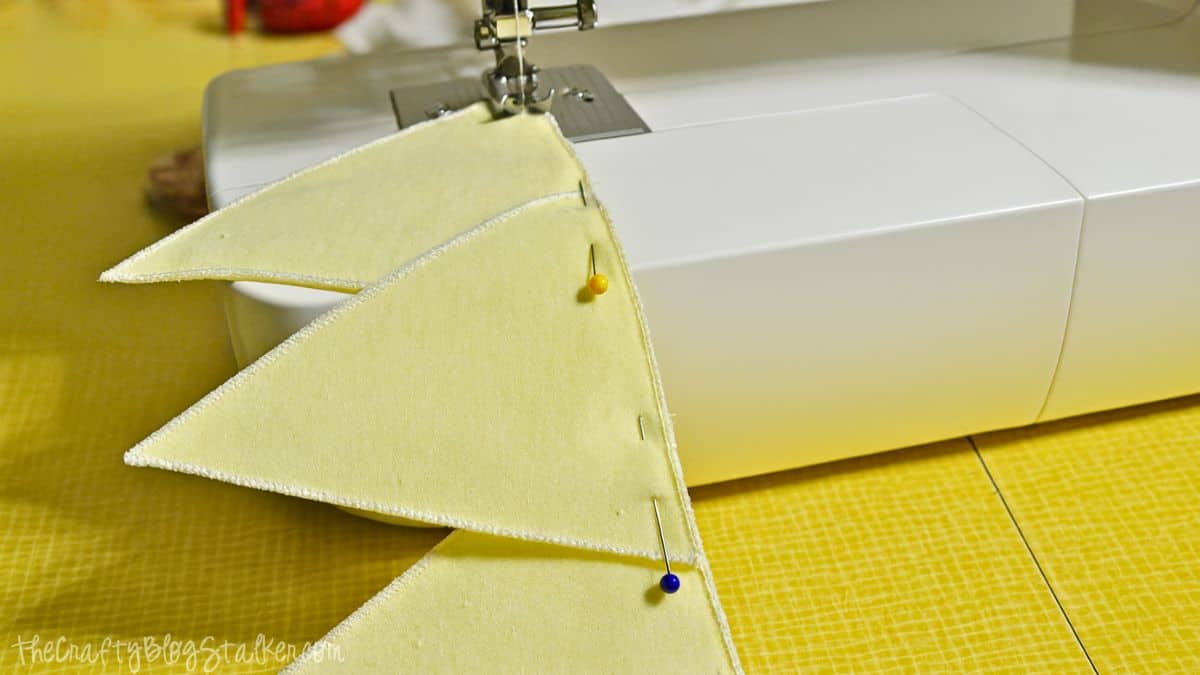
Pin the triangles together with the middle one in the front, and then line up the other two on the sides.
Make sure your spacing is even in between each triangle and sew along the bottom to attach them.
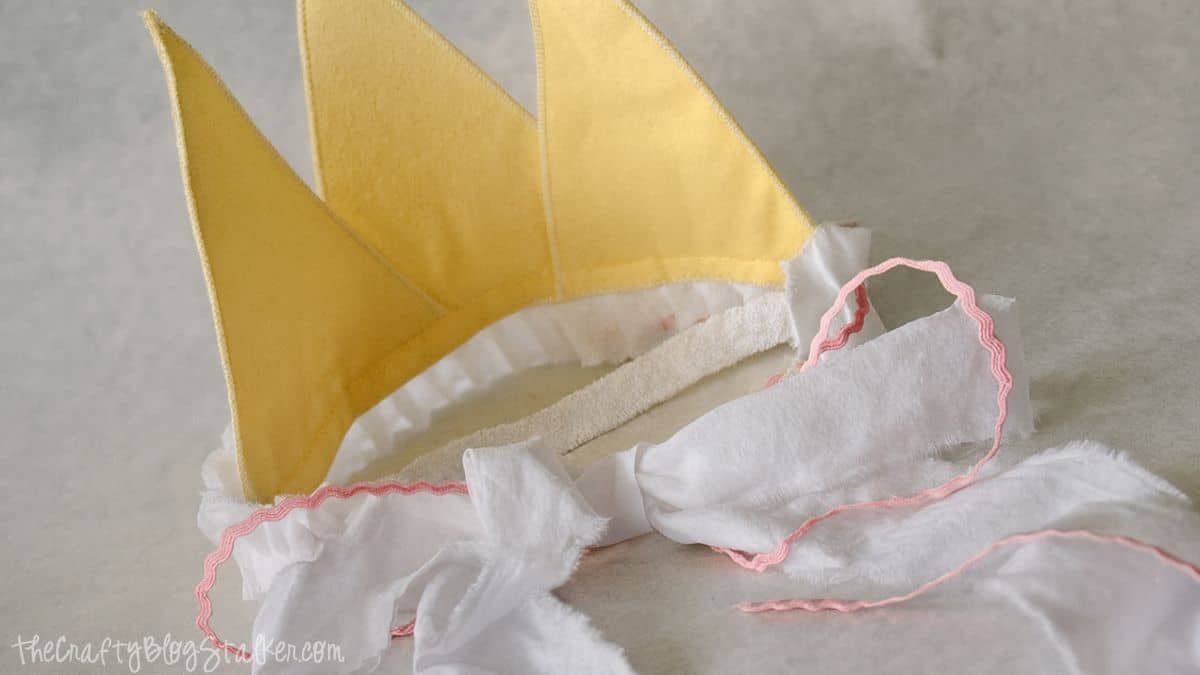
Next, let's work on the ruffled strip.
I used a ruffle foot on my sewing machine, but you can do it without one.
I took my strip of white fabric (muslin), which was about 2 yards long and 2 inches wide, and found its middle.
I measured from the center until I had about 20 inches, with 10 inches on each side of the center point.
Then I ruffled until I had the width of my crown (9 inches long) and stopped there.
I was left with a long piece of fabric with ruffles in the middle (I guess they are more like pleats, either way).

Take the mini ric rac and invisible or coordinating thread and sew it down over the stitching that created your ruffles.
I left my ric rac long as well, so that it was mixed in with the extra muslin for tying.

Now, we can attach the ruffled/pleated fabric to the triangles, lining up the ruffled section with the base of the triangles.
Sew right down the middle of the ric rac again, making sure you are attaching it to the base of your crown (side view below).

I made a cute fabric flower and glued it to the right side of the crown.
Lastly, I hot-glued a piece of elastic around the back of the crown to help it fit a bit more securely.
The back shows how I tied the bow with the fabric and ric rac.
Do you have a little girl who would want to wear a beautiful crown? It is such a fun little project to sew.

More Fun Items to Sew
Don't put that sewing machine away yet! Here are a few more fun ideas to sew.

Hi, I'm Katie!
I'm so glad you're here. Want to make something fabulous? I'm here to help!
Bonnie and trish @ Uncommon
ADORABLE!! She looks likes a princess! great tute!
Katie
Thanks Ladies! You guys make me smile! So glad to be blogging with you!
Kari the Sweetest Memory
This is so darling!
Katie
Thanks Kari!
Jessi
Too cute! Thanks for sharing the tutorial. Just wanted to drop by and let you know that I nominated you for the Sunshine Award on my blog today! I love your blog and you're so creative and inspirational, so thanks!
Katie
Thanks again, you are too sweet!
Maria
What an ADORABLE crown and cute idea!!!! I love it!
Katie
Thanks so much Maria! So glad you like it : )
Kristy Life-n-Reflection
This is so adorable, I just shared it on stumble upon and pinterest! It would make a great photo prop.
Katie
Thank you so much!! You're too sweet! I wish it would have worked as a better photo prop for me.. hopefully when my daughter gets older she'll let me play dress up with her! lol
Carol
I wish I had a little girl to make this for it is so adorable!
Katie
Thank you so much Carol! I think I might have to end up wearing it since my daughter won't, lol!
Kristi@ishouldbemoppingthefloor
Loving this...the ruffle and the beautiful fabric flower totally make it!
Katie
Thanks so much Kristi! I'll stop by and check it out!
Christina at I Gotta Create!
Awww...the crown is Adorable, as is your little model 🙂
<3 Christina at I Gotta Create!
Wildly Original Round Up party is open.
Katie
Thanks so much Christina! : ) Hope you have a great week!
Megan
What a beautiful crown!! Megan
Katie
Thanks Megan!
Nikki
Oh I love this! Reminds me of where the wild things are. 🙂 Thanks for sharing!
Katie
Thank you so much Nikki! : )
Jodi
What a fabulous crown and a wonderful tutorial. I am your newest follower.
Katie
Oh thank you so much!! : ) I am so excited to have you! : )
Ale
Thats a nice idea, thanks.
Ale
Costa Rica
Holly @ My Sister's Suitcase
SO darling!! Oh my goodness, you have me nervous about my little girl's birthday. All your party details are absolutely stunning! Just pinned it!!
Katie
Thanks Holly! Birthday parties are quite nerve wrecking! I worked for so long on this and was still freaking out at the end! I can't imagine decorating for a big party!!
Carrie@ My Favorite Finds
A Pink Lemonade party is in my daughter's future. This crown is adorable! I love how you are so excited about your new crafting tools! Thanks for sharing at our Handmade Tuesdays party.
six sisters
This is such a cute crown!! Our daughters will love this! We appreciate you linking up to our "Strut Your Stuff Saturday". Hope you'll come back soon! -The Sisters
Katie
Thank you so much! I wish my daughter loved it ; ) Hopefully others have better luck than I did!
Brittany @ Crafty Mischief
Too cute!
Katie
Thanks so much Brittany!
Paula Boudreaux
Thanks for the tutorial! I found you over at Pine Creek Style! New follower...
Katie
Yay! So glad to have you! Hope your week is going well!
Heather Kaluf
I just wanted to let you know, you are being featured on my blog today! I am finally back and getting caught up on all the parties I missed. Come on over and grab a featured button 🙂
xoxo
Heather
Katie
Thanks again Heather!
Emma
No serger 🙁 but I'm using your basic methods!! Making my daughter a hello kitty crown that I doubt she will want to wear lol. She's almost two, very girly, but runs the opposite direction when I have a bow in my hand 🙂 this mama makes pretties for lots of girlys but mine won't keep one on just like yours lol. Love the tutorial. When I post this crown I will give you a shutout!
Katie
Oh how cute! Can't wait to see how yours turns out!
Jane Louis
Simple yet gorgeous, love it! Thank you for sharing xx
Katie
Thanks Jane! Happy to have you stop by!
Chiara
Hi, made this today for my daughters friends birthday present. Was easy and looked great. Will now be making one for each of my little girls I think! Thankyou so much for sharing. Is it possible to ask how you made your fabric flower? I made one and attached it, however it took my longer than the crown to make as I am a hopeless hand sewer! Thanks again!
Amanda
Love the crown! I may have overlooked this, but how did you make the flowers? thanks!
Carissa Bonham
I love how this turned out! I just wanted to let you know featured this post in a round up of DIY crowns for International Tiara Day coming up on Friday.
Baileigh
I really love this idea thanks a lot!