

Build your own backyard table with these outdoor table plans. A simple DIY project that creates a beautiful space for outdoor meals and gatherings.

These outdoor table plans came from my dream of having a sturdy backyard table that could actually survive family life.
We love eating outside, and somehow the messes, noise, and kids running circles around the yard feel way less stressful out on the patio.
After spotting a chunky X-brace table at Pottery Barn, I teamed up with Rogue Engineer to create a version with the exact top design I wanted and enough durability to handle my kids treating it like playground equipment.
Even though these outdoor table plans look a little advanced at first glance, this build is surprisingly doable if you've tackled a few beginner DIY projects before.
Skill Level: Intermediate
Total Time: 1 weekend
Instructions
Step 1: Cut Lap Joints
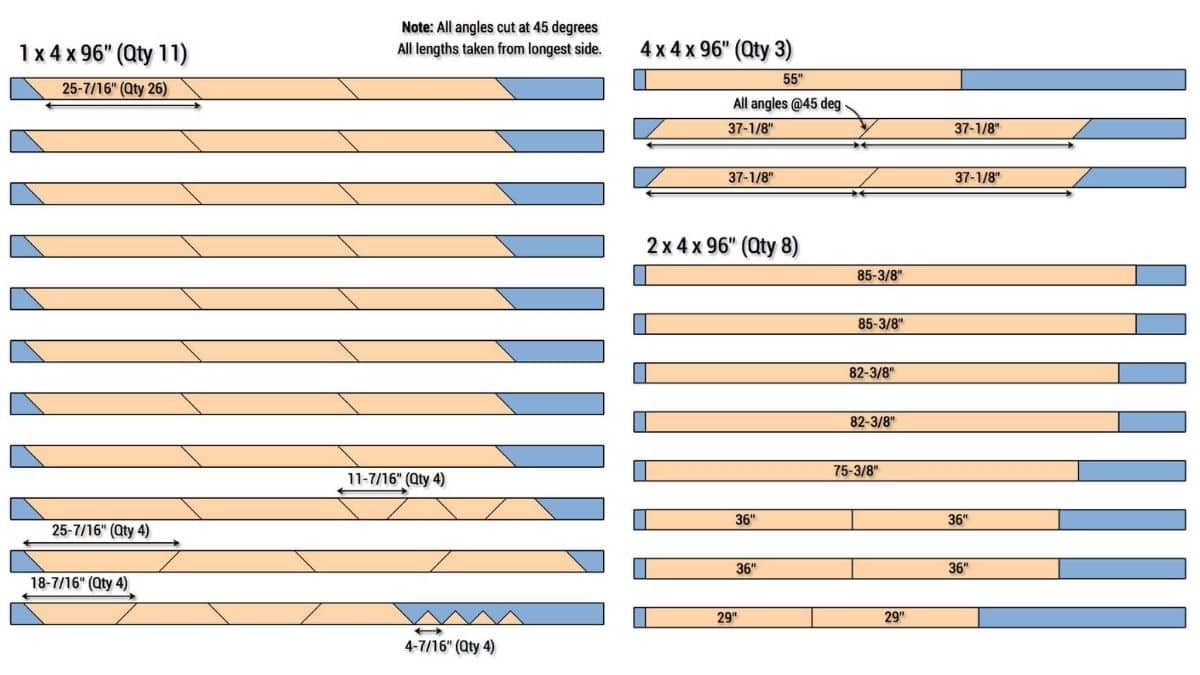
The build starts with the X-brace legs. The first step is to cut the lap joints according to the measurements below.
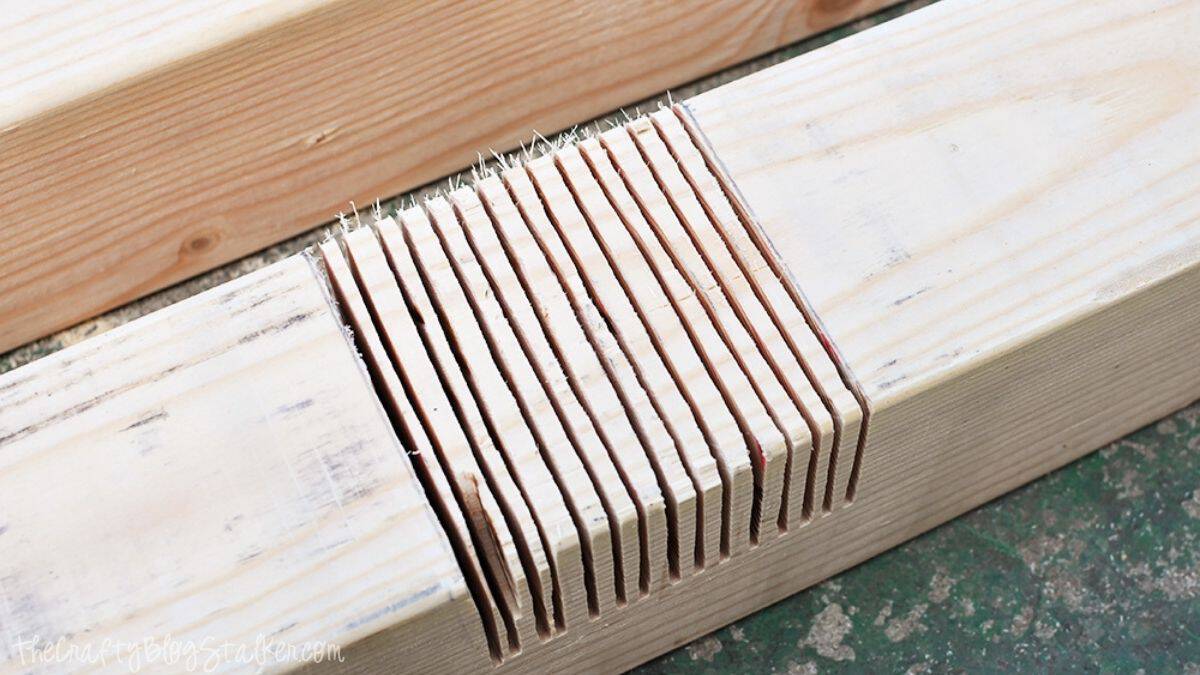
Start by cutting the two outer edges, then work through the center cuts. This helps keep the joint snug, preventing it from accidentally cutting too wide.
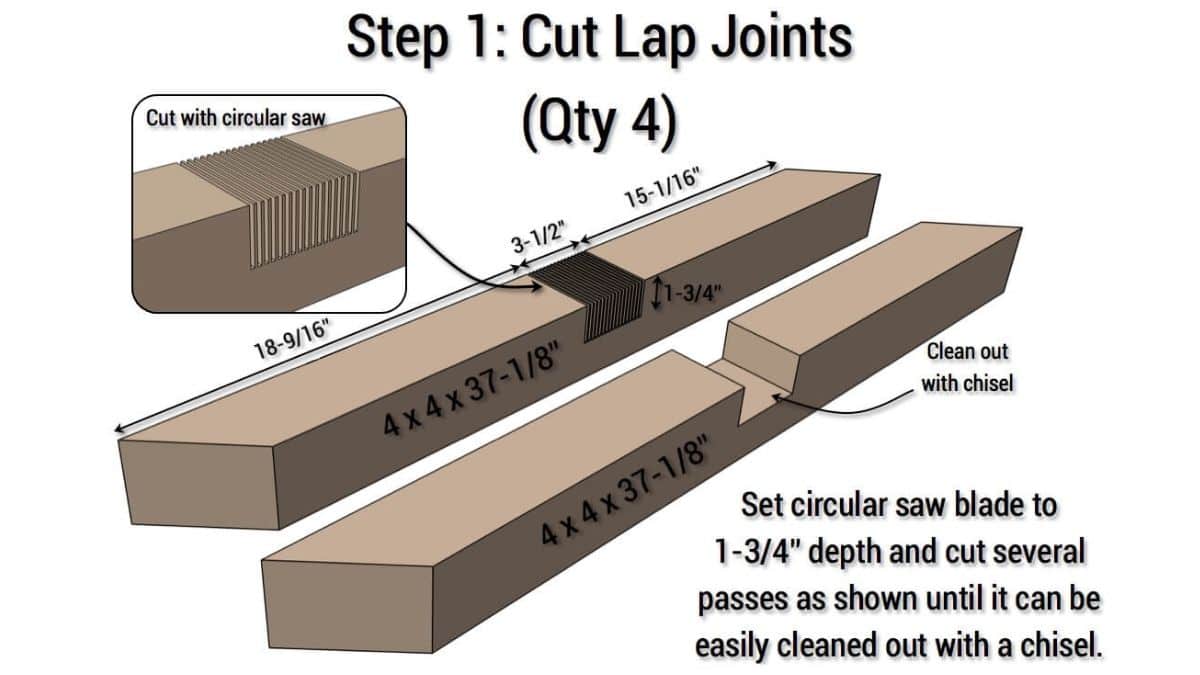
The cuts do not need to look perfect because the middle section will be cleaned out with a chisel afterward.
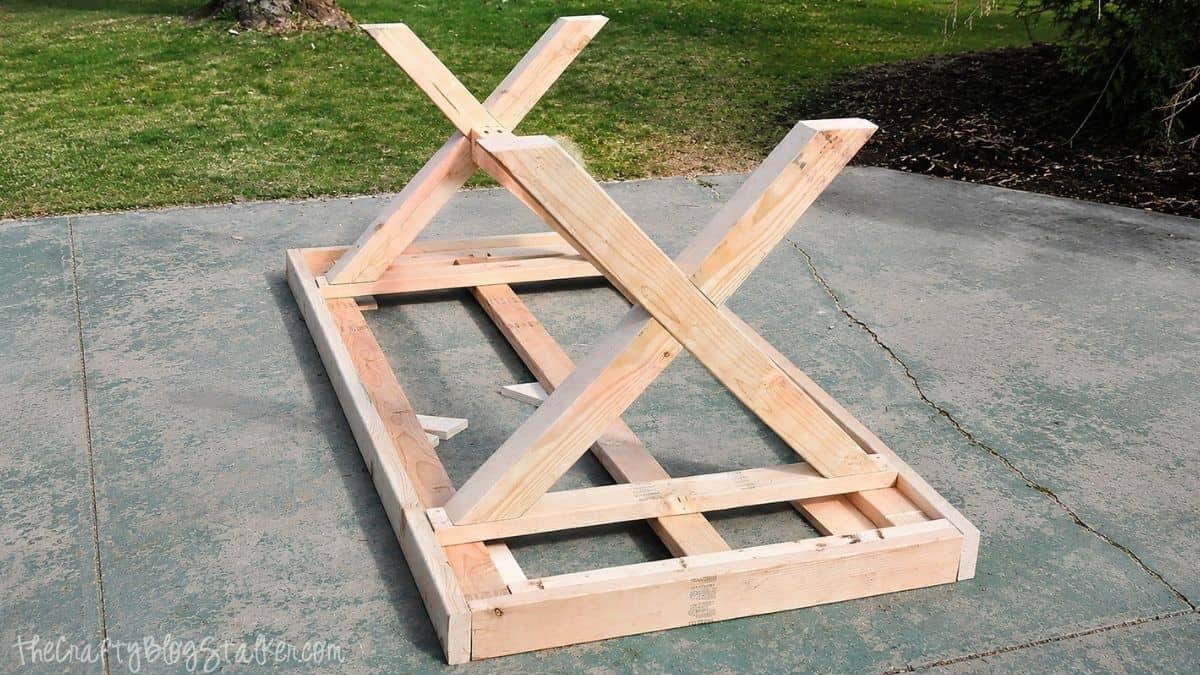
Step 2: Assemble Legs
Once the lap joints are ready, fit the two boards together to form the X shape.
Attach the pieces with wood glue and screws, making sure the lap joints face the correct direction before securing everything permanently.

Because the legs are cut at a 45-degree angle, the bottom edges can become sharp and prone to chipping.
Trim off the very tip with a circular saw...see below (note: legs are upside down in the picture, so that is the part that actually sits on the ground). Smooth the edges with a sander and sandpaper.
This small step helps the legs hold up better over time and gives the finished table a cleaner look.

Repeat for the legs on the opposite side of the table.
Step 3: Assemble Frame for Top
After the legs are finished, move on to the table top frame.
Most of the frame assembly uses pocket holes, so the Kreg Jig gets a workout.
Assemble the frame using 2 ½-inch pocket-hole screws, checking along the way to ensure everything stays square.

Step 4: Add Trim to Frame
Next comes the trim around the outside edge.
Since the herringbone pattern sits recessed inside the frame, you need to leave a ¾-inch space for the boards that will create the design.
The easiest way to do this is by placing scrap boards underneath while attaching the trim pieces.
Working on a flat, level surface helps keep everything evenly aligned.

Step 5: Assemble Table
Once the frame is complete, it is time to assemble the table base.
Attach the legs to the table top frame using wood glue and screws.
I actually found it easier to attach the large 4x4 support beam to each leg assembly first before attaching everything to the frame.
It helped me center everything evenly and made the assembly process smoother.
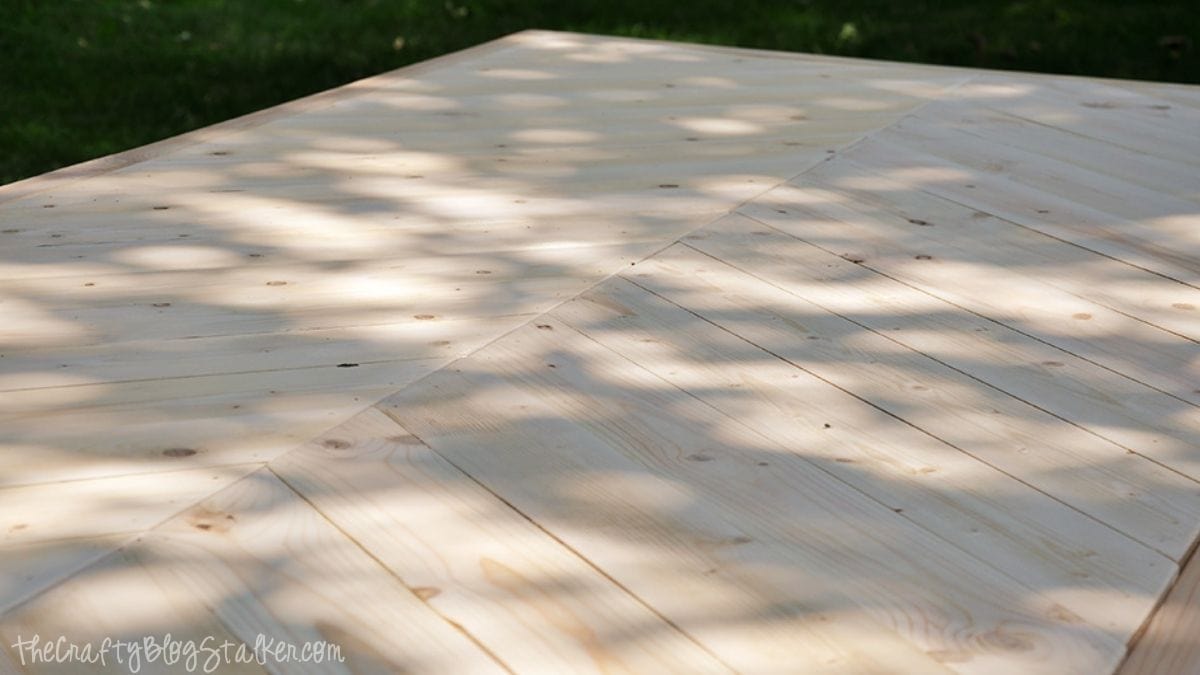
Step 6: Herringbone Pattern
The herringbone table top is definitely the most time-consuming part of the build, but it is also what makes this outdoor dining table stand out.
The process itself is not difficult, but it does require patience.
I highly recommend measuring and cutting each board individually rather than batch-cutting pieces in advance.
Lumber sizes can vary slightly, and even tiny differences can throw the pattern off.
As I worked, I cut each piece, dry-fitted it into place, and then attached it to the board one board at a time using wood glue and my finish nailer.
Going slowly here really pays off in the finished look.
Step up 7: Sand and Stain
After all the boards are attached, the final step is sanding the entire table.
Spend extra time smoothing the table top so it feels nice and even.
Once everything is sanded, apply your finish.
I used Thompson's WaterSeal stain and sealer in Moroccan Brown because I liked that it combined color and protection in one coat.
Plus, I was more than ready to see the finished table rather than wait through multiple finishing stages. 😄
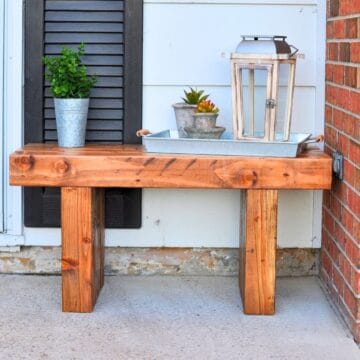
Final Thoughts
The finished table turned out even better than I had pictured.
The chunky legs make it feel sturdy and substantial, while the herringbone top adds so much character.
It has held up beautifully for outdoor meals, family gatherings, and everyday life with kids.
If you want to build your own, make sure to grab the downloadable outdoor table plans from Rogue Engineer.

More Furniture Build Plans
Looking for more woodworking tutorials? Here are a few more projects to try next:


Hi, I'm Katie!
I'm so glad you're here. Want to make something fabulous? I'm here to help!
Debbie
Amazing! Love it and all the others too!
Debbie
Emily Smith @ The Best of this Life
That table looks awesome! You did a great job!
shonee
wow that table!! Seriously so great! I have been wanted to get more into wood working, I have loved all of your wood projects. Thanks so much for sharing them!
-Shonee
Rebecca
What a gorgeous table. Thank you so much for sharing the plans. Definitely pinning this. And I completely agree that eating outside is much better than eating inside when the weather is nice. Clean-up is much easier.
sheetrock installer
Indeed an incredible project!
Katie Hall
Love this table! Where did you get the chairs?
Aaron
I know exactly where to put this! They are framing our new back porch now. Thanks for sharing
Jen
Love the table! Curious - is there a specific reason why you don't use treated lumber if it's an outdoor table?
Katie
Thanks Jen. I chose not to use treated lumber since I knew my kids would be eating on this table. Treated lumber isn't really meant for furniture and items that you will be sitting on and touching repeatedly, in my opinion. That is more for fences and maybe storage benches, things that aren't meant for everyday use. Of course you can use treated lumber if you think that would suit your lifestyle better, but it was just a personal choice for our family : ) Hope that helps!
Allan "the German" Sprenger
Because treated lumber is covered by impregnation cut's, each one a 3/8"strait cut, spaced about 1/2" apart in all directions. A 6ft. 2x4 has at least 2000 of these cut's in it.
Another solid valid reason for not using impregnated with creosote pressure treated lumber is just that you don't want to be eating and putting food on a table that's covered with creosote, yum!
Tanna
Hi! Love the table! Just wondering if you had an estimated cost for the materials? Thanks!
Printable Calendar
Love this table! Where did you get the chairs?
Isaias
For everyone who is asking. The Chairs are from Lowe’s. Item # 740360 Model # 63001
Sara
Hi Jen! What a beautiful table! Thanks for sharing. Like Katie Hall, I'm wondering if you could tell us where you purchased the chairs to go along with this table. You did such a great job pairing the two!
Thanks!
Sara
David
I love this table. I'm concerned about wood movement over the course of the summer and winter. Did you find any issues in that regard?
Katie
Hi David, There was some movement, but nothing that was a big deal to me. The only place I saw movement was the pieces in the top for the herringbone pattern, however if you were to pre drill and screw those pieces down that would probably eliminate most of that issue, I just didn't have the patience, nor did I want to see all the screws on the top. ; )
Rachael
Love this! I am thinking of making my own dining table and this is gorgeous! How much did it cost to build?
Alicia @ AHintofHome
This table is amazing and I absolutely love it! Your herringbone top was the inspiration for my own table! I switched things up a bit for mine and if you want, you can check it out over at ahintofhome.com. I made sure to link to your post in my tutorial. 🙂
Katie
Aww yay! It looks amazing! I miss that table so much!!
Ashley
My husband and I are going to make this table this month! I love it! Do you have any plans for a bench for one side? Also, where did you get those awesome metal chairs?
Anne
Hi Katie,
thank you of sharing the design and plan... this is amazing! I was also wondering where you found those chairs?
thank you!
chris
how has the Thomson's waterseal all in one stain held up? I'm in Illinois and just built the table. I used a similar product by Pittsburgh paints. I'm wondering if a var urethane or poly should still be applied. I mainly worried about all the knots in pine not holding up. During cold months I will cover the table but will be leaving it outdoors.
Terri
At this time I don’t need a table (although it is very nice)but I really like the chairs, just what I have been searching for (searching for quite a while). Would you you mind sharing where you purchased the chairs or who manufactured them.
Thank you, Terri
Kelly
Love this table! Where did you get the chairs from?
Thanks, Kelly
Anonymous
Lowe’s. Item # 740360 Model # 63001
ivwshane
You said you use Thompson's water seal and stain in a Moroccan color but I don't see that color on their website. Can you verify the color or brand?
Thanks for the plans!
Laura
Did you ever find this stain? I can't find it either.
Thomas
Hows the height? I'm about half way through the build and it seems to me that it might be too high. Thoughts?
Katie
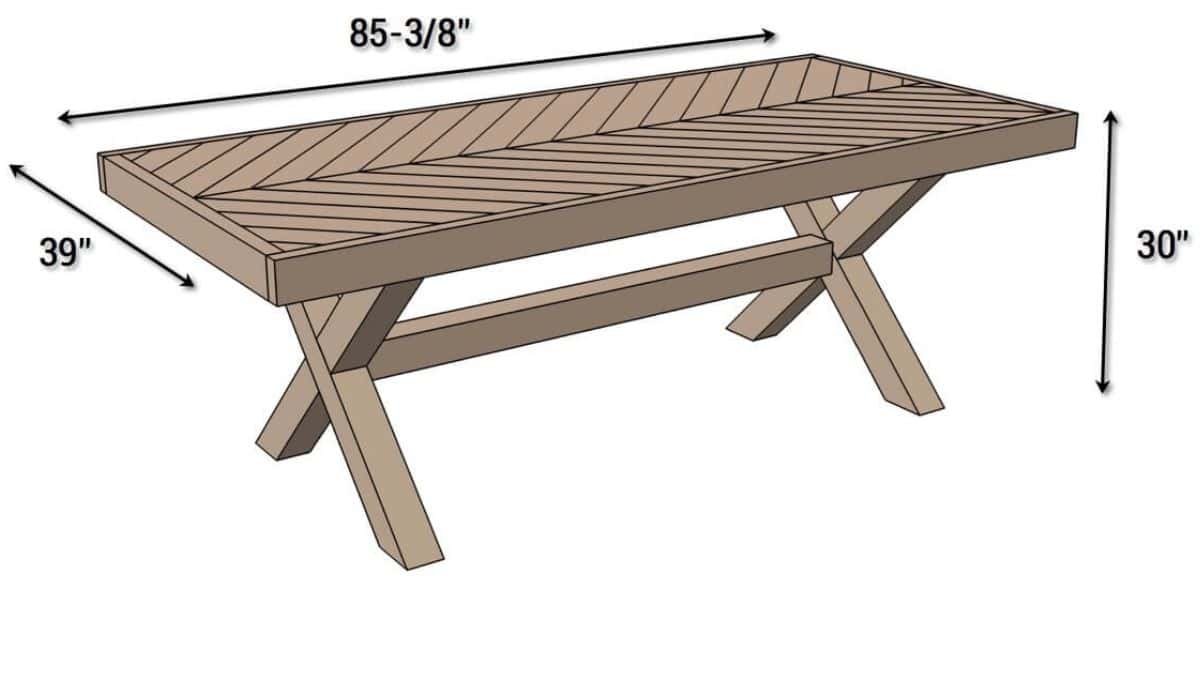
The height should be around 30". It is on the taller side for the average table height of 28-30" but we never noticed any issues using it with standard outdoor chairs.
aleidabianchi21
I made it by myself thanks to stodoys. I think it's the best way to learn how to build that.
Katie Seidel
About how heavy is the table? Super cute design and it seems like a pretty simple project given the right tools. I'm just worried about transportation. Also, would it be possible to prepare and stain the tabletop and legs separately, then assemble once inside the space? I'm thinking about using this as an indoor dining table.
Katie
Hi there, love this table and the deign. Would you mind sharing the estimated cost for the lumber? Thank you!
Mark Norman
As someone who does a lot of woodworking and has built several tables, I commend you on this project. Nice way to handle the legs, very nicely done. I hope it serves you well for years to come.
Georgia Conyers
Great design! I have always been interested to have like this for my garden. Can’t wait to start to build my own outdoor table. Thank you for inspiration you give to me.
Shantel Thomas
This is great! Thanks for sharing! I plan on doing something very similar in a 4x4 ft square (high top, maybe?) table. I have a few questions if you don't mind! For the frame, approximately how far are the legs from the actually edge of the table? Since my table would be a different shape/size I guess I'm wondering how much smaller I should make the frame? Like maybe 4-5 inch away from the table top edge? Also, is there a way to hide that long piece connecting the Legs? I really want to go fo a very minimalistic look so I'm wondering if that piece is necessary or if it was really just the look you wanted to go for? Lastly, you framed the table top, which I hadn't considered but I understand why, but if I'm going to finish it all with food filler prior to staining to give a cohesive look, do you think that part is also necessary? Sorry for all the questions but this was the best tutorial I found!
Dimah
Thank you for the design! I just finished building it. I can't find the stain color you chose. Any help on finding that would be appreciated.
Jennifer
Thank you for the design! I just finished building it. I can’t find the stain color you chose. Any help on finding that would be appreciated. 🙂
Aria
This is such an easy tutorial to follow, great job!
David
thanks for providing these outdoor table free plans diy.
Rylee Gregoire
Great job!
Jane
This is so nice! DIY has become my hobby in the past few months. Thanks for sharing!
Bill
Simple and stylish – this DIY table nails it!
Brandi
Your outdoor space just got an upgrade with this table!
Brook
Impressive craftsmanship on this outdoor table, great job!
Collin
This looks like a fun weekend project, can't wait to give it a try!
Frank
This DIY table would be perfect for enjoying morning coffee or evening cocktails outdoors.
Frida
I'm bookmarking this for my next weekend DIY project, thanks for sharing!
Mandi
This DIY table is giving me serious backyard goals – love it!
Fran
A DIY project that's both practical and picturesque – well done!
Felix
I'm sold! Time to upgrade my patio with a table like this.
Justin
This DIY table is the missing piece to my backyard.
Toni
This DIY table is a must-have for any outdoor gathering.
Alex
Simple steps, stunning results – can't wait to try it myself!
Debbia
Definitely considering this for my next DIY project!
Matilda
I like the design of the table. Great share!
Aavi
This blog post provides a fantastic guide on constructing your very own outdoor table! The free plans are comprehensive and easy to follow, making this project ideal for DIY enthusiasts of all experience levels.
Katie Adams
Thank you so much!