

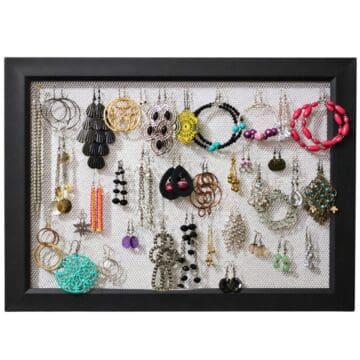
Make a DIY key holder for your entryway to keep keys organized and easy to grab, while adding a simple touch of style to your wall.

This little project came together with supplies I already had, which made it feel quick and low-stress.
I knew I wanted to bring a bit of yellow into my space, and since our keys always end up in the kitchen anyway, it made sense to turn that idea into something useful.
Now it works as both a key holder and home decor, and it's become our go-to drop zone when we walk in the door.
Skill Level: Beginner
Total Time: 1 hour
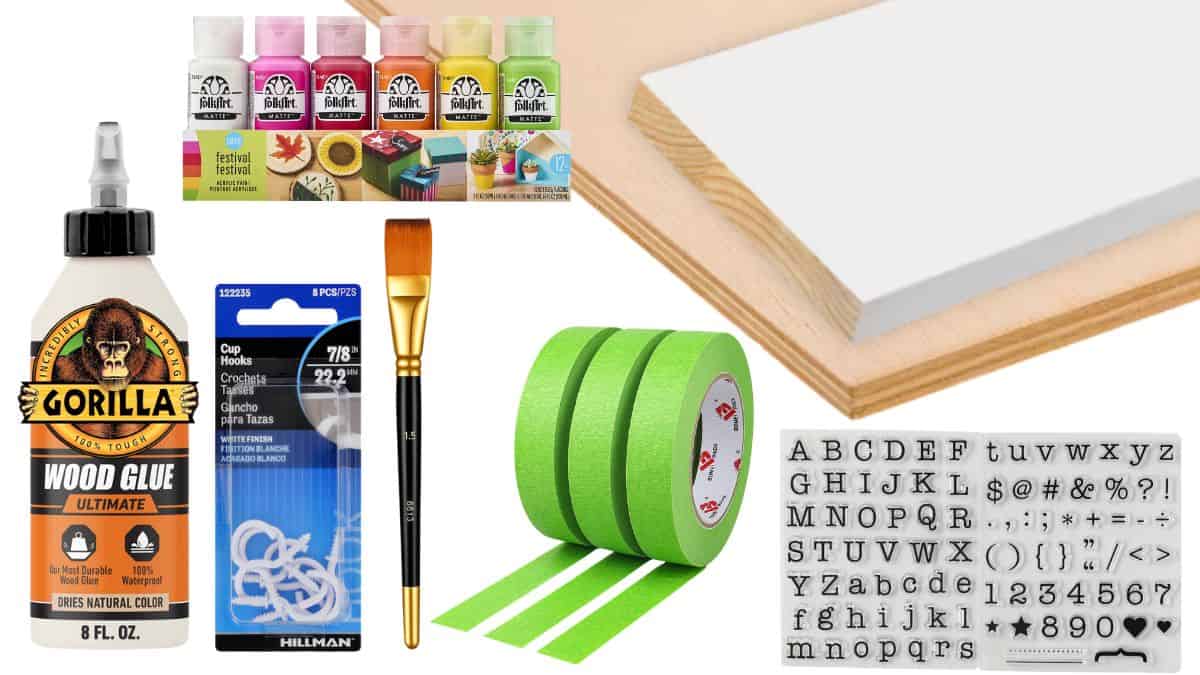
Supply List
Some links may lead to similar items when the exact item is unavailable.
- 1-in x 6-in Trim Board
- ¼-in Plywood
- Paint (white & yellow)
- Paint Brush
- Painter's Tape
- Alphabet Stamps
- Wood Glue
- 4 Small Cup Hooks
You can absolutely swap things out based on what you have on hand. Different paint colors, fonts, or even hardware styles will give it a completely different look.
Instructions
This is one of those projects I made early on, before I thought to take step-by-step photos, but the process is simple and easy to follow.
If you are cutting your wood pieces, start by measuring and cutting the back board to about 12 by 6 inches.
Then cut four small blocks that will hold your letters. Mine measured about 2 by 2.75 inches each.
Step 1: Paint the Wood
Begin by painting the back board with white paint.
Apply thin, even coats and let each coat dry fully before adding another so the finish stays smooth.
At the same time, paint the small wood pieces yellow, making sure to cover all sides and edges.
Set everything aside until it is completely dry.
Step 2: Create the Yellow Stripe
Once the back board is dry, use painter's tape to mark off a stripe along the bottom.
Place two strips of tape about an inch apart to create a clean line.
Paint the exposed section with yellow paint, then let it dry fully before removing the tape.
This step gives you that crisp, finished stripe across the bottom.
Step 3: Add the Lettering
Next, add your lettering to the small wood blocks.
You can use alphabet stamps, vinyl, or stickers to spell out the word "keys."
Take a minute to line them up so the spacing looks even before attaching anything.
Step 4: Attach the Letter Blocks
When you are happy with the layout, flip each block over and apply wood glue to the back.
Press them onto the top portion of the board and hold them in place for a few seconds.
Let the glue dry according to the instructions on your bottle so everything stays secure.
Step 5: Install the Hooks
After the glue has set, it's time to add the hooks.
Screw a cup hook into the yellow stripe directly below each letter block.
Try to center each hook underneath its letter so everything lines up nicely.

Step 6: Hang Your Key Holder
To finish, hang your key holder on the wall in your entryway or wherever you tend to drop your keys.
I used Command hooks for an easy, no-damage option, but nails or screws will work just as well, depending on your space.
Final Thoughts
This project is simple, useful, and easy to customize.
It keeps keys in one spot so you don't have to search for them on the way out the door, and it adds a little personality to your space.
It's one of those small changes that make everyday life feel just a little more organized.

More Organizational Ideas
If you're looking for more simple ways to keep your home tidy, these organization ideas are easy to try and actually work for real life.


Hi, I'm Katie!
I'm so glad you're here. Want to make something fabulous? I'm here to help!
Chris Wyrick
Congratulations on the pregnancy and the upcoming relocation, hopefully your last for awhile! And thank you for all the lovely ideas you share with us. Wishing you all the best!
Rachel
Love that cute little key holder. It's so sunny and bright!! And congrats on the pregnancy!! And the move!! So exciting!
Inspire Me Heather
What a cute key holder - thanks! Congratulations on your big news too, you must be so excited!
Chissy
This is so cute!! I love the idea!!
Thanks!
Chrissy
Crystal
Love it!! Especially the colors!! Thanks for sharing 🙂
Shauna {The Best Blog Recipes}
Just saw your key holder over at Somewhat Simple's Link Party and had to come over and check it out 🙂 Super cute project!
Mel the Crafty Scientist
So cute and so useful! I love the bright yellow color and the little stripe - just perfect! : )
-Mel
Kelly
Such a sweet project! I love the yellow too!! Hugs to you, friend.
Jaime from Crafty Scrappy Happy
Super cute!! I love it!
Jaime
Trish @ Uncommon
Love this project! Hope you are feeling well!
Take care,
Trish
Roeshel
It's awesome! Love it! Even with a basket near the door here, someone is always losing their keys. lol!
Cheryl | That's What Che Said...
This is super cute! Thanks for linking up to Monday Funday! I featured you today!
Leah
So cute, I need a little key holder at my house...