



Turn a walk in the woods into an adventure with this DIY nature scavenger hunt for kids. Each compartment holds a tiny treasure they find along the way!
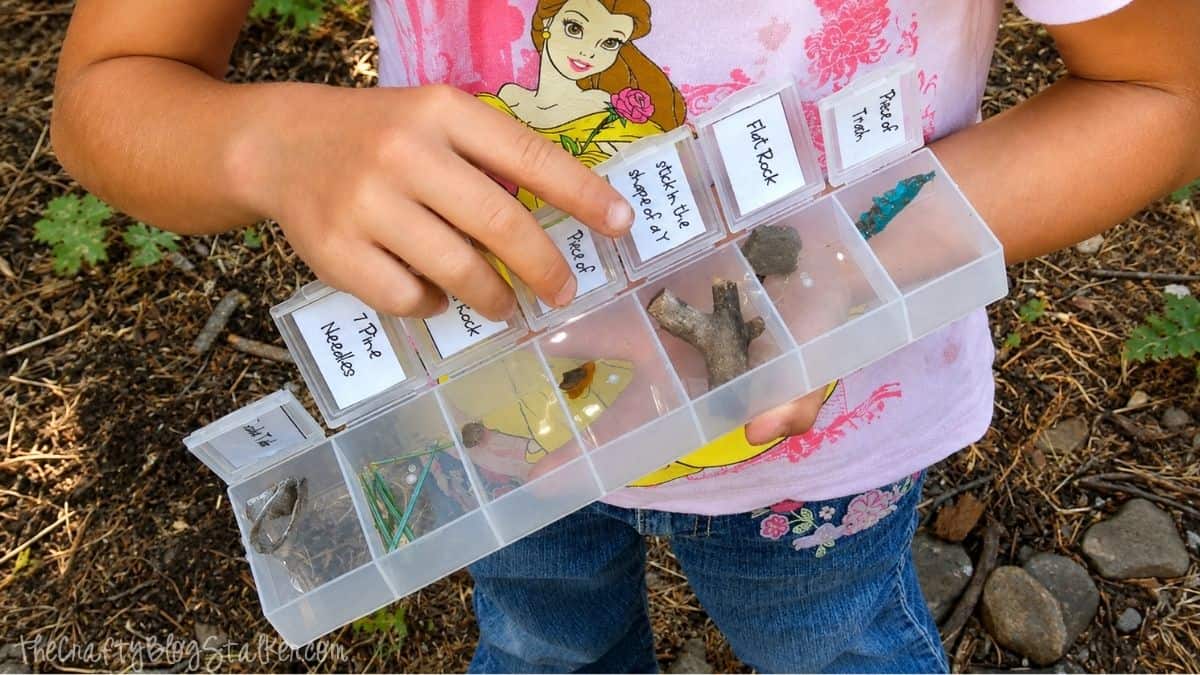
We recently had a camping family reunion, and I was put in charge of coming up with a game for the kids.
Well, you know me. There was no way Duck, Duck, Goose was going to cut it, so I made a scavenger hunt they could take exploring with them.
The kids had so much fun searching for natural treasures that they played with these little scavenger hunt boxes all weekend.
Jump to:
Skill Level: Beginner
Estimated Cost: $5-$10
Total Time: 1 hour
Supplies List
- Large Pillboxes
- Pure Acetone
- Colored Cardstock
- Printer Paper
- Glue Stick
- E6000 Glue
- Cricut (optional)
- Adhesive Vinyl (optional)

I purchased the pill boxes from Dollar Tree. They are much cheaper there than on Amazon.
How to Make a Nature Scavenger Hunt
The fun part about this outdoor scavenger hunt is that the container does double duty.
Each little compartment has a clue inside the lid, and when the kids find that item, they can tuck it right into the compartment.
Instead of simply checking things off a scavenger hunt list, they end up with a tiny collection of their discoveries.
It makes the hunt feel a little more like a treasure hunt, which was a big hit with our group.
Prepare the Containers
I started with large seven-compartment pillboxes.
The individual lids make them perfect for this project because each compartment can hold a different scavenger hunt item.
Mine had the days of the week printed across the lids, so I used pure acetone to carefully remove the lettering.

This tip is also included in my 25 Helpful Tips and Tricks post.
If you use acetone, test it on a small area of your container first. Different plastics can react differently, and you don't want to discover halfway through that your particular container doesn't like acetone.
Once the printing was removed, I had nice clear lids ready for my scavenger hunt clues.

Create the Scavenger Hunt Clues
Next, I measured the inside of each lid. This told me exactly how large to make the individual labels.

Then I started thinking about the kinds of things the kids would realistically find while we were camping. My list of items included things like a flat rock, leaves, pine needles, sticks, seeds, a soda can tab, and even a piece of trash.
Yes, trash counts! If they're going to be exploring anyway, we might as well leave the area a tiny bit cleaner than we found it.
I created my labels in an Excel sheet, but you can make yours in whatever program you're comfortable using. I don't have a printable template for this particular scavenger hunt because the best items will depend on where you're exploring.
A scavenger hunt in the woods might include a pinecone, twig, different types of leaves, or an interesting rock. A backyard version could include a flower petal, feather, seed, or piece of bark.
This is also a great way to customize the game for kids of different ages. Younger children can search for simple objects, while older kids can work from more specific clues or look for signs of wildlife and different habitats.
Make the Labels More Durable
Once my clues were printed, I glued the sheets onto colored cardstock using a glue stick.
Then I covered the sheets with clear laminate contact paper before cutting the individual squares apart.
This made the labels more durable, which was important since I knew these little boxes would be carried all over the campground.

I also made each scavenger hunt a little different. That way, the kids could play several times without searching for the exact same things over and over again.
Once everything was cut apart, I used E6000 to attach one clue inside each compartment lid.

Allow the adhesive to dry completely before handing the containers over to the kids.
Here's what the inside looked like when all of the labels were in place.

Add the Find It! Lettering
For the finishing touch, I grabbed some scraps of brown adhesive vinyl and used my Cricut to cut the words Find It!
I applied the letters across the outside lids, and that was it. Our little nature scavenger hunt boxes were ready for an adventure.
Of course, the Cricut lettering is completely optional. You could use stickers, permanent vinyl letters, or leave the outside plain.

I love how they turned out, but more importantly, the kids loved them too!
Ideas for Your Scavenger Hunt
The best part about making your own scavenger hunts is that you can change the clues to fit wherever you're going.
For a nature scavenger hunt in the woods, look for small objects that can safely fit inside the compartments, such as a tiny pinecone, smooth rock, seed, twig, pine needles, or fallen leaves.
Avoid asking kids to collect living insects, wildflowers, anything from protected areas, or objects that shouldn't be removed from their natural environment.
You can also turn some clues into things the kids simply need to spot instead of collect.
Animal tracks, a bird, interesting tree trunks, signs of wildlife, or reflections on water can all become part of the adventure. If you want to include those, give each participant a small spotter sheet or have them take a picture with a camera instead.
Think about where you'll be exploring when creating your clues. The natural treasures you find on a mountain trail will be different from those found in a backyard, campground, or picnic area.
And don't make the scavenger hunt so difficult that everyone gets frustrated. A successful scavenger hunt should include enough easy finds to keep kids excited, with a few trickier discoveries mixed in for extra challenge.
Frequently Asked Questions
Choose items that are common in the area you'll be exploring. Rocks, fallen leaves, pinecones, seeds, twigs, and pine needles are easy places to start. You can also include things to spot rather than collect, such as animal tracks, birds, insects, or different types of trees.
Yes, and it's easy to adjust the difficulty. Younger kids can look for simple items based on shape or color, while older kids can search for more specific plants, textures, wildlife clues, or features in different ecosystems.
Absolutely. You don't need a camping trip or woodland trail to play. Customize the clues around natural items the kids can find in your backyard, neighborhood, or local park.
Turn it into a "spot it" clue instead. The kids can show an adult what they found, mark it on a separate sheet, or take a photo. This works especially well for things like tree trunks, animal tracks, flowers, and wildlife.
For a longer outdoor adventure, plan for the location and weather. A water bottle, sunscreen, appropriate shoes, and other basic outdoor supplies can make exploring much more comfortable. If you're heading onto a trail, adults should also prepare for local conditions, including ticks and changing weather.
Yes! That's one reason I made several versions. You can create new clues for your next camping trip, nature walk, picnic, or backyard adventure and use the containers again.
Need help with this project?
Click a button below to ask AI for some scavenger hunt ideas for a camping trip.

Hi, I'm Katie!
I'm so glad you're here. Want to make something fabulous? I'm here to help!
Laurel @ Ducks in a Row
What a fantastic idea - I really really love it!
Sketched Soul
Oh this is so awesome, love the idea..and yours turned out wonderful!!
Thank you for sharing the whole process 🙂
Theresa
Love this idea! I host a lot of parties and this will come in handy when game planning starts!
Grammy Goodwill
What a great idea. Now that I know about it ahead of time, I can stock up on those dollar ones when I see them even cheaper at yard sales or Goodwill.
Natasha SerenityYou
love this idea!! so cute!!!
Renae.
so cute and so well explained. I'll have to do that with my grands and that will keep them busy, huh? thanks!!!!!!!!!
(confession: I don't like diy sites --- cuz i don't do diy stuff/diy crafty stuff --- but I love yours)
hehehehe
(hug)
Carole
Great idea. I found you through Crazy Mama's fun blog hop. I linked in a post about my travel bucket list. Have a super week.
Holistic Homemaking
I am going to have to do this for my kids. What a novel idea! I love this! Thanks so much for sharing it at the Happy Hello this week!! I look forward to future links you share!
Recipes We Love
LOVE IT my son would have SO MUCH FUN with this
Allison {A Glimpse Inside}
This is such a great idea!! How fun! It would be cute to do at a birthday party too!
Thanks for linking up to this week's Catch a Glimpse party! I'll be featuring this tomorrow! 🙂
micki @ ADD housewife
great idea! Thanks for linking up at pin inspiration thursday 🙂
Nicoletta Cossa
it's awesome! I would like to do that but I have no pill boxes... I will look for something else! I found your link on One Creative Mommy, nice to meet you!
KCoake
What a clever idea! Looks like lots of fun.
Rachel
That's super fun! My kids would love it.
Nicole@Show Off Friday
That is such a cool idea! I'm pinning it too!
Blythe
Great idea! I bet the kids had fun!
Keitha
WOW! I am in love with this idea. I have done scavenger hunts with egg cartons, but your pill boxes are so much cuter!
Erin
great idea!
the Sweetest Memory
So creative! What a wonderful idea! Kari
Bonny Yokeley
What a fun idea! I didn't know acetone would remove those letters. I've pinned it to try with my kids, and I've become your newest follower. I hope you'll check out my blog for some kid-friendly activities we've tried this summer.
Bonny @ thedomesticatedprincess.blogspot.com
Cindy
Great idea for when the grandkids visit! Love it.
Tammy
This is fantastic! We are headed out for a week long camping trip in a few days and I'm going to "whip" these up first. Is there any chance you are willing to share your already finished spreadsheet? Or at least the formatting measurements? I can't wait to explore your site some more! Thanks for sharing.
Sarah
I LOVE this! Thanks so much!
sew sweet vintage
Super fun idea! My nieces and nephews love games! Gotta try this! Pinned:) I posted anchors aweigh. Drop by
Wanda Ann Olsen
What a great idea! Thank you for sharing at Memories by the Mile's Tuesday Trivia. Pinned it and be sure and check back for Friday's features.
Hugs,
Wanda Ann @ Memories by the Mile
Cheryl @ Sew Can Do
Such a great idea. And so handy to hold all the finds! I've featured this as a Craftastic Pick. Stop by and grab a Featured On button. Thanks for linking to the Craftastic Monday party at Sew Can Do:)
A Moms Rambles
Hi! I recently wrote a Summer Activity bucket list on my blog and I gave you a shout out! You can check it out here if you would like!
(all photos and page mentions were sourced and linked back to your original post.)
Deanna Zamora
I WOULD LOVE TO MAKE THESE FOR OUR CUB SCOUTS. I JUST FOUND THE SAME VITAMIN BOXES AT THE DOLLAR TREE. WOULD YOU MIND SHARING YOUR FILE YOU USED ON EXCEL TO SAVE ME SOME PRECIOUS TIME? I'M A VOLUNTEER FOR BOY SCOUTS, I HAVE 4 BOYS AND WORK FULL TIME. I LACK IN THE CREATIVE SIDE AND WOULD JUST LOVE THIS FOR NEXT CAMPING TRIP IN OCTOBER 🙂
THANK YOU SO MUCH FOR BEING SO CREATIVE!! I LOVE TO READ YOUR BLOG
Deanna Zamora
Sorry it was in all CAPS! We chart our patients in all caps. :-/
Katie
I am so sorry but it is not a file a saved. I wish I would have because I have had several people ask for it. So sorry.