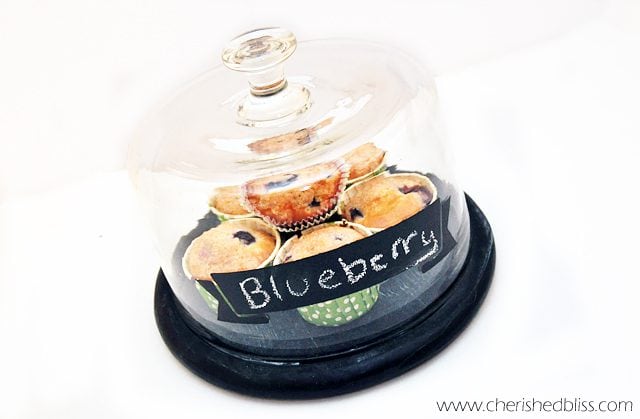
Today I'm going to share a fun little project to help display all those yummy treats you will be baking this season! Yes, you will need one of these chalkboard cloches, I promise ; )

I actually purchased this cloche a while back at a garage sale for $2! I love a good find : ). I knew I wanted to do something with it, but with all the moving I just never knew exactly what. I'm in my house now and decorating is on my mind. I am so so so ready for the holiday season! I'm always in the mood to bake (which isn't a year round occurrence, lol). I'm also a huge fan of using one thing from season to season. So I made this chalkboard cloche using Plaid's new FolkArt Multi Surface Paint. You can get both the paint, and the stencils at Michael's!
So this is how my cloche started out.

I have to admit, it was kinda awesome before, but as my husband would say.... I want to paint everything. So I did. I painted it! Wanna know how? Well here you go....
Supplies:
-FolkArt Multi Surface Paint
-FolkArt's new Chalk Anything Paint
-Handmade Charlotte Stencils
-Stencil tape
-Foam brush
Painted Cloche Tutorial:
This is going to be really easy. Why you ask? Well, I am kinda loving this new multi surface paint from FolkArt! I could use it on the wood, and the glass! I didn't have to go back and forth between all the different types of paint that's appropriate for different surfaces! This is seriously going to cut down on the ridiculous quantity of paint I have in my craft room! Plus that Chalk Anything paint turns literally ANY surface into a chalkboard, and it's clear. So if you want to paint over the cover of a book, but still see the cover and write in chalk.. well now you can! It also turns ANY paint you have into chalkboard paint. Just put a coat over whatever you want!

Ok, let's get started. First you will want to clean your surfaces following the directions! Then tape your stencil in place.

Using your foam brush or dauber, paint with the color of your choice. I chose to use black since it's great for the fall, but still universal!

While waiting for this to dry, I went ahead and painted the wooden part too. Once the paint on the glass was dry I cured it in the oven following FolkArt's directions. Once that was done I added a layer of the Chalk Anything to the banner on the glass, and the painted wooden bottom. Before you can use the chalkboard though, you have to condition it. There are instructions for this on the bottle as well. *Please be sure to follow all directions on the bottles and let everything cure as necessary!

Now just decorate and use! In the stenciled banner I made on the glass you can write whatever dessert you are sharing. This would be so fun to take to a party! : ) Label included!

Are you eyeing those blueberry muffins? You can get the wonderful recipe from my sister's blog, Once a Mom Always a Cook!


Laura / The Shed blog by Pet Scribbles
Love this idea to paint a cloche with chalkboard paint! Your took the cloche from nice to awesome! 🙂
Trish @ Uncommon Designs
So adorable! You are going to get such great use out of this little guy!
Take care,
Trish
Diana
Cute project Katie!! Love the chalk banners. 🙂
Kimber
I love this! The idea of writing the type of food on the glass is so fun. I definitely love the idea that the chalk anything is clear. SO many possibilities!
Katie
So cute, I love it!
Heather Painchaud
I love this Katie! Thanks so much for linking up ~ I've featured it on FB today 🙂
Mary @ Redo 101
Your cloche looks great, so do the muffins 🙂 and thanks for the giveaway offer!
Mary
PJ
Is this paint food-safe? Just curious. I know a lot of times I even see decorative plates that say that they are not for use with food so I just wondered.
Katie
I wouldn't put food directly on it just to be safe! Sometimes, when I want it to appear it is sitting directly on something that might not be food safe, I just put a layer of clear plastic wrap down first and tuck it under the food : )
Amy Marshall
I love this! I have one of these little cloches I picked up at Goodwill. I had thought about painting it but just hadn't gotten around to it. Definitely painting it with chalkboard paint...thanks for the inspiration!
Have a great week!
Amy
Katie
Thank you Amy! So glad you like it : ) Would love to see how yours turns out!
Sandy
Very good idea..and so useful..
Katie
Thanks so much Sandy!
Emily
Perfect! I love how it turned out. That stencil is really cute, too!
Bry Sando
How long do you bake a mug that you use the Chalk Anything paint on? The bottle just says cure 21 days or bake and I can't find any info on the website it gives.