
Learn how to sew a yarn bag with this easy tutorial and create a tote that keeps your yarn, needles, and projects neatly organized.
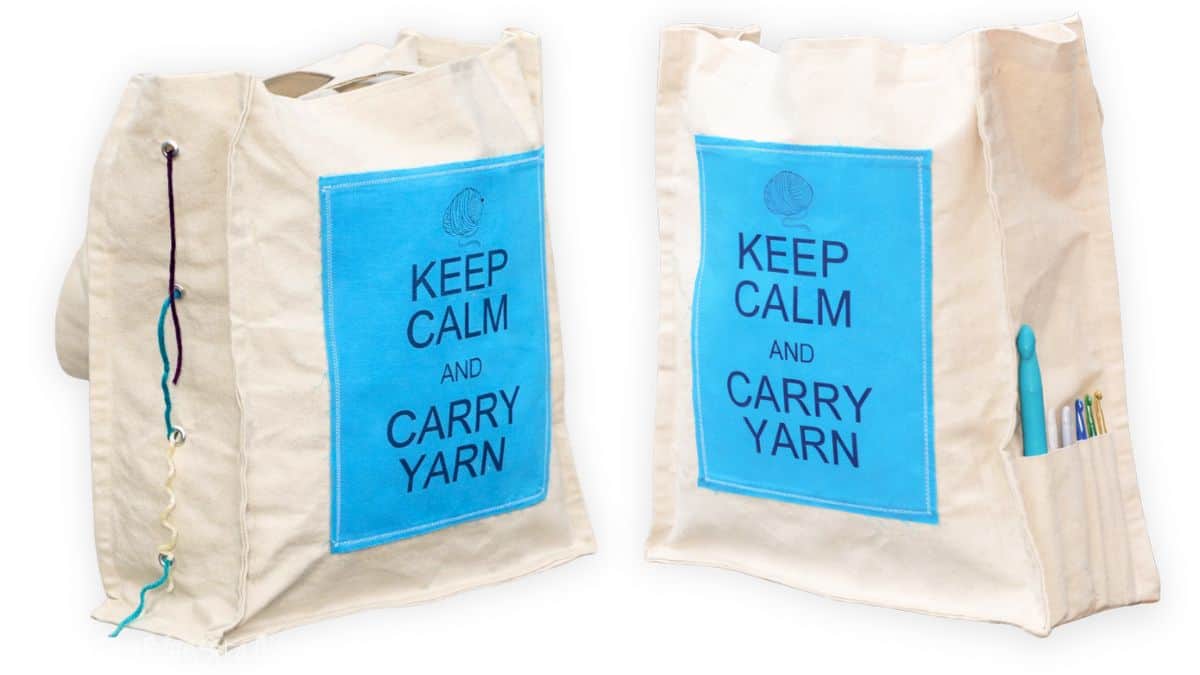
Remember when the Keep Calm trend was everywhere? The trend may have passed, but I still love this yarn bag and use it all the time.
I crochet a lot in the car while on the go, and my yarn used to get tangled every single time.
This yarn bag keeps everything neat with a spot for hooks, a pocket for patterns, and a clever opening that lets the yarn feed right through the side.
Now I can grab my tote and crochet on the couch, in the car, or at the park without dealing with a tangled mess.
Skill Level: Beginner
Total Time: 90 minutes
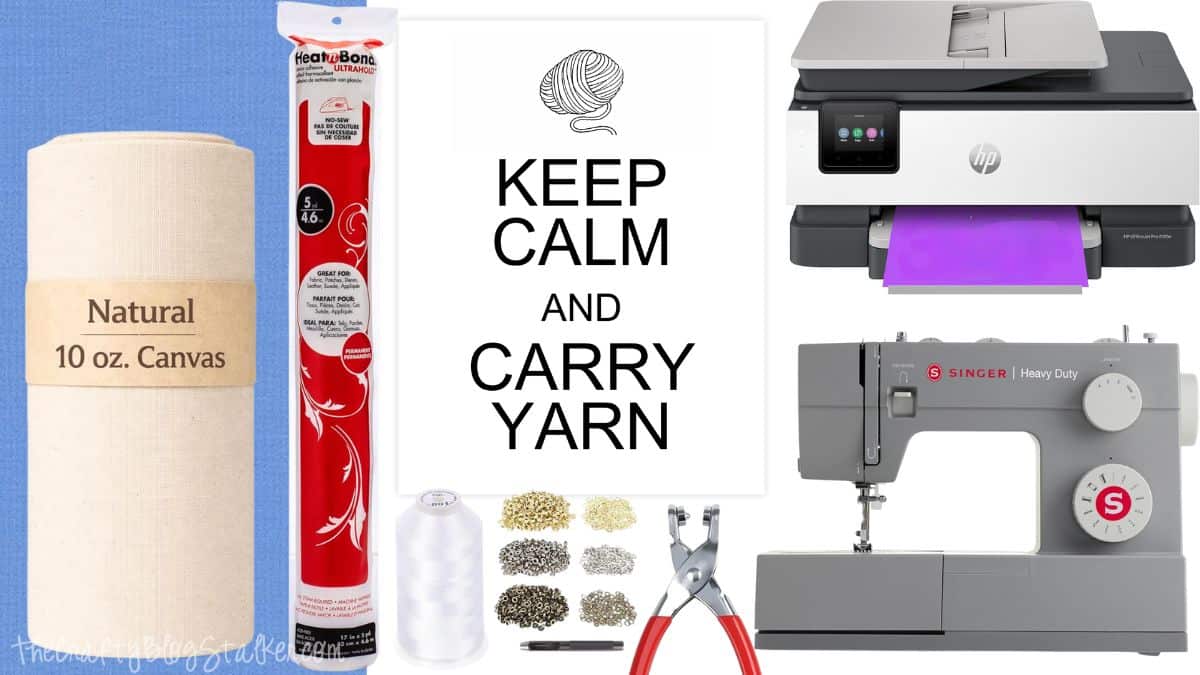
Supply List
- 1 yard of Canvas Material
- ¼ yard of Solid Cotton Fabric
- Coordinating Thread
- Grommet Kit
- Sticky Back Fusible Web
- Keep Calm and Carry Yarn Printable
- Home Printer
- Sewing Machine
Grab the Free Printable

Cut List from Canvas
- 2 - 18.5" x 15.5" pieces (front and back)
- 1 - 52.5" x 7" (this will be your 3 sides)
- 1 - 5" x 7" (slots for crochet hooks)
- 1 - 15.5" x 12" (back pocket)
- 2 - 5" x 34" (straps)
Instructions
Step 1: Print the Fabric Label
Print the Keep Calm and Carry Yarn design onto fabric using your home printer.
If you have not printed on fabric before, this tutorial will walk you through the process: How to Print on Fabric.
The printable file is designed for a full sheet of paper. If you want a smaller label, resize the design before printing.
Set the printed fabric aside while you assemble the bag pieces.
Step 2: Sew the Back Pocket
Take the back panel and the pocket piece.
- Fold the top edge of each piece under ½ inch and press.
- Stitch the folded edge to create a clean hem.
Place the pocket on top of the back panel with right sides facing out. Align the bottom and side edges.
Sew a basting stitch along the sides to hold the pocket in place while you assemble the bag.

Set this piece aside.
Step 3: Prepare the Front Panel
Fold the top edge of the front panel down ½ inch and sew a hem.
Next, attach the printed fabric label.
- Apply fusible web to the back of the printed fabric.
- Center the design on the front panel.
- Fuse according to the manufacturer's instructions.
- Stitch around the edge using a zigzag stitch to secure it.
This step gives the bag a fun, handmade look while keeping the fabric label's edges from fraying.

Step 4: Prepare the Side Panel
Take the long side panel piece and hem both short edges with a ½ inch seam allowance.
This long strip will wrap around the sides and bottom of the tote bag.
Step 5: Create the Crochet Hook Holder
Take the 5" x 7" piece that will hold your crochet hooks.
- Fold the top and bottom edges under ½ inch.
- Press and sew the hems.
Position this panel on the side panel piece where one side of the bag will be.
Sew vertical lines down the panel to create narrow pockets for crochet hooks, yarn needles, or stitch markers.

These small slots keep your tools organized so they do not disappear into the bottom of the bag.
Step 6: Sew the Bag Body
Now we assemble the tote.
Place the front panel and the long side panel right sides together.

The long strip wraps around one side, across the bottom, and up the other side of the bag.

Sew with a ⅜-inch seam allowance.
Once the front panel is attached, sew the back panel to the remaining edge of the side strip, again with right sides together.
You should now have the tote bag's shape. This will be the view of the inside.

Step 7: Finish the Seams
To strengthen the bag and keep the inside neat, we will flatten the seams.
On the right side of the bag, start with the two bottom seams and pinch them together.
Press and sew. Once you do the two bottom sides, then do the 4 side seams.

Step 8: Sew the Straps
Take the strap pieces and fold each long edge inward ½ inch. Press well.

Fold the strap in half lengthwise, then press again to enclose the raw edges.

Topstitch along both sides of each strap.
My straps are a little longer because I tend to carry a lot of yarn and tools, but you can shorten them if you prefer a shorter tote.
Attach the straps to the inside of the bag opening.
Sew an X inside the square to secure the straps firmly.
Step 9: Add the Yarn Feed Grommets
On the side opposite the crochet hook holder, install the grommets.
These allow your yarn to feed smoothly out of the bag while you crochet.
Thread the yarn through the grommet and continue stitching without the yarn ball rolling across the floor or tangling.
It is one of my favorite features of this bag.

Your Yarn Tote Is Finished
And that is it! Your new yarn tote bag is ready to hold all your crochet supplies.
Load it up with yarn, hooks, patterns, and maybe a few stitch markers, then take your crochet projects wherever you go.
As always, if you run into any questions while following one of my tutorials, leave a comment or send me an email. I am always happy to help.

More Sewing Tutorials
Can you ever have too many sewing ideas? I don't think so! Here are a few more fun projects to try next.

Hi, I'm Katie!
I'm so glad you're here. Want to make something fabulous? I'm here to help!
Cheri
I love the yarn tote! I am inspired to make one myself!
Thanks for sharing!
Cheri
Carrie
Cute and practical! Thanks.
Johanson Family
honestly girl, I would be more surprised if you DIDNT get to the next round!! You never disappoint!!!
Have I told you lately, that I love ya!?
Erin of Salvaged Whimsy
Your tote is so cute and I love how "handy" it is...if only I could knit. But I had to comment because I love what you wrote about projects taking forever because of starting and stopping for the kids...oh, I hear ya there, sister! Mine are 1 and 2...just writing this comment has been taken 10 minutes!
Thanks for stopping by and for the invite to your weekly party, I'll try to make it this week! Take care 🙂
Bronwyn
This is the perfect tote bag. I think I may make one for my mother's upcoming b-day. I love the graphics - perfect for this carry-all!
Tutus & Tea Parties
I love this...so much! I don't sew...but I'll have to ask, maybe even beg my mom to make this for me!
Karah @ thespacebetweenblog
This bag is such a great idea! It's so fun following along with OMTWI, good luck with it!
Feral Turtle
This is such an awesome idea! I pinned this. I would like to make one for my sister in-law! Thanks for sharing.
beachcomber
love the tote!!
new follower..cheryl x
Katie
Love this! There are a couple friends I should totally make this for!
--Katie
@Creatively Living
Alisha @ Crafty Brooklyn Army Wife
I just started knitting and this is a great tutorial!! TFS!! I am stopping by from delicate Construction linky party. I am also your newest follower here, google+ and Pinterest.
Pam
I have never seen a bag with holes for the wool. Ingenious!!! You have thought of everything. A great tutorial.
AmieAnn
This is awesome! I am going to have to attempt to make one of these for my MIL who loves to knit and drags her yarn EVERYWHERE! Congrats on making it to the next round.. you rock!
Thanks so much for sharing with the Pink Hippo party.. can't wait to see what you share next!
Jen-CraftOManiac
shared this on my COM-FB page. So darn cute. winks, jen
Our Delightful Home
Amazing job, Thanks for sharing!
~Mrs. Delightful
ourdelighftulhome.blogspot.com
Ann @ Suburban Prairie Homemaker
BRILLIANT! I LOVE this saying! I'm definitely going to have to give the pattern a go. Thanks so much for sharing this!
Evelene S
I 2nd Ann Brilliant!
Michelle
That is SUCH a great idea!
Emily @ 52 Mantels
Such a great bag! I love love love it!
Thanks so so much for linking up to my first party!! I really appreciate you sharing your awesome creativity!
Karen
you should sell these on esty! i'd buy one 🙂
Pat
Love this idea! I am an avid knitting/crochet fan ~ and this is just the kind of bag I need, will be making one up soon 🙂
quilary
Great tutorial - I have a friend whose birthday is coming up - this is perfect for her. Thanks for sharing 🙂
CSI girl
Cute, Katie. I hope you will link this up this week for the yarn project challenge. This is perfect for that.Hope all is well!!!XOXODee, the CSI Girl
Emily @SweetlyScrapped
That is so awesome! I LOVE the grommets on the side
Beansieleigh
Wow! A CUTE tote, and an awesome tutorial! Thanks for sharing how to make this, and have a great weekend! ~tina
Sue
What a fabulous tutorial. Thank you for sharing it.
pricillaprecise
Your idea for this bag reminds me of the Beehive my Mom had in the 1950's - it was a blue plastic beehive with a screw-on bottom, and holes in the top for the wools to be threaded through. In those days we bought skeins of wool and hand-rolled them ourselves, so the wool pulled from the outside - which meant the ball of wool rolled off on its' own mission! Your idea is great. Hope you don't mind if I make a suggestion - to prevent the wool from pulling back into the bag if it is not in use, you might sew on a button below each grommets on which to wind the loose end of the wool. Margaret.
Dragonfly Pond
This tote is brillent....can not wait to make one for myself, and perhaps one for my sister....
Dragonfly Pond
Was just thinking, when I make mine, I think I will add a flap to the top some how, to keep everything in, and perhaps dust, dirt and little fingers out !!!!
Mary M. Dye
love this site. easy instructions to follow
Katie
Thank you!
Randi - Dukes and Duchesses
What a brilliant design! I don't know how I haven't seen this post before but I love it ... the grommets are SO smart!
more
It's in reality a nice and useful piece of information. I am glad that you shared this useful information with us. Please keep us informed like this. Thanks for sharing.
more
It's in reality a nice and useful piece of information. I am glad that you shared this useful information with us. Please keep us informed like this. Thanks for sharing.
Tammy
I love this!!! Thank you so very much for the pattern! I will definately be making one of these bags...or two, or three...lol
Darcy Mallany-Stanley
I love your bag. The grommets on the side of the bag make it! Thank you for sharing it.
Katie
Thanks Darcy! : )
Fiona
I can't figure out how to do the sides/bottom. it ends up looking horrible. do you have any detailed directions on how to do those corners. so frustrated 🙁
Thank you
Fiona
I figured it out, Thank you for your reply. Was trying to make it squared before doing the enclosing seam, haha. sharing your tutorial on my Facebook page 🙂