
Learn how to sew a tank top for a toddler girl without a pattern. Just a few steps, some fabric, and zero need to dig through patterns you'll never find.
If you've ever looked at a store-bought tank top and thought, "I could totally make that," you're in the right place.
This post is all about how to sew a tank top for your toddler-no fancy pattern required.
It's perfect for parents who want to try their hand at handmade clothes but don't want to get tangled up in complex instructions or fussy designs.
Whether you're a confident beginner or someone who's winging it with good intentions and a seam ripper nearby, this project is a fun, simple win.
Plus, it's a great way to whip up something cute and custom when the perfect shirt is sold out (or let's be honest, overpriced).

Skill Level: Intermediate
Total Time: 1 hour
Supply List
- 1 yard of Fabric (approx for a size 3T)
- ⅜" Elastic
- Sewing Machine
- Matching Thread
- Scissors
I made this shirt specifically for my daughter's measurements, so yours may vary slightly.
Cuts
- 2 Bodice Pieces
- 2 Straps
- 2 Ties for Bow in the Back
- 1 Front Ruffled Panel
- 1 Back Ruffled Panel
Instructions
To create the bodice piece, I traced the bodice of another one of my daughter's shirts that had the same general lines I was looking for.
When tracing, just leave extra room for your seam allowance. Cut two of these out.

I made my straps using the double binding method.
Each strip was two inches wide. I pressed them in half, then folded the raw edges to meet the center line and stitched up both sides.

The width of the bottom part of the bodice (the armpit part) was about 2 inches, and the length of the bodice piece (or waist) was about 9 ½ inches.
I want each tie to be about 1" to 1 ½" inches longer than the length of the bodice to give room for the bow.
So, I cut two strips of fabric that were 11 ¾" by 4 ¾".
For each strap, I fold the strip in half lengthwise with the right sides together and straight stitch along the raw hem and end.
Turned them out and ironed flat. Each of the sewn ties measured about 11" long and 2" wide.
Next, attach the straps to the bodice.
With the two bodice pieces right sides together, pin the straps in place, and the bow pieces.
Sew around all sides except the bottom, turn right sides out, press, and top stitch.
Make sure you leave enough room under your bow pieces so you can attach the front panel.
I totally forgot to attach my straps to the bow pieces, so I just ripped the seam where I wanted them and top-stitched them in place. 😆
Below is how it should look when you're done, perhaps without all the extra threads hanging out.

Next, attach the front panel.
I based the measurements of the shirt I used for the bodice on the original measurements, but I added a few inches to allow for a slightly ruffled effect.
So once I ruffled the fabric, I serged it onto the bodice, right sides together. Make sure and leave a seam allowance on the sides to attach the back panel to.
Then I pressed the seam towards the top and top-stitched.

For the back panel, you want it to be the same length as the front panel, but you have to take into consideration the extra allowance for the casing for the elastic.
However, before you create the casing for your elastic, you will need to cut out a small section from the top of the back panel, creating a cut-out look under your bow.
To do this, I folded my back panel piece in half, wrong sides together. Starting at the fold, I measured about 1 ½" down and cut out curving up towards the corners of the raw edges.
Don't make the dip too big here, because once you add the elastic, it will look more drastic. I made a diagram to help explain where to cut.

On the curve, serge your top edge and then fold over to create your casing for the elastic.
Press and stitch in place.
Using a safety pin, feed your elastic through. (I cut my elastic a little shorter than the width of the bodice. Then stitch your elastic in place with a basting stitch.

Layer the front and back panel pieces with right sides together and sew or serge the side seams.

Once that is done, finish your bottom edge and hem.
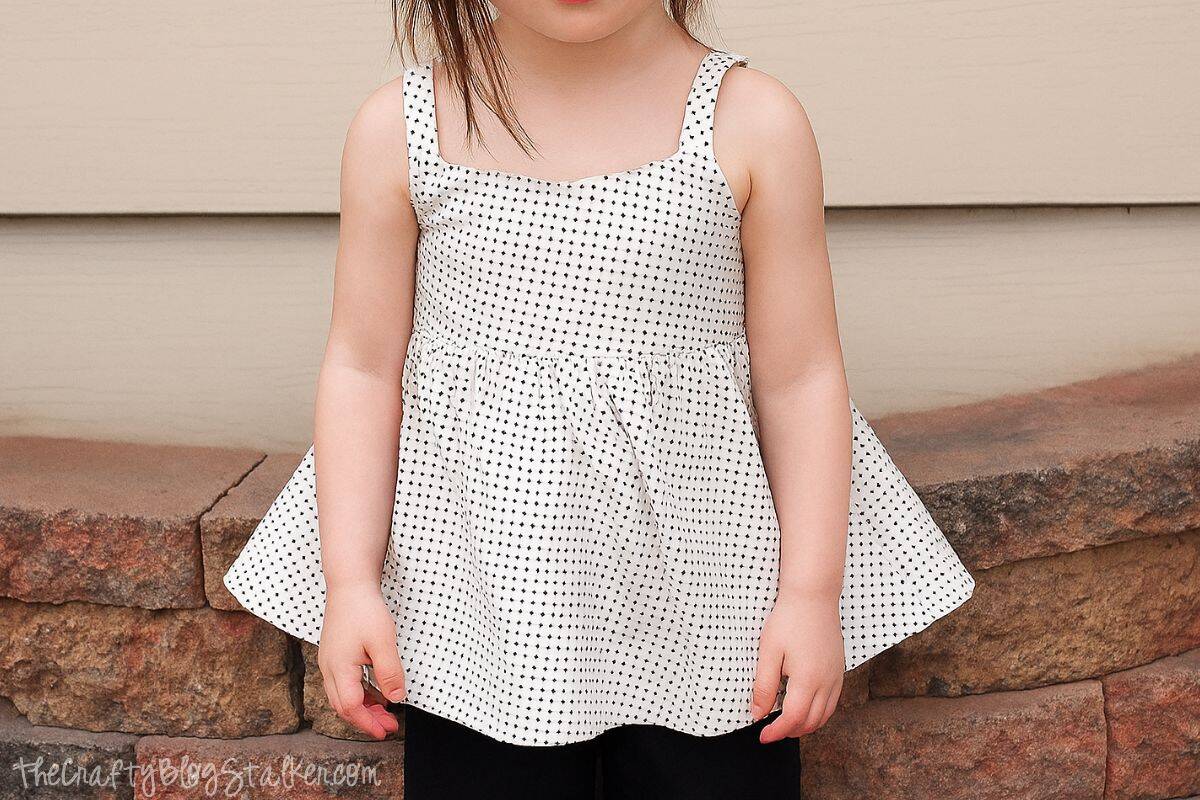
You are done! Now you have an adorable little shirt.
Final Thoughts
I hope you were able to follow along with these instructions. I know how to sew, but I'm not sure of all the technical terms. 🤭
This cute Bow Back Tank Top turned out so pretty! I like it even better than the shirt I based it on.
My daughter wasn't into posing much that day... she was more into running around everywhere, so it was kind of hard to get good shots of her in the tank top, silly toddlers.

More Fun Things to Sew
Don't put that sewing machine away yet, there are more fun things to make! Here are a few more ideas.

Hi, I'm Katie!
I'm so glad you're here. Want to make something fabulous? I'm here to help!
Glenna
This is just darling, and why wouldn't it be on just a pretty little lady. She loves her new outfit mama made her. Oh how I remember those great days when I would sew multiples of the same style for my now 47 year old daughter. You did good Mom!!!
Crystal
So cute!! I love that it ties in the back and flows out on the bodice. Love it!!
sam
That is soo cute!!! I want to make one!
Melissa
You did a great job with this project! It's so cute on her!
Heidi
This is so cute!! The polka dot fabric you used is absolutely adorable! I love the flowy-ness of the fabric, it is so girly. Great job!
Natasha in Oz
That is a sweet little top and your model is the cutest thing!
I wish I could sew!
Best wishes,
Natasha in Oz
Ash
This is just way too cute for words! Thanks for the how-to!
Trish @ Uncommon
This is so adorable! Your little one is too sweet, too! Hope you are feeling well!
Take care,
Trish
Michaela
Love it!! Just made it for my little one and it turned out great. I too forgot to attach the straps to the back ties. I just sewed them onto the inside of it no biggie LOL.