
How to refinish a dresser that's seen better days. This guide keeps it real with easy steps and zero pressure to be the next furniture-flipping star.
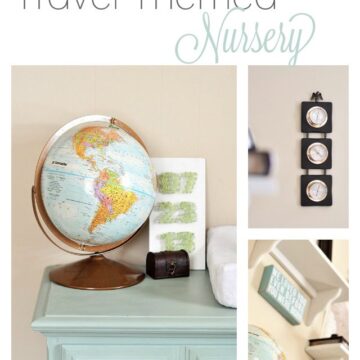
The travel-themed nursery is finally getting some love, and I'm finally able to share this tutorial on how to refinish a dresser.
Now that I'm settled into the new house, I can finally focus on the fun stuff, like furniture flips and DIY projects that don't involve moving tape.
This dresser makeover was simple, satisfying, and definitely more budget-friendly than buying a new one.
If you've got an old piece just sitting there, this is an easy way to make it look like you totally meant to keep it.
Jump to:
Skill Level: Beginner
Total Time: Depends on the size
Supply List
- Wood Dresser
- Mineral Chalk Paint
- BIN Primer
- Screwdriver
- Paintbrush
- Painters Tape
- Lint-free Cloths
- Very Fine Grit Sand Paper (optional)
- Polyurethane Seal
Choosing Paint Color
The paint brand I used is sadly no longer available. It was called Maison Blanche. You can still find it on Etsy and a few other places, but it hasn't been available for a while, so even if you do find it, I wouldn't recommend using it.
However, I can recommend using Dixie Belle Mineral Paint. There are so many colors to choose from, and the paint is so smooth!

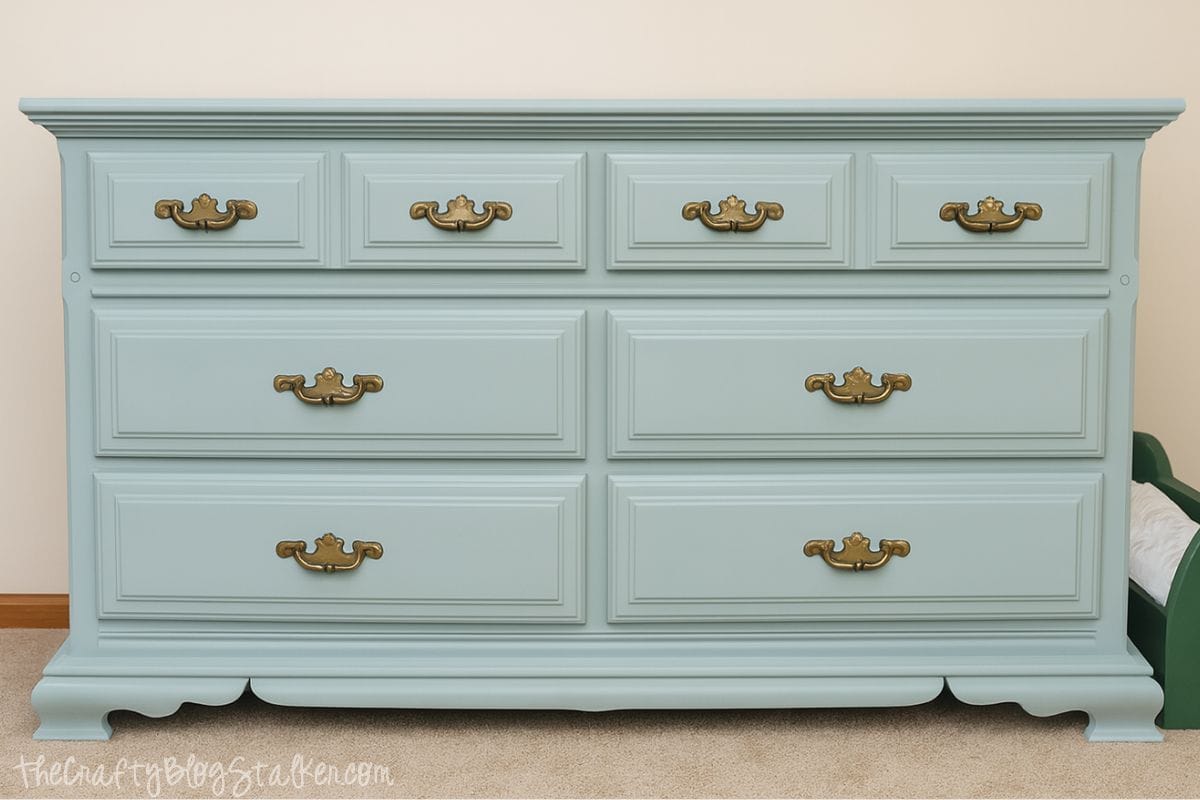
The closest color to what I used is probably Sea Glass. It is a shade of mint, but also has a hint of blue.
Instructions
Since I started this project at my previous house, had a baby, and then moved, I am missing a few pictures, but the overall process is pretty simple. I promise!
Here is a picture of the dresser before I began.

PLEASE PLEASE PLEASE test this in a small area if you are unsure of the results.
This is the only piece of furniture I've tried this on, and while I love the look, you may not.
It will also depend on the color of paint you are using as the base color. So again, PLEASE test it. I am not responsible for you ruining a piece of furniture.
Step 1
Begin by giving the dresser a good clean with a damp cloth.
While you're at it, you might as well clean everything, even if it won't get painted. The corners of old dresser drawers can get nasty!
Let the furniture dry completely before painting.
Use a screwdriver to remove any necessary hardware and tape off areas as needed.
Step 2
Apply a light coat of BIN Shellac-Based Primer. This primer is a bit more expensive, but it's a high-quality primer that dries extremely fast.
Lightly sand the surface with 220-grit sandpaper to smooth the finish before painting.
Step 3
Ensure the paint is thoroughly mixed by either shaking the container or stirring with a paint stir stick.
It doesn't really matter what kind of paintbrush you use. You can find nice furniture paintbrushes, or just use the same one you used last year to paint your front door.
Step 4
Apply a very thin coat of mineral paint.
You could do one really thick coat and be done with it, but I think the overall finish ends up better if you start with a thin coat.
Let that dry. Usually, by the time I'm finished painting, I can go back to where I started and apply a second coat, unless it's a tiny project.
It dries really fast, though. You shouldn't have to wait too long.
Step 5
Take a dry cloth and wipe it down to remove any dust or excess paint (it has a very chalky feel at this point).
Some people sand, but I find it comes out very smooth by just brushing it off with a cloth.
If you want an excellent finish, you might consider sanding with a very fine grit paper, but I was aiming for a vintage look, so perfection wasn't necessary.
Step 6
Apply a final third coat. This layer can be brushed on a bit thicker than the first, but not so much that it drips.
Let that dry completely. My plan was to let it dry overnight, but then I had the baby, so it dried for a bit longer. 😆

Step 7
Now it's time to seal it. I chose to use polyurethane. We'll discuss why I chose this option below.
Follow the product instructions when sealing your furniture to get the best outcome.
I simply rubbed on my poly, even though I didn't buy the wipe-on poly, I used Minwax Fast-Drying Clear Satin, and have a better description of how I did it below.
Allow the furniture to cure completely and then reinstall the hardware.

My Sealing Technique
I had a definite look in mind for the finish of this dresser.
I wanted a vintage look, but didn't want to distress it. I wanted it to look clean and like I had bought it that way, but at the same time, as if I had bought it a really long time ago.
The nursery has a travel-themed, vintage look, so I wanted it to appear as if it had traveled the world in a very safe place. Does that make sense? That's just how my crazy brain works, I suppose.
I wanted the furniture to have a varnish on it, but at the same time, an old piece shouldn't have a glossy finish, right?
To achieve the look I had in mind, I simply wiped Minwax Fast Drying Clear Satin onto the dresser.
I used a cloth diaper, similar to the ones used for dusting, but you can use any lint-free cloth. An old white t-shirt would also work well.
I rubbed in long, smooth motions, following the grain of the wood.
Typically, you sand between each layer of poly, but I skipped that step because I wanted it to look like it had been worn. I tried my best to achieve an even cover, but the lack of sanding will leave it with a streaky finish (which is desirable when aiming for a vintage look).
I let this dry following the instructions on the can.
Then I applied a second coat to ensure it was thoroughly sealed. After I applied the second coat, I took a dry part of the diaper and rubbed it vigorously over the entire dresser.
You can't just slap it on there. You must apply it as evenly as possible in long motions, especially on large, flat surfaces. The streaking comes naturally... no need to streak it yourself!
So that's it. Now you have a piece that looks vintage but has been well-maintained. That might only make sense to me, but I LOVE how it turned out! 🤪
Types of Poly
Typically, a polyacrylic finish is used when refinishing painted furniture, as polyurethane can yellow with age.
I wasn't too worried about that since my furniture isn't painted white, and I actually wanted the yellowing to happen.
This is why I didn't brush it on, but instead rubbed or wiped it on.
There isn't a real thick coat of the poly, so the yellowing won't be drastic. Yay for looking old!
Update
It's been a few weeks with the poly on the dresser, and it has started to yellow. It is perfect.
It looks like an old piece of furniture you would find at an estate sale! Sometimes, doing something the "wrong" way will give you great results! 😀
More Nursery Ideas
Let's create a nursery that is both calming and inviting. Here are a few DIY ideas!

Hi, I'm Katie!
I'm so glad you're here. Want to make something fabulous? I'm here to help!
Trish @ Uncommon Designs
How beautiful! You did an awesome job, girl!
Take care,
Trish
Katie
Thanks so much Trish!
Vickie
Have you ever used Annie Sloan Chalk Paint and if so how does it differ in price with Maison Blanche Chalk Paint?
Katie
I have used both. The Maison Blanche is a little more expensive, and it is very similar in how it goes on. I particularly like the colors of Maison Blanche more than the others. The two that I have used (Creme De Menthe and Silver Mink) are more of a muted (if you will) and are a little bit more of the vintage look I am going for. Also with the Maison Blanche I got it in two coats, and other brands I have had to do 3 a few times to get the same look. It's really just personal preference though. I would definitely give it a try! : )
Katie
Pretty! In the future use poly acrylic. Polyurethane tends to yellow over time which is why you should only use it on stained wood. Poly acrylic is what you use on painted wood!
Katie
Thanks Katie! I do that usually, but I didn't have any on hand and since it wasn't white I wasn't too worried about it, plus I doubt it will be that color long enough to yellow... hehe! But I DEFINITELY need to put that in the post so others know! Thanks so much for pointing that out. Sometimes I forget not everyone is in my head ; )
Holly
Actually, the poly-acrylic is what yellows. Over MB or ASCP, since both are water based, you would use a poly-acrylic vs a polyurethane, which is for oil based. But, waxing is preferred. If you want a smooth surface on something like a dresser, use the largest natural bristle brush you can find. That helps to eliminate brush marks.
Gretchen
oh, wow--that is SUCH a lovely color! And I love how it looks with the hardware, too. Great job!
Katie
Thanks! I always debate on painting the hardware, but I love original hardware. It always looks better when the dresser is painted : ) Thanks for stopping by, have a great week!
Laura
LOVE!! I just received 2 cans of Maison Blanche paint... But unfortunately I didn't order Creme de Menthe. (I just put on a couple coats of Spanish Moss and its beautiful.). But Creme de Menthe will be on my next order. Love the dresser!!
Katie
Thanks Laura, I'm so excited to try new colors, but I am in LOVE with this color! Thanks for stopping by : ) Have a great weekend!
Nicole
Love the way the dresser looks. Fabulous job and I love Mason Jars visit my blog for the before & after Mason Jar Pendant Light. Visiting from Happy Hour!
Katie
Thanks so much Nicole!
Rebecca Cooper
Thanks for the great tips!! 🙂
Nicole torres
I am sooooo loving the color! Great job, and the hardware is always a stunning way to finish it off (especially when its original). Love...visiting from the hop stop by designitgirl and say hi!
Krista @ the happy housie
So pretty Katie! I absolutely LOVE that shade of blue!! I would be thrilled if you have the chance to share this at our new Fall DIY Challenge if you haven't already- today we are linking up BLUE projects - old or new!
- Krista
Katie
Thanks so much Krista!
Katie
Thanks so much Nicole! I love a good original hardware : )
nicolette @ momnivore's dilemma
Wow. That color of creme de menthe alone...Love, just love. I seriously have the upright dresser that matches this very project in my basement laundry room. It was my husband's from his childhood.
I also like that you kept the original hardware!
Thanks for linking last week. We shared this today at the party and are also pinning it to our collaborative board!
Nicolette & Jo-Anna
Katie
This color is seriously my favorite! It is perfection!! I am a sucker for old dressers and original hardware, aren't they just fabulous?! Thanks so much for stopping by, and for pinning! : ) Have a great week!
Beth @ incomplete guide to living
This is beautiful! Thanks for all the tips! Just stopped by from tater tots and jello! 🙂
Katie
Thanks so much Beth! : ) So glad you stopped by! Have a great night!
Anni
Beautiful end result, and I love the color. I've never heard of Maison Blanche Furniture Paint, so I'm excited to have something new to try!
Katie
Thank you Anni! It is fabulous and I really love their colors! : )
Lauren
Love the look of this nursery. My baby boy is due in a few weeks and we picked up some used furniture for his nursery that desperately needs a make-over. Were you able to do the entire dresser with one quart of paint? I'm trying to estimate costs before I buy the paint. We also have a crib and a changing table to paint so we may need a quart for each.
Katie
Thank you Lauren! : ) I had one quart of the color I used for my crib, and one quart of the color I used on the dresser and I have quite a bit left of each. I used a bit more for my crib because it was spindles that I was painting so I ended up going back over it several times because I would find little spots I missed. Hope that helps! Good luck : )
Lauren
That does help. Thanks so much! 🙂
Trisha
I love this! Did you do this while you were pregnant? I am pregnant and I want to do this project but not sure if it is safe for me to do or if I should have the hubby conquer the painting.
Katie
I did do it while I was pregnant! I'm not sure if it's 100% approved by doctor's, but you can hardly smell it, and I did do it outside and wore a face mask just to be safe! : ) Good luck on your painting!
Michelle
Thanks for the detailed and creative post! Just have on question, why did you decide to apply the finish with a cloth instead of a brush? Did you use the spray on or liquid version featured in the link you posted? Also, I don't understand what you mean by "yellowing" because in your pictures it looks very not yellowish!
Thanks,
Michelle
Katie
Hi Michelle, the yellowing occurs with polyurethane, but over a wood stain it isn't noticeable, when you put it over a paint color you can see that a little more. I don't notice it tremendously on this particular piece, but it did a little. It's definitely more noticeable if you use it over a white paint. I used a cloth instead of a brush because it allowed me to rub it in and get a matte finish. It's just a personal preference thing really.... you could go either way. oh, and I used just the regular ol liquid version out of a can ; ) Hope that helps! Have a great week!
cynthia
I am in the process of painting an entire bedroom set with this paint. I will also need to repaint the walls and i was wondering what color is on your wall. It looks great together.
Katie
Thanks so much. I'm not entirely sure of the paint color. Our house was a foreclosure when we bought it and this was the standard color Fannie Mae used.. I believe it's called Kilim Beige from Sherwin Williams though. I grabbed a paint swatch the other day cause I have a few spots I need to touch up and it seems to be pretty close, but I haven't actually bought the paint yet!
Keri
HI! Any idea how much of a quart can you needed to paint the dresser? Love the color!! Thank you!
Katie
Hi Keri, I don't remember off hand, but I do know I had quite a bit left over. Maybe a 1/4 of the can for our dresser. Hope that helps! : )
Courtney Bishop
Wow, I love your style! you have inspired me to paint something 🙂
Amanda
I love this! I have just looked up the paint and the poly to buy for a project I want to do. I believe you did this while you were pregnant with Adam, correct? So I am assuming it’s okay to use while pregnant?!? I hope so! You did such a great job and I can’t wait to start my project!
Tiara Losey
The further I see, the more the better your material is.