DIY PVC Camera Mount
Elevate your photography with our DIY PVC Camera Mount tutorial. Learn to create stable shots and angles for your creative projects!
Equipment
- Drill
- 15/64 Drill Bit
- PVC Pipe Cutter optional
- Smart Phone Mount
Ingredients
- 1 10 foot ½ inch PVC Pipe
- 2 ½ inch End Caps
- 3 ½ inch Elbows
- 2 ½ inch Tee
- 1 ¼-20 x ½-inch Bolt
Instructions
Cut PVC Pipe:
- Cut the PVC pipe into lengths: 1 - 21 inch piece,3 - 13 inch pieces, 2 - 11 inch pieces, 1 - 7 inch piece, and 1 - 3 inch piece.
Camera Screw:
- The bolt you will need is ¼ - 20 x ½. You don't want a screw with a point on the end, you want a bolt with a flat bottom.
Drill a Hole:
- Place a mark on the back center of the pipe tee, I did this so I knew where to drill my hole.
- Using a 15/64 drill bit, drill the hole where that black dot is.
- Use a screwdriver to twist the bolt into the tee as far as it will go.
- The end of the bolt should be sticking out of the pipe about .25 inch.
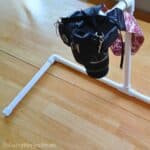
Assembly:
- Place one end cap on the end of each 11-inch piece, and top each piece with an elbow.
- Push a 13-inch piece into each elbow section.
- Connect the two sections with a tee, that points up.
- Insert the other 13-inch piece into the tee section that points up.
- Add another elbow, connect with the 3-inch piece, and place the tee at the end with the bolt.
- You can either twist your camera directly onto the mount or attach a smartphone clamp. Both methods work great!
Notes
The tall 13-inch piece in the back can be switched out with the 21-inch piece, to make the camera farther from the counter.
Same with the 3-inch piece at the top, it can be switched out with the 7-inch piece.