Explore your creativity with the Speedball carving kit. Below is the step-by-step tutorial on How to Carve your own Rubber Stamps!
*This post was originally written for a Stampin' Up! kit that is no longer available. A similar kit is available through Speedball and I have adjusted this post to fit that kit. Some pictures may show the discontinued Stampin' Up! kit, but the process is still the same.
Stamp carving is so much fun and I have to admit that I want to make all sorts of stamps. The first time I carved something I was nervous and a little apprehensive.
I am not confident in my drawing skills at all. BUT you don't have to carve freehand. You can carve from a template which is exactly what I did.
More Craft Tutorial Ideas:
Since we love crafts here at The Crafty Blog Stalker, we have lots of craft tutorials to share! Like this Sea Glass Wind Chimes, these Easy Flowers with Paper Loops, and this Personalized Front Door Mat with Sublimation.
Be sure to look around the blog for more craft tutorial ideas!
Supplies You'll Need to Create this Project:
This post contains affiliate links.
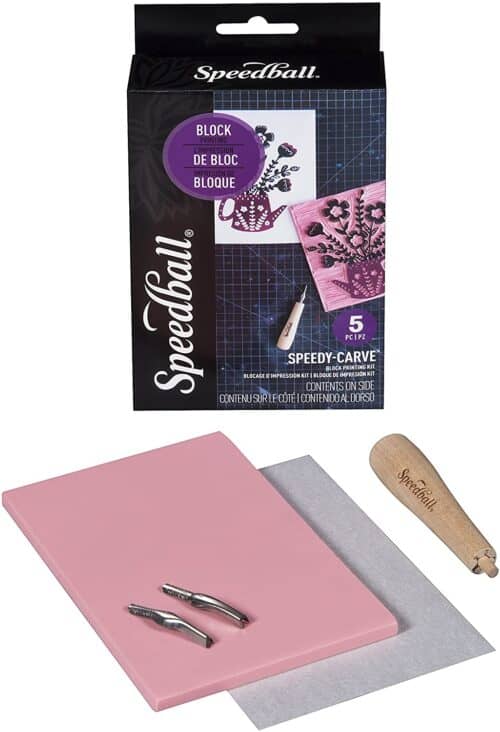
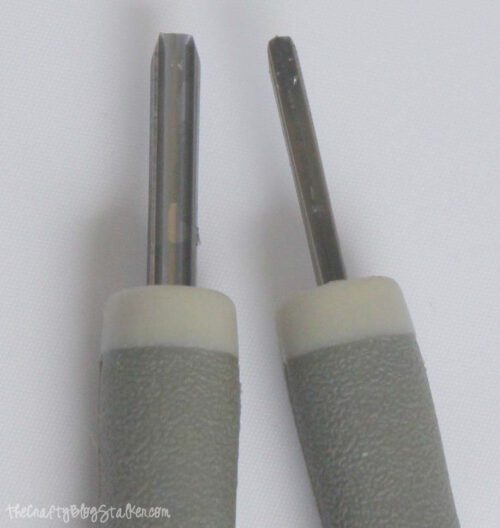
This kit comes with everything that you will need. 2 carving tips with a handle, 1 sheet of rubber, a wooden handle, and instructions.
How to Carve a Rubber Stamp:
Find an image from google images that you would like to recreate in a rubber stamp, and print the image or design.
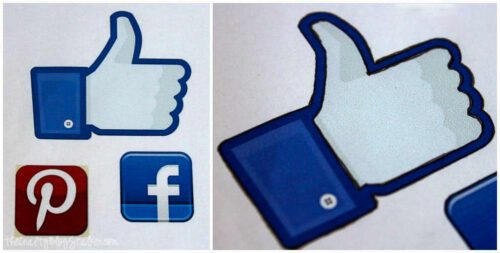
Place a white piece of paper over the image and trace with a pencil.
Turn the traced image right side down onto the rubber and rub over the paper with a bone folder. When you remove the white paper the penciled outline will remain on the rubber. Trim the rubber around the design.
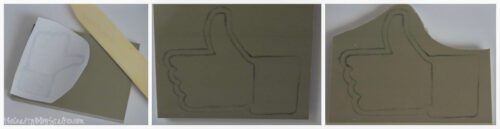
In the kit are two different size carving tools. A large rounded edge for deep or wider cuts and a smaller v-shaped edge for details or finer cuts.
Begin by going around the image with the small detail tool and then carve out deeper with the larger tool.
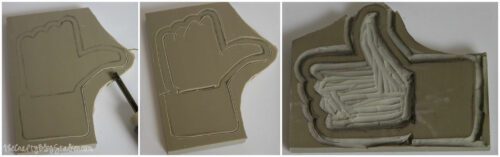
Before you trim the rubber stamp, make sure none of the grooves show and you like how it looks.
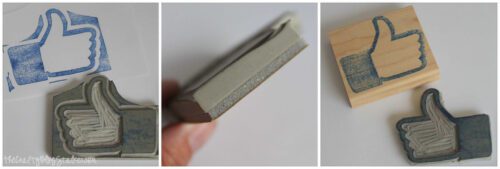
If you decide to mount the rubber stamp to a block (not included), stamp the woodblock before you adhere to the rubber stamp.
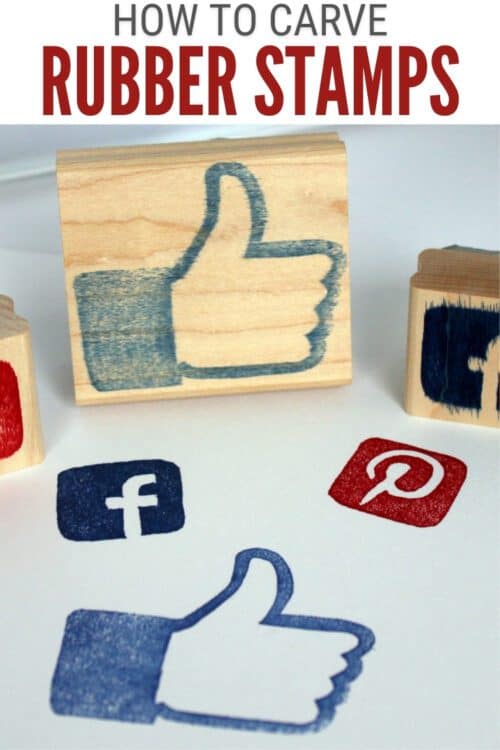
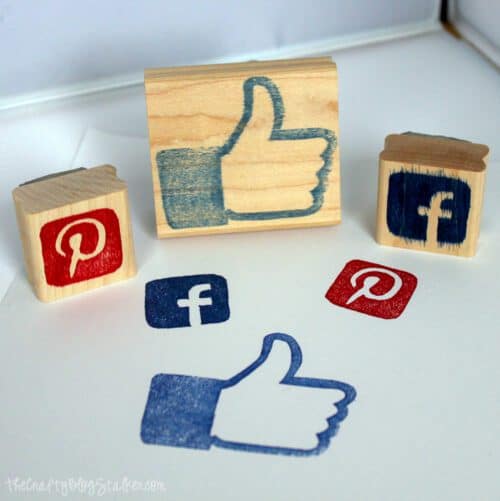
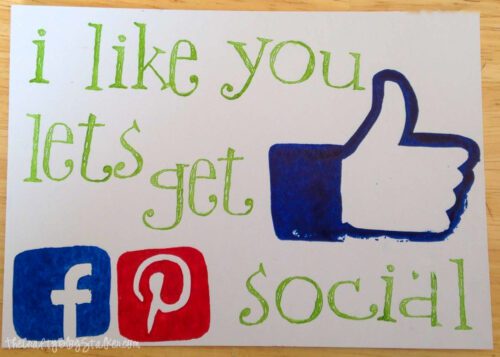
Here are the Social Media stamps that I made. I absolutely loved how they turned out.
Do you like the postcard I made with my new stamps?
If you love this tutorial, please give it a five-star review and help me share it on Facebook and Pinterest!
Our Crafting Essentials:
- The Cricut Cutting Machine is easily our favorite crafting tool. We use it in so many of our tutorials!
- These MakerX Crafting Tools are perfect for keeping in the craft room and are always ready when needed!
- This Fiskars Paper Trimmer is easy to use and cuts nicely without frayed edges.
- These Scotch Precision Scissors cut like a dream, and you get multiple pairs in a pack!
Recommended Posts

Al@PolkaDotsandPaisley
These are so cute! I had to carve using a similar tool in junior high art class and it was slightly traumatic.
Melody Hyde
Katie these are terrific! Thanks so much for sharing your talents! 🙂
Victoria Selix
Wonderful tutorial! I am just not brave enough to order this myself, and my ladies keep asking questions. I am so going to share your blog with them! Thank you so much for the wonderful pics and details!
Adorable stamps too!
Joshua Carroll
You know, smaller versions of these would be GREAT on business cards at blogger meetups. Thanks for sharing!
Mary Fish
a BIG thumbs up, katie!
kraftmint.com
This is just GREAT! I love stamps and I'll have to get myself one of those!
superflashcreative
These are awesome!! I love social media, I love rubber stamps, and I love this idea! Great work!
Jamie Sherman
That's pretty cool, Katie! I didn't even know they sold kits like this!
Emily Hagedorn
Stopping by from the Monday Funday Link Party. Great project! I love how your stamps turned out.
Aleks
How cool!! I love the social media stamps!!
For My Love Of
Eep! These are so cute! I don't know what I would use social media stamps for BUT I WANT THEM! haha...
XO,
CorinnaAshley.com
Kristin Baird
Very clever! Thanks for sharing!
Angela Paris
This is too clever! I saw your thumbnail on the Simply Create Thursdays link party and had to check it out. You're so creative!
Happy Thursday,
Ang, Juggling Act Mama
SWEET HAUTE for Sweet Haute
Thanks for sharing at the Thursday SWEET HAUTE Share Linky Party at the SWEET HAUTE Blog! Another great project...!!!!
http//:sweethaute.blogspot.com
Christine
Totally AWESOME!!!!!! I want to make some too!!
Becca Diestelkamp-Woodham
Love these cute little stamps! I use my logo stamp all the time! (http://diy-vintage-chic.blogspot.com/2013/04/create-rubber-stamp-of-your-logo.html)
the cape on the corner
love the idea of the like button!
Randi@SowderingAbout
This is super cute and seems pretty easy. This would have been a great thing tutorial for me to have had about 3 years ago when I was working on a project that I needed a custom stamp.
Natalie
This is awesome! Is the rubber in the kit like lino?
Is "Stamping Up" available in mainland Europe?
Thanks for linking to Tutorial Thursdays on Marigolds' Loft.
x
Natalie
Katie
I have never used lino, so I can't answer that question - sorry.
Yes, Stampin' Up! is in Europe and there is a webiste as well. Stampinup.com - you will need dto select your country in the upper right and then be able to shop to your hearts content. I work at the home office in Utah and I think Stampin' Up! is pretty cool, but I may be a little biased 🙂
Megin
I love this, Katie! I still have to get one to try for myself.
Thank you for sharing your post this week at Brag About It Link Party on VMG206. I'm featuring you at Next Weeks Brag About It Link Party, Monday at midnight!
~ Megin of VMG206
Nicole @ Or Whatever You Do
YOUR STAMPS ARE ADORABLE!! THANKS FOR SHARING WITH THE MERRY MONDAY LINKY PARTY!
kukafera
The facebook's "I like" one is the best!!
T'onna Peters (Navy Wifey Peters)
Cute stamps!!
Ce Ce
I really love this! Pinned!!!
Thanks for sharing!!
Adrian
This would be awesome for my older son to work on:)
Thanks for sharing at the Teach Me Tuesday Linky Party! Be sure to join in again tonight starting @ 9pm est.!
Amanda {Burlap & Babies}
That is awesome! I had to no idea that you could make such intricate stamps so easily. Thanks for sharing such a great tutorial! And thanks for sharing at our Motivational Monday party. Be sure to stop by again this week to link up another diy post.